Lord Marshal Ragnrok Posted May 26, 2014 Share Posted May 26, 2014 very nice man! Link to comment Share on other sites More sharing options...
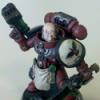
BKZer0 Posted May 27, 2014 Author Share Posted May 27, 2014 A few more updates. I finished painting all the little accessory pieces, and I took a picture or two of that to share, and I painted the banner. Assault Marine with pouches and Krak Grenades: http://www.40k.zombiecrisis.org/20140521_224605.jpg Purity Seals: http://www.40k.zombiecrisis.org/20140522_212735.jpg My Banner Bearer: http://www.40k.zombiecrisis.org/20140524_162536.jpg I provided a small tutorial for how I made the banner here: http://www.bolterandchainsword.com/topic/291498-making-a-banner-with-custom-waterslide-decals/ Monstra Sumus, BrotherCaptainArkhan, Dosjetka and 2 others 5 Back to top Link to comment Share on other sites More sharing options...
Aridene Posted May 31, 2014 Share Posted May 31, 2014 Amazing work there brother. Link to comment Share on other sites More sharing options...
That Guy Matt Posted June 3, 2014 Share Posted June 3, 2014 Still awesome. Fantastic banner. Link to comment Share on other sites More sharing options...
deathspectersgt7 Posted June 3, 2014 Share Posted June 3, 2014 Awesome Banner!!!!! Link to comment Share on other sites More sharing options...
rydhus Posted June 4, 2014 Share Posted June 4, 2014 Recently I've played DoW2 from the start all over again, and then I found this project log. I'm really impressed by your work, absolutely love it! So now I'm starting a SM army, and with your tutorials and concept, I hope to achieve creating an army worthy of the Blood Ravens. Thanks for sharing this much awesomeness! Lord Marshal Ragnrok 1 Back to top Link to comment Share on other sites More sharing options...
BKZer0 Posted June 4, 2014 Author Share Posted June 4, 2014 (edited) Thank you very much for the kind words everyone. rydhus: I would love to see them when you are done. Based on the work in your website, you army will come out looking better than mine. Edited June 4, 2014 by BKZer0 Link to comment Share on other sites More sharing options...
rydhus Posted June 4, 2014 Share Posted June 4, 2014 Thanks! I've been painting for a while, but still have lots to learn. The characters I used through most of DoW2 were Thaddeus (assault), captain w/ jump pack, tarkus (tactical) w/ terminator armor and heavy flamer and Avitus with lascannon. As you can see in my profile pic, I started with a captain based on the build in DoW2. I'm thinking about using the same tactic for my army list. Raven Guard chapter tactics look really promissing. (exspecially with the new 40k rules). I've been doing some testing with the color scheme. Your first post artwork is great and works really well! I was wondering, what Chapter tactics will you use? And what elements of the game will you add in your army? (or strategy from the game onto the table?) Link to comment Share on other sites More sharing options...
Lord Marshal Ragnrok Posted June 4, 2014 Share Posted June 4, 2014 wow nice stuff rydhus! and nice website! rydhus 1 Back to top Link to comment Share on other sites More sharing options...
BKZer0 Posted June 4, 2014 Author Share Posted June 4, 2014 I built the with the standard Space Marine Codex in mind. I have technically only played 3 full games of 40K ever. I have always been much more into the lore, painting, and video games than playing the actual tabletop game. I picked the Generic Space Marine Codex because it provided me access to the entire SM catalog of units. I am also pretty boring and generic. Link to comment Share on other sites More sharing options...
BrotherCaptainArkhan Posted June 4, 2014 Share Posted June 4, 2014 As stated, that's an excellent banner. I truly look forward to some finished squad/battle force shots. Link to comment Share on other sites More sharing options...
BKZer0 Posted June 4, 2014 Author Share Posted June 4, 2014 As stated, that's an excellent banner. I truly look forward to some finished squad/battle force shots. Thanks! SOOOOON.... I am in the process of painting 31 bases for these guys. I have also decided to repaint my 10 finished models bases. They currently have a brown rim around them which I am going to be repainting black. I feel it fits the overall scheme of the army better. The brown was originally there for contrast, but I want to make a magnetized army display for the completed army, and I think the brown rim will just clash with what I am planning on doing. Link to comment Share on other sites More sharing options...
rydhus Posted June 4, 2014 Share Posted June 4, 2014 As long as you have fun in what you do, you can never be boring. The normal SM codex is great, lots of different chapters in there to try. Can't wait to see more of your awesome force! Link to comment Share on other sites More sharing options...
zeeorc Posted June 19, 2014 Share Posted June 19, 2014 Wow, I freaking love how you painted these! Keep up the good work man, can't wait to see more! :) Link to comment Share on other sites More sharing options...
BKZer0 Posted February 11, 2015 Author Share Posted February 11, 2015 Long time no see. Before I begin, I figured I would indulge you all in a little more of my concept art. Concept Art:http://40k.zombiecrisis.org/knight.jpg For my next project I will be painting an Imperial Knight. As most of you know, Imperial Knights are not part of a chapter, and therefor are should not be painted as such (lore wise at least). However, I really wanted the knight, which at its massive size will clearly be the center piece, to match the rest of the army. What I chose to do was take an Imperial Knight from House Taranis, which is Bright Red/Black/White, and color :cuss it slightly to be Dark Red/Black/Bone White. I thought this would be a decent compromise. The knight would "for the most part" hold true to its codex colors, and "for the most part" match my army. I am happy with the results of the concept art alterations, so I am going to run with it. I read the Codex cover to cover, and decided to right a real brief origin story, nothing extravagant. Anyway, on to the progress. If you build something, you should start from the ground up, right? Therefore I started with the feet. It also gave me an opportunity to use most the colors on one small assembly to test everything out. Red (Armor), Dark Metal (Skeleton), Black (Accents), Silver (Trim). http://40k.zombiecrisis.org/20150121_201358.jpg Cleaning up the work, Terminator for scale. http://40k.zombiecrisis.org/feet.jpg http://40k.zombiecrisis.org/20150121_231506.jpg This took longer than I wanted it to so I decided to batch paint the next few assemblies. Everything is silver..... http://40k.zombiecrisis.org/20150123_191501.jpg Next it is on to the legs. I was heavily inspired by the demo model on the GW website. I believe it is House Krast? I will be doing red accents similar to the ones shown in their 360 preview. http://40k.zombiecrisis.org/20150126_195104.jpg That's all for now, thanks for looking! Questions? Comments? deathspectersgt7 and Lord Marshal Ragnrok 2 Back to top Link to comment Share on other sites More sharing options...
BKZer0 Posted February 13, 2015 Author Share Posted February 13, 2015 (edited) I completed the leg assembly minus the little detail bit. I figured they would make the model harder to paint in the long run. I will add them at a later date. http://40k.zombiecrisis.org/20150127_154848.jpg http://40k.zombiecrisis.org/20150127_155032.jpg I pinned the feet to the legs. They only get attached by 4 very small points of contact, and it just didn't seem very sturdy, especially with the massive amount of model that has to go on top. Once the feet were attached, I took my pin vice and drilled straight through the bottom of the feet, and up into the lower leg with a .8mm bit. I then took a paper clip and straightened it, covered it in super glue, and pushed it through the hole in the foot with a pair of pliers. Then I filled the hole in the foot with more glue to keep the whole this secure. Next up is the torso. I already have all the pieces base coated in silver, so it is just a matter of doing the detail work. Edited February 13, 2015 by BKZer0 Lord Marshal Ragnrok 1 Back to top Link to comment Share on other sites More sharing options...
BKZer0 Posted February 17, 2015 Author Share Posted February 17, 2015 On to the torso. I painted and assembled the majority of the larger sub assemblies. Good old two tone Cog Mechanicum. http://40k.zombiecrisis.org/20150129_225836.jpg Better picture to scale. http://40k.zombiecrisis.org/20150129_225631.jpg Lastly I did the front and sides. I feel that the model needs a contrasting metal, in my case brass, because it is just sooo silver. Brass is not a standard color that I used in my army so I am using it very sparingly on the model. Here is a picture of one of the sides, complete with detail, as early I used brass for all the servo covers. http://40k.zombiecrisis.org/20150130_215437.jpg Next order of business, bits! http://40k.zombiecrisis.org/20150128_203953.jpg Lord Marshal Ragnrok 1 Back to top Link to comment Share on other sites More sharing options...
Guest Posted February 17, 2015 Share Posted February 17, 2015 so bold, painting in so many different sub assemblies. Especially with the knight. I would be terrified to that. but it seems to be working so far. Good work. Love the blood ravens. Any chance of an entire army shot? Link to comment Share on other sites More sharing options...
Maerlen Posted February 17, 2015 Share Posted February 17, 2015 Stunningly painted mate! You going to weather it or give it battle damage? Link to comment Share on other sites More sharing options...
BKZer0 Posted February 18, 2015 Author Share Posted February 18, 2015 You going to weather it or give it battle damage? Honestly, probably not, for a few reasons. Mainly because the rest of the army as pictured in the previous posts is mostly clean (Think GW box art). I do apply some light weathering in the form of varying layers of brown washes where applicable, but because of this, the model will remain un-weathered to match. The more in depth answer is I have tried weathering over the years to varying degrees and have never been personally happy with the results, sure it looks OK, but it is not what I wanted. I would only consider weathering if I KNEW I could get it right, and that required a lot more practice which is something I am not willing to do on such an expensive and time consuming model. I know I am chickening out, but weathering is a project for another day for me. Link to comment Share on other sites More sharing options...
BKZer0 Posted February 19, 2015 Author Share Posted February 19, 2015 Minor update, All the little hoses, pistons, and covers have been added to the leg and torso sub-assemblies. http://40k.zombiecrisis.org/20150202_195132.jpg Link to comment Share on other sites More sharing options...
BKZer0 Posted February 23, 2015 Author Share Posted February 23, 2015 It can see! http://40k.zombiecrisis.org/20150208_183014.jpg That little scratch over the right eye came like that from the factory. It gives it character I guess. I really like the head, it is almost a shame I am going to cover it with a face mask. Head attached with machine guns. http://40k.zombiecrisis.org/20150208_202849.jpg Approximate position of final pose. http://40k.zombiecrisis.org/20150208_202946.jpg I guess all that is left now is arms and armor! The_son_of_Dorn and Lord Marshal Ragnrok 2 Back to top Link to comment Share on other sites More sharing options...
Maerlen Posted February 23, 2015 Share Posted February 23, 2015 Really beautiful and inspiring! Link to comment Share on other sites More sharing options...
Zeller Posted February 23, 2015 Share Posted February 23, 2015 Are you using a small dab of super glue to attach the holding pegs to the torsos for painting? I assume the tooth picks are stuck in the bolter barrels with friction alone? Link to comment Share on other sites More sharing options...
BKZer0 Posted February 23, 2015 Author Share Posted February 23, 2015 @Zeller For painting the Marines I: painted the legs and torsos and one assembly together temporarily glued to a base. painted the heads on the sprue as they are only attached at the neck for the arms I used my pin vice to drill a small hole when the arm would attach to the torso, or when convenient, in a place that they should pad covered. They are held with friction alone to a paper clip. I drilled the barrels of the bolters and they are held to tooth picks with friction alone. (Be careful not to split the barrel, it happens) The backpacks were printed on sprue and snipped and cleaned up at the end. The shoulders were painted while sitting on some painters tape, the insides did not get a terrible amount of paint since you will never see them. Once painting was complete I had to use a file or hobby knife to rough up the connection surfaces because glue doesn't stick to paint. For the knight, the surfaces are so big I could just handle the model with my hands. Link to comment Share on other sites More sharing options...

Recommended Posts
Create an account or sign in to comment
You need to be a member in order to leave a comment
Create an account
Sign up for a new account in our community. It's easy!
Register a new accountSign in
Already have an account? Sign in here.
Sign In Now