Wiffinberg Posted February 23, 2015 Share Posted February 23, 2015 Wow very inspiring work brother, The decals are looking fantastic too! love What you have done here Link to comment https://bolterandchainsword.com/topic/272170-blood-ravens-5th-battle-company-wip/page/6/#findComment-3960154 Share on other sites More sharing options...
Kizzdougs Posted February 23, 2015 Share Posted February 23, 2015 I'm not usually a fan of the Blood Ravens, but these are really awesome! Great paint work and the Knight is looking great so far :) BKZer0 1 Back to top Link to comment https://bolterandchainsword.com/topic/272170-blood-ravens-5th-battle-company-wip/page/6/#findComment-3960164 Share on other sites More sharing options...
BKZer0 Posted February 24, 2015 Author Share Posted February 24, 2015 @kizzdougs What's not to like about space looters? By the way do you have any relic "gifts" I could have? Ironclad001 1 Back to top Link to comment https://bolterandchainsword.com/topic/272170-blood-ravens-5th-battle-company-wip/page/6/#findComment-3960285 Share on other sites More sharing options...
BKZer0 Posted February 25, 2015 Author Share Posted February 25, 2015 Next update: Here is the approximate final pose of the completed model. I chose to have the model facing left, but looking right kind of like it is lunging with the gun arm. http://40k.zombiecrisis.org/20150211_212337.jpg I chose to paint the chainsword first. Here is the near-complete model: http://40k.zombiecrisis.org/20150218_231312.jpg I need to differentiate between the metal used for the machine bits, and the metal used on the armor trim. I want to make the armor trim a very shinny silver. Here is the WIP Picture for the armor trip. You can see the blade of the chainsword is much brighter than the machine parts: http://40k.zombiecrisis.org/20150218_231057.jpg Lastly I starting painting some of the bits. (hoses and pipes). Here is a picture of the copper colored fuel tanks filled with a glowing green liquid. http://40k.zombiecrisis.org/20150221_011355.jpg Something to note, I am holding the arm by a piece of blue painters tape the I wrapped around the end. Prior to this picture I realize that the red on the arm was rubbing onto my fingers, and I subsequently rubbed the red all over the metal arm making the arm pink, rose colored metal. I repainted the arm, and proceeded to quickly clearcoat the red which also got rid of the patchy sheen from the washes. Lord Marshal Ragnrok, Dolchiate Remembrancer and That Guy Matt 3 Back to top Link to comment https://bolterandchainsword.com/topic/272170-blood-ravens-5th-battle-company-wip/page/6/#findComment-3961989 Share on other sites More sharing options...
BKZer0 Posted February 27, 2015 Author Share Posted February 27, 2015 (edited) Armed and ready! Here is a close up of the Cog Mechanicum on the back of the gun arm. http://40k.zombiecrisis.org/20150220_203545.jpg The completed thermal cannon arm. note the clear coat over the decal was not completely dry yet giving the dark appearance. http://40k.zombiecrisis.org/20150222_000421.jpg WIP pose head on: http://40k.zombiecrisis.org/20150222_182553.jpg right: http://40k.zombiecrisis.org/20150222_182506.jpg Left: http://40k.zombiecrisis.org/20150222_182539.jpg I still have not glued the arms or body in place. Time to bust out the airbrush and paint some armor! Edited February 27, 2015 by BKZer0 Lord Marshal Ragnrok and Dolchiate Remembrancer 2 Back to top Link to comment https://bolterandchainsword.com/topic/272170-blood-ravens-5th-battle-company-wip/page/6/#findComment-3963739 Share on other sites More sharing options...
BKZer0 Posted March 2, 2015 Author Share Posted March 2, 2015 (edited) Last update before finally assembly and completion. I decided to bust out the airbrush for painting the bone colored pieces. I went with approximately 2:1 Airbrush medium to paint. The thinning was required to just get the paint to run through the airbrush in the first place without clogging. However, it took a few coats to cover fully and I had to be careful to avoid pooling. http://40k.zombiecrisis.org/20150225_190853.jpg I hand painted the red in place. The color I used is a custom color I made a few years ago for my Rhino it is approximately 2:1 Citadel Foundation Paint Mechrite and Citadel Scab Red. Foundation paint was some heavy duty stuff. I would not dare put it in the air brush. http://40k.zombiecrisis.org/20150226_200426.jpg The first thing I decided to tackle was the Black/Bone pieces. Here is a completed Shin armor piece: http://40k.zombiecrisis.org/20150227_210559.jpg And the complete set of black/bone armor pieces This is just prior to clear coating. I painted all my pieces with Krylon Cystal Clear Gloss finish to give the decals something smooth to work with. http://40k.zombiecrisis.org/20150228_154956.jpg The next thing I did was all the red bits. Here is the top porthole which I am happy with. I am OK wet blending green. Not so much any other color. http://40k.zombiecrisis.org/20150301_001722.jpg Finally all the finished and decaled armor pieces. This was the worst. I am used to making my own decals and working with them. The GW decals are very flimsy and really like to stick to themselves... and nothing else. On top of that, despite their flimsy nature, they are very think, and no amount of MicroSol blends them into the surface. I found a few time, even after the decal was left to set for 30+ minutes, it could still move the dry decal with my finger like it never bonded to the surface. Copious amounts of MicroSet and MicroSol were spent, but I got it done. I also clear coated the pieces with Gloss again before applying matte just to try and smooth the surface. I got excellent results, but what I process. Also, the kit just does not come with enough decals. My original design called for a white gear with a 6 in the middle to be placed onto each of the black shin areas. It was only later that I learned there is only 1 white gear of appropriate size. To achieve the desired effect I also had to place sever decals on top of decals. For example the skull in the center of the gear on the bone knee. No ideal. I give this kit a D+ on decals at the best. Not quite failing... but you know, barely passed. Anyway, finished pieces pre-assembly: http://40k.zombiecrisis.org/20150301_164713.jpg All that is left to do is paint a few little accent pieces, assemble and base. My next post should be a completed model. Edited March 2, 2015 by BKZer0 Dolchiate Remembrancer 1 Back to top Link to comment https://bolterandchainsword.com/topic/272170-blood-ravens-5th-battle-company-wip/page/6/#findComment-3966654 Share on other sites More sharing options...
Vissah Posted March 3, 2015 Share Posted March 3, 2015 Loving it..!! Models like yours inspire me to get back to paining again..!! Link to comment https://bolterandchainsword.com/topic/272170-blood-ravens-5th-battle-company-wip/page/6/#findComment-3966706 Share on other sites More sharing options...
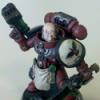
BKZer0 Posted March 13, 2015 Author Share Posted March 13, 2015 Here we go all finished. I left the banner detachable. I am not the biggest fan of how it came out, or the look of the model with it so I left it off for the pictures. Front: http://40k.zombiecrisis.org/20150309_221734.jpg Left: http://40k.zombiecrisis.org/20150309_221844.jpg Right: http://40k.zombiecrisis.org/20150309_221918.jpg Back: http://40k.zombiecrisis.org/20150309_221946.jpg Top: http://40k.zombiecrisis.org/20150309_222658.jpg And here are some detail pictures from the group up. Legs: http://40k.zombiecrisis.org/20150309_222223.jpg Cog Mechanicum: http://40k.zombiecrisis.org/20150309_222801.jpg Shoulder: http://40k.zombiecrisis.org/20150309_222128.jpg And look at that face... Isn't he cute? http://40k.zombiecrisis.org/20150309_222312.jpg Most fun I've ever had painting a model. 10/10 would paint again. Lord Marshal Ragnrok, chaplainmikey, Shard and 3 others 6 Back to top Link to comment https://bolterandchainsword.com/topic/272170-blood-ravens-5th-battle-company-wip/page/6/#findComment-3976041 Share on other sites More sharing options...
Son of Carnelian Posted March 13, 2015 Share Posted March 13, 2015 Stellar work. I'm incredibly impressed with this whole force. Link to comment https://bolterandchainsword.com/topic/272170-blood-ravens-5th-battle-company-wip/page/6/#findComment-3976043 Share on other sites More sharing options...
deathspectersgt7 Posted March 13, 2015 Share Posted March 13, 2015 Wow great looking Knight. Link to comment https://bolterandchainsword.com/topic/272170-blood-ravens-5th-battle-company-wip/page/6/#findComment-3976173 Share on other sites More sharing options...
Maerlen Posted March 14, 2015 Share Posted March 14, 2015 Slap some butter on my ass and call me a biscuit! I, Sir, am impressed. Link to comment https://bolterandchainsword.com/topic/272170-blood-ravens-5th-battle-company-wip/page/6/#findComment-3976611 Share on other sites More sharing options...
Rojo Posted March 14, 2015 Share Posted March 14, 2015 This is fantastic! I love how you work and as others have said, it is so inspiring. Now that the Knight is done, do you have anything in the pipeline? I remember there was a bit of a last a while ago. Link to comment https://bolterandchainsword.com/topic/272170-blood-ravens-5th-battle-company-wip/page/6/#findComment-3977056 Share on other sites More sharing options...
BKZer0 Posted March 16, 2015 Author Share Posted March 16, 2015 This is fantastic! I love how you work and as others have said, it is so inspiring. Now that the Knight is done, do you have anything in the pipeline? I remember there was a bit of a last a while ago. @Rojo To finish the army there will be: 1 Dreadnaught 1 Land Raider 1 Predator 2 Rhinos 1 Centurion Devastator Squad (This was not part of the original plan. The models are new, and I like the way they look so I want...) That is it. 1 Rhino is for the II Tactical Squad, and the other is for the Command Squad. I am going to get a Forge Word Damocles Command Vehicle as a stand in for the Command Squad Rhino just to make it stand out and be unique. The Dreadnaught is next followed by the Predator probably because I physically own those models from the Space Marine Force bundle I bought a while ago. Link to comment https://bolterandchainsword.com/topic/272170-blood-ravens-5th-battle-company-wip/page/6/#findComment-3977861 Share on other sites More sharing options...
Rojo Posted March 16, 2015 Share Posted March 16, 2015 Awesome. Then I shall wait with baited breath : ) Link to comment https://bolterandchainsword.com/topic/272170-blood-ravens-5th-battle-company-wip/page/6/#findComment-3977869 Share on other sites More sharing options...
Dolchiate Remembrancer Posted March 16, 2015 Share Posted March 16, 2015 I must confess brother, I have been keeping an eye on your blog in the hopes of differentiating my Crimson Sons of Vengeance DIY Successor of the Blood Angels from your Blood Ravens. But even with this intention in mind, this is a joy to follow! Link to comment https://bolterandchainsword.com/topic/272170-blood-ravens-5th-battle-company-wip/page/6/#findComment-3978451 Share on other sites More sharing options...
Boyka Posted March 19, 2015 Share Posted March 19, 2015 I've been following your work here for a while now; Amazing stuff!How on earth do you get your decals to sit so flat on the shoulder pads of your marines?! Link to comment https://bolterandchainsword.com/topic/272170-blood-ravens-5th-battle-company-wip/page/6/#findComment-3981168 Share on other sites More sharing options...
BKZer0 Posted March 19, 2015 Author Share Posted March 19, 2015 I've been following your work here for a while now; Amazing stuff! How on earth do you get your decals to sit so flat on the shoulder pads of your marines?! @Boyka I really should do a tutorial some time. I am good at it now, but it was a lot of trial and error. First I printed my own deals. I have never tried using the forgeworld decals, but I do know that Gamesworkshop ones are terrible. The decals are printed using a color laser jet. This is important because a laser jet does not use ink, it uses toner which is not affected by water. Once the decals are printed they are sealed to the paper using Krylon Crystal Clear Acrylic #1303 or #1303A (Doesn't matter). This basically encases the artwork between the decal membrane and the clear coat protecting it. All surfaces that are to receive a decal are prepped with a generous coating of Krylon Crystal Clear. This gives the surface a smooth gloss surface which is free of imperfections. Think of it like applying a decal to glass. Once the clear coat is dry I coat the surface with Micro Set. This is a decal setting agent and really helps the decal bind to the surface. I apply the decal to the surface and move it around with an exacto knife and a stuff brush. You have a few seconds to move the decal into position before you run the risk of sticking and wrinkles. Once the decal is where I want it I just let it sit until the Micro Set / residual water dries. sometimes if there is still a ton of fluid, or the decal seems to be floating on the surface I wick it up with a piece of paper towel taking care not to disturb the decal. When the decal is dry it will typically be a little wrinkled. I coat the entire decal with Micro Sol, and let it soak for a second. Micro Sol is a solvent that dissolves the decal membrane and makes it very very soft. It will allow the decal to conform to irregular shapes (like a shoulder pad). At this point I typically use one of my brushes to press the wrinkles out of the decal. You have to be careful here though. The Micro Sol will make the decal so soft that it will tear easy. Also don't touch it with you fingers because you will left the decal off the surface. I usually do the above step up to 3 times depending on how well the decal is sitting. The next thing I do is soak a Q-Tip in Micro Sol, and really press it into the surface by applying pressure and rolling the Q-tip over the surface like you are using a rolling pin. The last thing I do it any touch up work with paint. For example some deals develop rip that I just patch with some black paint. Micro Sol is nasty stuff and if you are not careful it will eat through the cleat coat so don't get too aggressive. It will also dissolve GW Washes. Once everything is dry, and I mean bone dry, you will need to clear coat everything. You have to remember you not have a gloss surface with an equally glossy decal on it which is not good. Apply a generous coat of Testors Dull coat. Don't go nuts because dull coat tents to start to dry while if it is too thick (but you have to add a lot for that too happen). If done right, the dull coat will both remove the gloss shine, and remove the edge of the decal. Link to comment https://bolterandchainsword.com/topic/272170-blood-ravens-5th-battle-company-wip/page/6/#findComment-3981562 Share on other sites More sharing options...
BrotherCaptainArkhan Posted March 19, 2015 Share Posted March 19, 2015 Recent developments are all looking good. Big fan of your Ravens. Link to comment https://bolterandchainsword.com/topic/272170-blood-ravens-5th-battle-company-wip/page/6/#findComment-3981623 Share on other sites More sharing options...
BKZer0 Posted March 19, 2015 Author Share Posted March 19, 2015 @Brother-Captain Arkhan, Thanks, huge fan of your work too. Link to comment https://bolterandchainsword.com/topic/272170-blood-ravens-5th-battle-company-wip/page/6/#findComment-3981625 Share on other sites More sharing options...
Brother Argent Posted March 19, 2015 Share Posted March 19, 2015 Just wondering is there any chance we can get some pics of the finished marines from earlier in the thread? Last I saw they were in bits with a few assembled but I see they appear to be finished now. Just asking because I have been following this from the start. Link to comment https://bolterandchainsword.com/topic/272170-blood-ravens-5th-battle-company-wip/page/6/#findComment-3981838 Share on other sites More sharing options...
Iron_Lord Posted March 20, 2015 Share Posted March 20, 2015 this is fantastic! Great job man! Link to comment https://bolterandchainsword.com/topic/272170-blood-ravens-5th-battle-company-wip/page/6/#findComment-3981954 Share on other sites More sharing options...
Ironclad001 Posted April 3, 2015 Share Posted April 3, 2015 What website did you get the army painter on? Link to comment https://bolterandchainsword.com/topic/272170-blood-ravens-5th-battle-company-wip/page/6/#findComment-3996795 Share on other sites More sharing options...
BKZer0 Posted April 8, 2015 Author Share Posted April 8, 2015 What website did you get the army painter on? Not 100% sure what you are asking. If you could clarify I would be happy to answer. Link to comment https://bolterandchainsword.com/topic/272170-blood-ravens-5th-battle-company-wip/page/6/#findComment-4001956 Share on other sites More sharing options...
Recommended Posts
Create an account or sign in to comment
You need to be a member in order to leave a comment
Create an account
Sign up for a new account in our community. It's easy!
Register a new accountSign in
Already have an account? Sign in here.
Sign In Now