Durfast Spiritwolf Posted November 24, 2013 Share Posted November 24, 2013 Yes, it just felt like the right time to launch this one: http://i221.photobucket.com/albums/dd141/jannerxi/HH/IMG_1319_zpsf55ba86d.jpg Parts washed, organised and ready for cleaning up. Feet: http://i221.photobucket.com/albums/dd141/jannerxi/HH/IMG_1318_zps52a2495f.jpg Legs: http://i221.photobucket.com/albums/dd141/jannerxi/HH/IMG_1320_zps7886d21e.jpg Main Body: http://i221.photobucket.com/albums/dd141/jannerxi/HH/IMG_1321_zps9e090a99.jpg Head: http://i221.photobucket.com/albums/dd141/jannerxi/HH/IMG_1322_zps894067d2.jpg Etc: http://i221.photobucket.com/albums/dd141/jannerxi/HH/IMG_1323_zps602aaea7.jpg Sorry, but the light was a bit http://heresy30k.invisionzone.com/public/style_emoticons/default/smile.pngropey yesterday. So some of the focusing suffered - will do better next time Link to comment https://bolterandchainsword.com/topic/283743-legio-mortis-aka-durfast-builds-a-titan/ Share on other sites More sharing options...
GhostMalone Posted November 24, 2013 Share Posted November 24, 2013 Let's see this baby sing Link to comment https://bolterandchainsword.com/topic/283743-legio-mortis-aka-durfast-builds-a-titan/#findComment-3529817 Share on other sites More sharing options...
Olis Posted November 24, 2013 Share Posted November 24, 2013 Good luck with the assembly, brother! ;) Link to comment https://bolterandchainsword.com/topic/283743-legio-mortis-aka-durfast-builds-a-titan/#findComment-3529849 Share on other sites More sharing options...
Dono1979 Posted November 24, 2013 Share Posted November 24, 2013 have fun with the assembly, i love building the warhounds. planning on basing it or having it freestanding? Link to comment https://bolterandchainsword.com/topic/283743-legio-mortis-aka-durfast-builds-a-titan/#findComment-3529861 Share on other sites More sharing options...
Durfast Spiritwolf Posted November 24, 2013 Author Share Posted November 24, 2013 My other one has been based, but that can be quite inconvenient. So I'm going to try for freestanding first. I plan to clean up the feet next weekend, drill out the joints for pinning etc. as I doing it in between my Sons of Horus project. So hopefully the next update will follow that :) Link to comment https://bolterandchainsword.com/topic/283743-legio-mortis-aka-durfast-builds-a-titan/#findComment-3529924 Share on other sites More sharing options...
Durfast Spiritwolf Posted December 1, 2013 Author Share Posted December 1, 2013 Both feet cleaned up, drilled out and ready for pinning: http://1.bp.blogspot.com/-0aCsRqrz11M/UpsaNqcRYJI/AAAAAAAAAgg/RE9bpen4GSc/s320/IMG_1325.JPG I tried to drill them out with a power Dremel, but didn't like the lack of control. So switched the 3mm drill bit to my GW hand drill and that produced much tidier results. In each case I predrilled with a much smaller bit to ensure it was central. The space is exactly 3mm, so there is no room to be off centre: http://2.bp.blogspot.com/-sj-R_gC1BfE/UpsaKMK1g3I/AAAAAAAAAgY/rdngi2vmtSc/s320/IMG_1328.JPG Next up, cutting the brass rod: Link to comment https://bolterandchainsword.com/topic/283743-legio-mortis-aka-durfast-builds-a-titan/#findComment-3534808 Share on other sites More sharing options...
Forté Posted December 1, 2013 Share Posted December 1, 2013 The more I see these kits the more I want one. Never realized they had so many parts. Link to comment https://bolterandchainsword.com/topic/283743-legio-mortis-aka-durfast-builds-a-titan/#findComment-3534815 Share on other sites More sharing options...
Durfast Spiritwolf Posted December 1, 2013 Author Share Posted December 1, 2013 So, the pinned feet. At this stage the joints are still fully articulable (a litle more cleaning up required on the big toe): http://i221.photobucket.com/albums/dd141/jannerxi/HH/IMG_1330_zpsfa536996.jpg The pin from the big and rear toes extends into the ankle socket: http://i221.photobucket.com/albums/dd141/jannerxi/HH/IMG_1329_zps65d2d374.jpg This will assist in pinning the lower leg in place: http://i221.photobucket.com/albums/dd141/jannerxi/HH/IMG_1331_zps6365d189.jpg Next week - the legs! Link to comment https://bolterandchainsword.com/topic/283743-legio-mortis-aka-durfast-builds-a-titan/#findComment-3534849 Share on other sites More sharing options...
Durfast Spiritwolf Posted December 8, 2013 Author Share Posted December 8, 2013 As promised last week, this weekend I tackled the legs. First came the clean up, followed by dry assembly: The hips and pelvis: http://4.bp.blogspot.com/-CQ7xETEzP8w/UqRPO-WcOiI/AAAAAAAAAiY/5Nc38PUxWY0/s320/IMG_1351.JPG And the legs themselves. thigh, two piece knee, and lower leg with ankle joint: http://4.bp.blogspot.com/-TPaWygobQT8/UqRPSgNb4qI/AAAAAAAAAio/KIr4Ao8uiks/s320/IMG_1352.JPG I found pre-drilling with a smaller bit essential here. First I measured the centre point on either side of the outer joint, and them I drilled through. The next stage was to place the inner piece, gently push the drill bit through to mark the correct spot. I then changed the angle and repeated this to ensure the centre mark was consistent. This was then repeated for the upper joint. I hope that all makes sense: http://4.bp.blogspot.com/-2G7ps3jGH8g/UqRPPrIEMZI/AAAAAAAAAic/K6vOmsohr8A/s320/IMG_1353.JPG I did not want to drill all the way through the hip ball joint as I don't expect them to be at an exact right angle to the pelvis once assembled. I pushed a cut down brass spear from my historical bits box, point outwards, and used this to confirm the centre point for the thight joint. In both cases the true centre point matched the centre of the disc on the thigh: http://3.bp.blogspot.com/-v4X-B635o8c/UqRPS29ZOPI/AAAAAAAAAis/L_F5wZjMzXI/s320/IMG_1356.JPG The next stage was simply to drill through with the 3mm bit and cut the brass rod to length. I drilled the outer edges first, then placed the inner joint in place to confirm positioning, before removing it and drilling in from either side. I then resaampled it and confirmed the joint by passing the drill bit in from either side again in various positions. The pre-drilling meant that there were no issues at this stage. http://4.bp.blogspot.com/-f3mr1BXO8Gg/UqRPUZSMpaI/AAAAAAAAAi4/gGohf1cBjIM/s320/IMG_1359.JPG I did not drill all the way through to the outer edge of the thigh joint as this will make it easy to conceal with putty later. Next week I will work on the torso and head. I need these pieces to be complete to allow me to confirm the model is in balance before fixing the various joints in the feet, legs and hips in place, attaching the pistons etc. Whilst I may fix a small base under each foot to protect them from the rigours of clumsy gaming and aid stability. I would like it to be freestanding if possible. Link to comment https://bolterandchainsword.com/topic/283743-legio-mortis-aka-durfast-builds-a-titan/#findComment-3540686 Share on other sites More sharing options...
Durfast Spiritwolf Posted December 15, 2013 Author Share Posted December 15, 2013 Onto the torso.Clean-up was fairly simple. http://1.bp.blogspot.com/-8rBi34G3LdY/Uq1-CK-pacI/AAAAAAAAAlI/BtCen-tFzmk/s320/IMG_1380.JPG There's a hefty tab to cut off the rear side of the 'shoulders', but it's covered by the grills. So there's no need to spend too much time cleaning it up: http://3.bp.blogspot.com/-Bt0VrcJ01lw/Uq1-Dt4s1UI/AAAAAAAAAlU/D4lyXfQ7ohY/s320/IMG_1381.JPG http://2.bp.blogspot.com/-6trcvDr3mQc/Uq1-DYFgCbI/AAAAAAAAAlM/lARgZw55VLg/s320/IMG_1382.JPG Onto the pinning. Unlike the toes and leg joints, which are there to help support the weight of the beast, pinning of the torso is designed to help to glue hold anything together. So I didn't get too carried away: http://3.bp.blogspot.com/-JaVp-hiw8zs/Uq1-Iq3XPKI/AAAAAAAAAlg/Nbdet3hueRo/s320/IMG_1383.JPG http://4.bp.blogspot.com/-YcCKnpE3RYY/Uq1-JMK8wjI/AAAAAAAAAlk/O7U1b0H22qY/s320/IMG_1384.JPG You can get away with drilling through the back piece and into the block either side of the shoulders. As it will be covered by the rear sockets (see final picture): http://3.bp.blogspot.com/-dxAjLlF762c/Uq1-Kh-KVZI/AAAAAAAAAlw/2oskz0KwGso/s320/IMG_1386.JPG http://2.bp.blogspot.com/-ZfNN5gku_V0/Uq1-Sp2s8KI/AAAAAAAAAl4/uSNaz4vMm20/s320/IMG_1387.JPG Next week we'll sort out the arms. I've yet to order the magnets for the weapons, but given the effect of long barrels on balance, I'll need to have them in place before fixing the final pose, glueing the feet and legs in position etc. Link to comment https://bolterandchainsword.com/topic/283743-legio-mortis-aka-durfast-builds-a-titan/#findComment-3546785 Share on other sites More sharing options...
Brother Callius Posted December 15, 2013 Share Posted December 15, 2013 Looking good there brother! I love titan threads and it's interesting to see and hear the different approaches to pinning and posing. It's really great that you made it so tutorial-like with pics of everything and a description of it all. Im proberably going to loan some of your tips when I get around to sell my firstborn to FW for a Warhound to go with my Reaver Looking foward to seeing the progress here Link to comment https://bolterandchainsword.com/topic/283743-legio-mortis-aka-durfast-builds-a-titan/#findComment-3546793 Share on other sites More sharing options...
Durfast Spiritwolf Posted January 20, 2014 Author Share Posted January 20, 2014 So with the festivities and what not out of the way, it was time to get on with the Warhound. On assembly, I found that one of the pins holes was quite a way off line. In retrospect, I would have drilled these after assembly: http://1.bp.blogspot.com/-vMoz1gQ63dw/Ut0Mjp2C85I/AAAAAAAAApA/Mmxkt1y8fHk/s1600/IMG_1442.JPG Following some advice off a Danish friend, the shield generators are attached with magnets. So if a shield goes down, one can be removed :-) http://1.bp.blogspot.com/-_8AvT6MW-qE/Ut0MkM8OP2I/AAAAAAAAApE/-sKyaoVUxaQ/s1600/IMG_1444.JPG http://3.bp.blogspot.com/-CWqm9khi7kM/Ut0MoiA_DZI/AAAAAAAAApU/Gef0DyDjtHI/s1600/IMG_1446.JPG And the first of the weapons - again magnetised: http://2.bp.blogspot.com/-lGbNnkBQqJQ/Ut0MobABhYI/AAAAAAAAApQ/YyGF1DCTKHA/s1600/IMG_1447.JPG Onto painting… Link to comment https://bolterandchainsword.com/topic/283743-legio-mortis-aka-durfast-builds-a-titan/#findComment-3574051 Share on other sites More sharing options...
Phalanx Warder Posted January 20, 2014 Share Posted January 20, 2014 Very well done good Sir, got to say I stayed away from huge FW models because they seemed to hard/complex. You have me re thinking that point of view Link to comment https://bolterandchainsword.com/topic/283743-legio-mortis-aka-durfast-builds-a-titan/#findComment-3574442 Share on other sites More sharing options...
Durfast Spiritwolf Posted January 20, 2014 Author Share Posted January 20, 2014 Very well done good Sir, got to say I stayed away from huge FW models because they seemed to hard/complex. You have me re thinking that point of view I'm taking it one step at a time. Once the body is painted up and assembled, I'll worry about sorting out the legs etc. ;) Link to comment https://bolterandchainsword.com/topic/283743-legio-mortis-aka-durfast-builds-a-titan/#findComment-3574537 Share on other sites More sharing options...
Durfast Spiritwolf Posted January 26, 2014 Author Share Posted January 26, 2014 The next session focused on painting and assembling the hull interior: http://i221.photobucket.com/albums/dd141/jannerxi/HH/IMG_1467_zpscd1614f8.jpg http://i221.photobucket.com/albums/dd141/jannerxi/HH/IMG_1471_zps867e627f.jpg As you can no doubt see, I've used my hobby knife to cut criss crosses into those parts about to be glued together. Next week, I'll move onto pinning the arms to the shoulders, and start painting the gun servitors. Link to comment https://bolterandchainsword.com/topic/283743-legio-mortis-aka-durfast-builds-a-titan/#findComment-3578825 Share on other sites More sharing options...
Durfast Spiritwolf Posted February 2, 2014 Author Share Posted February 2, 2014 Back to mundane cleaning, pinning and assembly this weekend. http://1.bp.blogspot.com/-caBmPkaFc90/Uu447gsGe2I/AAAAAAAAArw/OeMDR5-9hCc/s1600/IMG_1486.JPG The first pin goes all the way though from the outer edge of the shoulder. This will carry the weight of the weapon. Green stuff is then used to hide the hole. The 'arm' retains a degree of backwards and forwards movement. So a second pin comes in from the rear to fix it in place. This pin only goes halfway into the shoulder joint and the hole will be hidden by the torso: http://1.bp.blogspot.com/-uKCE0I0iD-s/Uu446xVwBMI/AAAAAAAAAro/NSNr5lGCWXA/s1600/IMG_1485.JPG The base is then shaved down ready to receive a magnet, which is greenstuffed and glued into place. http://1.bp.blogspot.com/-N2qd47RLlbo/Uu44-MJ4aLI/AAAAAAAAAr4/4l4C0T2Z7_g/s1600/IMG_1487.JPG The weapon can now be rotated left and right. Time for undercoating... Link to comment https://bolterandchainsword.com/topic/283743-legio-mortis-aka-durfast-builds-a-titan/#findComment-3584706 Share on other sites More sharing options...
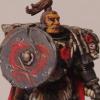
Durfast Spiritwolf Posted February 17, 2014 Author Share Posted February 17, 2014 Interior of the cockpit: http://i221.photobucket.com/albums/dd141/jannerxi/HH/IMG_1523_zpsff3b0806.jpg http://i221.photobucket.com/albums/dd141/jannerxi/HH/IMG_1522_zpsdb2d3dab.jpg http://i221.photobucket.com/albums/dd141/jannerxi/HH/IMG_1515_zps0d6a031d.jpg http://i221.photobucket.com/albums/dd141/jannerxi/HH/IMG_1512_zps1a15c7f4.jpg Onto the exterior of the head and the gun-servitors http://heresy30k.invisionzone.com/public/style_emoticons/default/smile.png Link to comment https://bolterandchainsword.com/topic/283743-legio-mortis-aka-durfast-builds-a-titan/#findComment-3596287 Share on other sites More sharing options...
Captain Semper Posted February 17, 2014 Share Posted February 17, 2014 I totally missed that up to now... Suffice to say thread followed! I could see the Princeps with a bit brighter colors - you know to stand out a bit more... But the engineering it takes to pin everything together and make it stand leaves me in awe.... Monumental effort brother... but you will not walk alone! Link to comment https://bolterandchainsword.com/topic/283743-legio-mortis-aka-durfast-builds-a-titan/#findComment-3596469 Share on other sites More sharing options...
Durfast Spiritwolf Posted February 18, 2014 Author Share Posted February 18, 2014 I know what you mean Semper, but I'm drawn to Isstvan-era Legio Mortis near the start of their journey into darkness. So he's dressed to match the colours of his titan: black with red and white contrasts. He did have red trousers, but that was bit much! Link to comment https://bolterandchainsword.com/topic/283743-legio-mortis-aka-durfast-builds-a-titan/#findComment-3596927 Share on other sites More sharing options...
Hyaenidae Posted February 18, 2014 Share Posted February 18, 2014 This is one hell of a project, man, and I applaud you for undertaking it. I gotta ask, though, how are you planning of hiding the brass rod edges on the side of the toes? They seem a touch....glaring, at the present. Link to comment https://bolterandchainsword.com/topic/283743-legio-mortis-aka-durfast-builds-a-titan/#findComment-3596933 Share on other sites More sharing options...
Durfast Spiritwolf Posted February 18, 2014 Author Share Posted February 18, 2014 The rod size was chosen to match the sculpted 'axles' that were there before. So, with paint, all should be good :) Link to comment https://bolterandchainsword.com/topic/283743-legio-mortis-aka-durfast-builds-a-titan/#findComment-3597082 Share on other sites More sharing options...
Warsmith Aznable Posted February 18, 2014 Share Posted February 18, 2014 These are great pictures of the parts and assembly. Good luck with the rest of the project, I will look forward to seeing it. Link to comment https://bolterandchainsword.com/topic/283743-legio-mortis-aka-durfast-builds-a-titan/#findComment-3597089 Share on other sites More sharing options...
Durfast Spiritwolf Posted March 25, 2014 Author Share Posted March 25, 2014 On to the shoulders: http://i221.photobucket.com/albums/dd141/jannerxi/HH/IMG_1599_zpsb5ae4937.jpg http://i221.photobucket.com/albums/dd141/jannerxi/HH/IMG_1597_zps31b140ce.jpg More than a tad of grey added to the flesh tones to aim for that unhealthy look Link to comment https://bolterandchainsword.com/topic/283743-legio-mortis-aka-durfast-builds-a-titan/#findComment-3632449 Share on other sites More sharing options...
Recommended Posts
Archived
This topic is now archived and is closed to further replies.