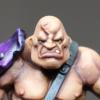
WarriorFish Posted May 3, 2015 Share Posted May 3, 2015 The hero of Armageddon deserves such detail ;) He'll be well worth it though as he's looking great already :) Link to comment https://bolterandchainsword.com/topic/303832-small-ig-and-scion-force/page/3/#findComment-4029085 Share on other sites More sharing options...
UltraRich Posted May 5, 2015 Author Share Posted May 5, 2015 (edited) Ive moved my ETL wip over to here so Im now spamming the main ETL page. Yarrick is done so its onto the hardware This is the guide Im following which is awesome in its detail and the guy deserves credit for this. http://www.akaranseth.com/blog/tutorials/step-by-step-valkyrie-imperial-guard.htm While Im waiting for the tape to arrive Im going to magnetize and paint the interior so wip shots to follow Edited September 15, 2019 by UltraRich elmo, CaptainDangerous and WarriorFish 3 Back to top Link to comment https://bolterandchainsword.com/topic/303832-small-ig-and-scion-force/page/3/#findComment-4031530 Share on other sites More sharing options...
UltraRich Posted May 6, 2015 Author Share Posted May 6, 2015 (edited) Ok so magnatising has started Im going to make the roof removable and allow the tailgate door to drop so I needed magnets in both I sanded the edge of the tailgate door to allow it to drop and then sank one magnet into the center I then did the same along the edge of the roof A neat trick to line them up is put one magnet in and before you drill the other side put blu tac or putty on it and put the piece in place. If you remove it you see the indent in the blutac and know where to drill 5 magnets on the ship aligned to the roof A little clean up with GS where I managed to drill through the side! Edited September 15, 2019 by UltraRich walter h, CaptainDangerous, Mithrilforge and 1 other 4 Back to top Link to comment https://bolterandchainsword.com/topic/303832-small-ig-and-scion-force/page/3/#findComment-4032919 Share on other sites More sharing options...
UltraRich Posted May 6, 2015 Author Share Posted May 6, 2015 Yep.... just realised I put the door on the wrong way round...... Its now the right way around and has a hole filled with GS...... Emicus 1 Back to top Link to comment https://bolterandchainsword.com/topic/303832-small-ig-and-scion-force/page/3/#findComment-4033046 Share on other sites More sharing options...
our_baz Posted May 6, 2015 Share Posted May 6, 2015 Whoops! UltraRich 1 Back to top Link to comment https://bolterandchainsword.com/topic/303832-small-ig-and-scion-force/page/3/#findComment-4033052 Share on other sites More sharing options...
WarriorFish Posted May 7, 2015 Share Posted May 7, 2015 A sharp knife? :confused: UltraRich 1 Back to top Link to comment https://bolterandchainsword.com/topic/303832-small-ig-and-scion-force/page/3/#findComment-4033382 Share on other sites More sharing options...
UltraRich Posted May 7, 2015 Author Share Posted May 7, 2015 A sharp knife? :confused: I managed to rip the side off when prising it apart so its currently sat drying wrapped in elastic bands Link to comment https://bolterandchainsword.com/topic/303832-small-ig-and-scion-force/page/3/#findComment-4033497 Share on other sites More sharing options...
WarriorFish Posted May 7, 2015 Share Posted May 7, 2015 All's well that ends well! :P Link to comment https://bolterandchainsword.com/topic/303832-small-ig-and-scion-force/page/3/#findComment-4033647 Share on other sites More sharing options...
Ulrik_Ironfist Posted May 7, 2015 Share Posted May 7, 2015 Looking good. Link to comment https://bolterandchainsword.com/topic/303832-small-ig-and-scion-force/page/3/#findComment-4033691 Share on other sites More sharing options...
UltraRich Posted May 7, 2015 Author Share Posted May 7, 2015 (edited) Thanks guys Once Id fixed the door issue and glued it all back together I hit it with Halfords grey primer. Im liking this over the GW range of undercoat Ive now sprayed the interior boltgun silver and the odd area of black. Tomorrow this will have hairspray, salt and a coating of bleached bone! Edited September 15, 2019 by UltraRich WarriorFish, our_baz and CaptainDangerous 3 Back to top Link to comment https://bolterandchainsword.com/topic/303832-small-ig-and-scion-force/page/3/#findComment-4034120 Share on other sites More sharing options...
WarriorFish Posted May 7, 2015 Share Posted May 7, 2015 Looking good already, keep at it and it'll be done in no time :tu: Link to comment https://bolterandchainsword.com/topic/303832-small-ig-and-scion-force/page/3/#findComment-4034178 Share on other sites More sharing options...
Vel'Cona Posted May 8, 2015 Share Posted May 8, 2015 Good disaster recovery! I've definitely had modeling issues like that myself in the past, so I know the pain of having to disassemble and re-assemble a nearly completed model. Glad to see you were able to get your Valkyrie back in working order! Link to comment https://bolterandchainsword.com/topic/303832-small-ig-and-scion-force/page/3/#findComment-4034510 Share on other sites More sharing options...
UltraRich Posted May 8, 2015 Author Share Posted May 8, 2015 (edited) It dried quicker than I thought last night so I ended up doing the bone and salt chipping Here it is after a wash and quick dust with Mig powder This weekend is all about detailing while painting round corners! Edited September 15, 2019 by UltraRich nismogrendel, Captain Antargo, Mithrilforge and 4 others 7 Back to top Link to comment https://bolterandchainsword.com/topic/303832-small-ig-and-scion-force/page/3/#findComment-4034908 Share on other sites More sharing options...
UltraRich Posted May 8, 2015 Author Share Posted May 8, 2015 (edited) So Ive started detailing the interior Im not sure why a cabin needs so many buttons! There are hundreds of the things Edited September 15, 2019 by UltraRich Arcima, WarriorFish, Emicus and 2 others 5 Back to top Link to comment https://bolterandchainsword.com/topic/303832-small-ig-and-scion-force/page/3/#findComment-4035473 Share on other sites More sharing options...
Toxichobbit Posted May 8, 2015 Share Posted May 8, 2015 That's a nice looking interior. Hair spray method? Link to comment https://bolterandchainsword.com/topic/303832-small-ig-and-scion-force/page/3/#findComment-4035491 Share on other sites More sharing options...
WarriorFish Posted May 8, 2015 Share Posted May 8, 2015 That's my secret Rich... I never paint the buttons :lol: Looking very good, be sure to remember to make your opponents look inside before every game ;) Link to comment https://bolterandchainsword.com/topic/303832-small-ig-and-scion-force/page/3/#findComment-4035493 Share on other sites More sharing options...
UltraRich Posted May 9, 2015 Author Share Posted May 9, 2015 (edited) That's a nice looking interior. Hair spray method? Thats right. I wasnt sure if Id gone too far but I wanted this to look like a well used aircraft Ive sealed the interior with purity seal and then taped it up with Tamiya masking tape (its really good, I went for the 18mm version) Its now had a base coat of catachan green. Its going to get another coat then its onto highlighting If anything looks like a run or pool its because Ive sprayed with the consistency of milk so itll shrink back to flat Edited September 15, 2019 by UltraRich WarriorFish and scatmandoo 2 Back to top Link to comment https://bolterandchainsword.com/topic/303832-small-ig-and-scion-force/page/3/#findComment-4036364 Share on other sites More sharing options...
WarriorFish Posted May 9, 2015 Share Posted May 9, 2015 That's a smooth coat of green, but are you sure it's Catachan? Looks different under that light, more like Lorien Green? Link to comment https://bolterandchainsword.com/topic/303832-small-ig-and-scion-force/page/3/#findComment-4036470 Share on other sites More sharing options...
UltraRich Posted May 10, 2015 Author Share Posted May 10, 2015 (edited) That's a smooth coat of green, but are you sure it's Catachan? Looks different under that light, more like Lorien Green? I think its the lights. Its only about 8" above it Saying that it now is straken green on top The plan is to mask it off panel by panel and shade it out via loren green to catachan green Lets see how that goes! Edited September 15, 2019 by UltraRich WarriorFish and our_baz 2 Back to top Link to comment https://bolterandchainsword.com/topic/303832-small-ig-and-scion-force/page/3/#findComment-4037614 Share on other sites More sharing options...
WarriorFish Posted May 11, 2015 Share Posted May 11, 2015 I need to sort out decent lighting etc for photographs, but then I always think "this could be time I spend painting" :lol: Looking forward to seeing your progress on this :tu: Link to comment https://bolterandchainsword.com/topic/303832-small-ig-and-scion-force/page/3/#findComment-4038051 Share on other sites More sharing options...
Vel'Cona Posted May 11, 2015 Share Posted May 11, 2015 Taking pictures is definitely my least favorite part of WIP. I'm so glad others seem to be much better at this! In either case, glad to see this model coming together. Painting that interior is definitely a bold move! Link to comment https://bolterandchainsword.com/topic/303832-small-ig-and-scion-force/page/3/#findComment-4038384 Share on other sites More sharing options...
nismogrendel Posted May 11, 2015 Share Posted May 11, 2015 All these models look amazing, I love the interior of that Valk! Link to comment https://bolterandchainsword.com/topic/303832-small-ig-and-scion-force/page/3/#findComment-4038407 Share on other sites More sharing options...
UltraRich Posted May 11, 2015 Author Share Posted May 11, 2015 (edited) Thanks guys And so it begins 4 panels down and about 40 to go Im liking the results though Edited September 15, 2019 by UltraRich CaptainDangerous, WarriorFish, our_baz and 1 other 4 Back to top Link to comment https://bolterandchainsword.com/topic/303832-small-ig-and-scion-force/page/3/#findComment-4038798 Share on other sites More sharing options...
WarriorFish Posted May 11, 2015 Share Posted May 11, 2015 Yeah it's working nicely, hopefully we can see the finished article soon :tu: Link to comment https://bolterandchainsword.com/topic/303832-small-ig-and-scion-force/page/3/#findComment-4038815 Share on other sites More sharing options...
UltraRich Posted May 11, 2015 Author Share Posted May 11, 2015 (edited) Had enough masking/spraying now This is the result of 4 masking sessions Ive taken it without the flash but the light behind me and it still wont capture the depth of the colour fade This is with flash Edited September 15, 2019 by UltraRich WarriorFish, our_baz, Emicus and 2 others 5 Back to top Link to comment https://bolterandchainsword.com/topic/303832-small-ig-and-scion-force/page/3/#findComment-4038894 Share on other sites More sharing options...
Recommended Posts
Create an account or sign in to comment
You need to be a member in order to leave a comment
Create an account
Sign up for a new account in our community. It's easy!
Register a new accountSign in
Already have an account? Sign in here.
Sign In Now