Brother Desultor Posted May 15, 2018 Share Posted May 15, 2018 Back in September of 2016, I posted my WIP of a Warlord Titan of the Legio Mortis. At the time I was happy with the end result, but since then I've (somehow) managed to improve my painting skills and learn some new techniques. So around May last year I decided to start again. What followed was weeks of freezing the model to separate the parts and soaking them in IPA baths to remove the paint. I wish I'd found the delights of using Biostrip 20 much sooner than I did which would have made the paint stripping process SO much easier, but that's one of the lessons learnt. After several months (including countless hobby distractions, such as the Death Guard) I finally managed to reassemble the titan with surprisingly few repairs needed as a result of breaking it apart. Over the past few weeks I've been slowly repainting it, using some of the newly learnt skills and techniques - the most important of which is........... TAKE YOUR TIME YOU MUPPET!!!! Looking back I really did do such an awful rush job the first time round which did not do the model (or associated cost) any justice. I'm now at the stage where I've nearly finished the main "skeleton" and am pleased with the result. I've yet to add oil stains, rust streaks and other dirt/grime to it but I like the direction it's going in. The armour will be the last thing to complete, as although I've registered the engine with the ToC as Legio Metalica this time around, I'm trying to wait until Adeptus Titanicus is released in case there's another Legio that catches my eye, before committing to a colour scheme. As always, the idea of posting in the WIP section is to serve as a motivation for me to keep it going, as well as sharing techniques (and lessons learnt) with the fraters of this board. And of course to open myself up to criticism and feedback (be gentle....) By way of a quick comparison, here's an image of the shoddy job I did on the metalwork the first time: Thanks for looking. Link to comment https://bolterandchainsword.com/topic/347283-the-rebirth-of-a-titan-lessons-learnt/ Share on other sites More sharing options...
StraightSilver Posted May 15, 2018 Share Posted May 15, 2018 I don't think there was anything shoddy with the last paint job but I do much prefer the new direction you're going with it.I would describe the previous version as "clean, quick, minimalist" which was absolutely fine but as you say for a model such as this more detail and depth makes a huge difference.I love the different metal effects you have going on now and this will only get better when the grime and streaks are added. Looking forward to more. :) Link to comment https://bolterandchainsword.com/topic/347283-the-rebirth-of-a-titan-lessons-learnt/#findComment-5081869 Share on other sites More sharing options...
Brother Desultor Posted May 18, 2018 Author Share Posted May 18, 2018 I love the different metal effects you have going on now and this will only get better when the grime and streaks are added. Looking forward to more. Thank you. I've done some work on adding rust streaks and fresh oil stains. I've also applied the same metal techniques to the main weapon systems and am pleased they've turned out OK. Link to comment https://bolterandchainsword.com/topic/347283-the-rebirth-of-a-titan-lessons-learnt/#findComment-5085142 Share on other sites More sharing options...
hushrong Posted May 18, 2018 Share Posted May 18, 2018 This is looking great. I love seeing the titan without all of its armor plating because I can clearly see ALL of that detail worked onto it. Looking forward to seeing more progress on this god of war. Link to comment https://bolterandchainsword.com/topic/347283-the-rebirth-of-a-titan-lessons-learnt/#findComment-5085146 Share on other sites More sharing options...
Guiltysparc Posted May 18, 2018 Share Posted May 18, 2018 The metals are looking great! What's the main difference in technique between then and now? Link to comment https://bolterandchainsword.com/topic/347283-the-rebirth-of-a-titan-lessons-learnt/#findComment-5085193 Share on other sites More sharing options...
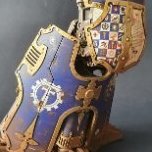
Brother Desultor Posted May 18, 2018 Author Share Posted May 18, 2018 The metals are looking great! What's the main difference in technique between then and now? The last time it was just a gunmetal spray over a black primer, then with random light GW washes here and there. This time it's much more involved: 1. Prime black. 2. Base coat of Vallejo Metal Colour Gunmetal Grey. 3. Add a coat of gloss varnish. 4. Then coat the entire model with a paste using 4 oil colours - Lamp Black, Raw Umber, Burnt Umber and Burnt Sienna. Allow this to dry for a couple of hours before wiping it away with a soft cloth, leaving the "shade" in the natural places. 5. Then a drybrush of GW Necron Compound. These next stages really make the difference - first time trying these products from MIG. When dry, they leave a matt almost grainy finish, which are perfect for rusting/aged metals. 6. Using a small piece of sponge, apply MIG Chipping. 7. Same as above but with MIG Rust Tracks applying over the previous colour but leaving some areas exposed. 8. Again the same as above with MIG Polished Metal, but in far fewer areas, focusing mostly on the edges etc. 9. Then it's adding some light rust pooling and streaks. 10. The final touch is the engine oil around pistons, joints etc. Link to comment https://bolterandchainsword.com/topic/347283-the-rebirth-of-a-titan-lessons-learnt/#findComment-5085250 Share on other sites More sharing options...
Dosjetka Posted May 18, 2018 Share Posted May 18, 2018 The work so far looks fantastic. I look forward to seeing more. :tu: Link to comment https://bolterandchainsword.com/topic/347283-the-rebirth-of-a-titan-lessons-learnt/#findComment-5085282 Share on other sites More sharing options...
Brother Desultor Posted May 18, 2018 Author Share Posted May 18, 2018 The work so far looks fantastic. I look forward to seeing more. Thank you. Link to comment https://bolterandchainsword.com/topic/347283-the-rebirth-of-a-titan-lessons-learnt/#findComment-5085301 Share on other sites More sharing options...
Bjorn Firewalker Posted May 18, 2018 Share Posted May 18, 2018 The metallic colors- including the subtle rust patterns- are expertly applied. The paint job is excellently done. Link to comment https://bolterandchainsword.com/topic/347283-the-rebirth-of-a-titan-lessons-learnt/#findComment-5085468 Share on other sites More sharing options...
Brother Desultor Posted May 18, 2018 Author Share Posted May 18, 2018 The metallic colors- including the subtle rust patterns- are expertly applied. The paint job is excellently done. Thanks very much. Link to comment https://bolterandchainsword.com/topic/347283-the-rebirth-of-a-titan-lessons-learnt/#findComment-5085515 Share on other sites More sharing options...
Torvak Kyre Posted May 18, 2018 Share Posted May 18, 2018 That skeleton is looking great. A big improvement. May I ask where you got the 4 oil colours and the blood varnish from. Might try out some of those techniques on some tank tracks. Link to comment https://bolterandchainsword.com/topic/347283-the-rebirth-of-a-titan-lessons-learnt/#findComment-5085544 Share on other sites More sharing options...
Lord Commander Eidolon Posted May 18, 2018 Share Posted May 18, 2018 It's a double edged sword when painting skills improve isn't it! Old models look that little bit off by comparison! You are always your own worst critic, but I'm on the verge of re-doing two/three of my own EC vehicles for this reason!! The original paint job wasn't bad, but the metal was pretty flat. The new technique works wonders, so rich and interesting to look at! Well done! I'm certain this will be a epic and worthwhile re-do!! Link to comment https://bolterandchainsword.com/topic/347283-the-rebirth-of-a-titan-lessons-learnt/#findComment-5085554 Share on other sites More sharing options...
Brother Desultor Posted May 18, 2018 Author Share Posted May 18, 2018 It's a double edged sword when painting skills improve isn't it! Old models look that little bit off by comparison! You are always your own worst critic, but I'm on the verge of re-doing two/three of my own EC vehicles for this reason!! The original paint job wasn't bad, but the metal was pretty flat. The new technique works wonders, so rich and interesting to look at! Well done! I'm certain this will be a epic and worthwhile re-do!! Praise indeed - thank you. Link to comment https://bolterandchainsword.com/topic/347283-the-rebirth-of-a-titan-lessons-learnt/#findComment-5085556 Share on other sites More sharing options...
Brother Desultor Posted May 18, 2018 Author Share Posted May 18, 2018 That skeleton is looking great. A big improvement. May I ask where you got the 4 oil colours and the blood varnish from. Might try out some of those techniques on some tank tracks. I’ll post details of the oil paints and what I assume you meant as “gloss” varnish in the morning. Link to comment https://bolterandchainsword.com/topic/347283-the-rebirth-of-a-titan-lessons-learnt/#findComment-5085559 Share on other sites More sharing options...
Torvak Kyre Posted May 18, 2018 Share Posted May 18, 2018 That skeleton is looking great. A big improvement. May I ask where you got the 4 oil colours and the blood varnish from. Might try out some of those techniques on some tank tracks. I’ll post details of the oil paints and what I assume you meant as “gloss” varnish in the morning. Yeah sorry. Can’t think of what I wrote to make my phone want to change it to blood? Cheers anyway. Link to comment https://bolterandchainsword.com/topic/347283-the-rebirth-of-a-titan-lessons-learnt/#findComment-5085594 Share on other sites More sharing options...
Eldrick Shadowblade Posted May 19, 2018 Share Posted May 19, 2018 Very cool project! Ever think about making a youtube of your new techniques? Link to comment https://bolterandchainsword.com/topic/347283-the-rebirth-of-a-titan-lessons-learnt/#findComment-5085726 Share on other sites More sharing options...
Brother Desultor Posted May 19, 2018 Author Share Posted May 19, 2018 That skeleton is looking great. A big improvement. May I ask where you got the 4 oil colours and the blood varnish from. Might try out some of those techniques on some tank tracks. I’ll post details of the oil paints and what I assume you meant as “gloss” varnish in the morning. Yeah sorry. Can’t think of what I wrote to make my phone want to change it to blood? Cheers anyway. Autocorrect does indeed throw up some interesting options at times....... This is the gloss varnish I use - purchased from Amazon. And these are the oil paints - again from Amazon but I am confident they are readily available elsewhere. As you specifically mentioned tank tracks, I thought you might be interested in this article I found and bookmarked with the intention of trying myself: http://www.secretweaponminiatures.com/index.php?main_page=page&id=2 I've bought the 4 pigments but as yet have not had the opportunity to try them. Very cool project! Ever think about making a youtube of your new techniques? Nooooo, I don't have the patience nor if I'm being honest, the inclination - but thanks for the compliment Link to comment https://bolterandchainsword.com/topic/347283-the-rebirth-of-a-titan-lessons-learnt/#findComment-5086211 Share on other sites More sharing options...
Recommended Posts
Archived
This topic is now archived and is closed to further replies.