Urauloth Posted August 3, 2022 Share Posted August 3, 2022 I love that Praetor! He looks like a tiny Lupercal. frankendoodle65 1 Back to top Link to comment Share on other sites More sharing options...
frankendoodle65 Posted August 3, 2022 Author Share Posted August 3, 2022 (edited) Thanks everyone! @Pearson73 that trophy rack's been hanging around for a while, it seemed obscenely large for a marine/terminator but I knew it would be handy somewhere! Bonding studs on the contemptor? Way ahead of you, I've already started but I'm not sure where to stop! @Shovellovin thanks! I'm afraid I don't have any rear WIP shots of extended mkiii legs, and I'm all out of mkiii legs so I can't even mock some up for you... But basically, on the back of the shins there's three overlapping plates and a sort of ribbed vent type detail. If you cut through just below the vent in the bottom plate, try to angle your cut so it doesn't go through any details on the front, then it's just a case of gluing it back together with a plasticard spacer. I tend to leave the spacer quite oversized, then trim and file it to match the contours of the leg. Hope that makes sense? It's basically the old fashioned true scale method but a little more fiddly with mkiii, I personally didn't bother with the thighs but you could probably do the same there. Once you add a small spacer at the waist they scale pretty favourably alongside the new mkvi. @Urauloth thanks! I've definitely been favouring angry bald heads so far on these guys, truly Sons of Horus I guess! Quick update on the contemptor, I've added a bunch of bonding studs and cables, made pteruges and a nice big eye of Horus for the groin plate. Plenty of greenstuff tidying up will follow, then I think it'll be on to chains and skulls! What does everyone think so far? I've only put studs on one leg and one side of the chest, shall I leave it at that or make it symmetrical? Shall I carry the studs around to the front of the leg or sculpt on some trim instead? Leave it plain? Too many options! Thanks everyone! Edited August 3, 2022 by frankendoodle65 Dr_Ruminahui, Agramar_The_Luna_Wolf, Trysanna and 13 others 13 3 Back to top Link to comment Share on other sites More sharing options...
Pearson73 Posted August 4, 2022 Share Posted August 4, 2022 Yippee! Love to see them, I think keep it asymmetric. Digging the cabling too, you're giving me lots of ideas for when I come to tackle this chap. frankendoodle65 and Marshal Mittens 2 Back to top Link to comment Share on other sites More sharing options...
FormelyKnownAsSmashyPants Posted August 4, 2022 Share Posted August 4, 2022 Great stuff man. If I ever pull the pin on HH it’ll either be SoH or WE. Yours look fantastic. What did you use to make the bonding studs on the Contempter? frankendoodle65 1 Back to top Link to comment Share on other sites More sharing options...
frankendoodle65 Posted August 4, 2022 Author Share Posted August 4, 2022 @Pearson73 thanks, I look forward to seeing what you do! This model's such a great starting point to get creative, I foresee more contemptors in my future too! @Captain Smashy Pants thanks, I'm a big fan of heresy WE too, the thought of an allied detachment has crossed my mind a few times already... If you ever go for it I look forward to seeing pictures! The bonding studs are from eBay, something like This - I'm afraid I can't remember what size mine are, I bought them a while ago with the hope of using them on power armour but clearly misjudged the size! Just a quick update for now, it's late and I've got work in the morning... I'm trying to squeeze in an hour or so of hobbying every evening, but it's easy to get carried away some nights! I thought the helmet was looking a little plain so wanted something a little more ornate. It's not perfect and I have no idea how I'll persuade it to fit back in its place, I expect I'll have to trim some off the back of the topknot and adjust the torso somehow, but I think it's worth the effort! Inspiration came from This fantastic sketch and you'll probably recognise a few other ideas I've stolen from there! batu, TheWarmaster, Elzender and 3 others 5 1 Back to top Link to comment Share on other sites More sharing options...
Pearson73 Posted August 5, 2022 Share Posted August 5, 2022 That helmet looks mega, really interesting to see a Contemptor with a top knot. I'm planning some layered panels, bonding studs and lots of cables to start with. Link to comment Share on other sites More sharing options...
frankendoodle65 Posted August 6, 2022 Author Share Posted August 6, 2022 Thanks @Pearson73, there's probably a good reason no other contemptors have topknots, it's a pain getting it to fit! Looking forward to seeing your contemptor, I've been having so much fun with studs and cables that I'm starting to wonder if I should have gone for iron hands too! Or maybe iron warriors, we can't be too goody goody here... I'll add it to the potential allied detachments list for the vague future. there's been a bit more progress on the contemptor, it's all getting down to detail work now so progress will be a bit slower, though I'm really looking forward to getting some paint on this guy! I'm thinking justaerin black and red like my terminator praetor, this guy's got some strong first company vibes. Ive added a cataphractii style shoulder trim. I was racking my brain for ways to model the cataphractii style layered shoulder plates while still keeping the overall profile of a contemptor, and I just couldn't think of a good way to go so this is a bit of a compromise but I'm happy with it. Still need to add rivets and iconography to the shoulders. Getting the head to fit was a real pain and there's still some tidying up to do - I had to saw off the arch behind the head and file some material away before reattaching it, originally it stuck out too far forward to allow the topknot in! I've also started adding chains, skulls and coins, I'm sure there'll be more before this model's done. The torso and arms are just blu-tacked in place for now, so the pose is a little off but you get the gist of it. As an HQ dread for Fury of the Ancients I thought a good old fashioned tactical rock and pointing stance seemed appropriate, and it's not something I've seen on a contemptor before. Marshal Mittens, TheWarmaster, CaptainFrederickson and 9 others 10 2 Back to top Link to comment Share on other sites More sharing options...
Marshal Mittens Posted August 7, 2022 Share Posted August 7, 2022 Your work is top tier! Really love your conversions, very inspiring! I need to up my game! Since the SoH do the coin thing and the golden skulls of their enemy thing, a piece of chain with small gold coins and/or skulls on it might be neat, to represent the dreads many victories. RocPSU on reddit is the only other person that's done a heavily converted SoH Contemptor. Your force looks excellent though, really awesome! frankendoodle65 1 Back to top Link to comment Share on other sites More sharing options...
Trysanna Posted August 7, 2022 Share Posted August 7, 2022 That's a mean looking dread, fantastic conversion work. They're really gonna standout on the table! Great use of Abaddon's trophy rack too. Always thought it was a bit much for the Warmaster but it works super well on Contemptor. Marshal Mittens and frankendoodle65 2 Back to top Link to comment Share on other sites More sharing options...
frankendoodle65 Posted August 9, 2022 Author Share Posted August 9, 2022 (edited) Thanks for the likes and comments everyone! @Marshall Mittens thanks, coins and skulls have always been the plan for this guy, hopefully you'll like the new pictures! Reddit totally confuses me but I managed to find the guy you mean, he's got some awesome minis so thanks for pointing me in his direction! @Trysanna thanks! Yeah that trophy rack's been in my bits box for a while now, I knew it would come in handy sooner or later. So just a few quick snaps for tonight, detailing work progresses and I think it won't be too long until I can get some paint on this guy. Sorry I couldn't get this shot remotely in focus! Basically added an arrow to the chest shield, added a few more coins to the chain on his shin and small rivets on the trim under his knee. All the fun stuff recently has been on the arms! Bonding studs, rivets, iconography and more chains, skulls and coins! I'm really feeling like this guy is at the final hurdle now, I'll probably glue everything together tomorrow and check over for any last details or tidying up I need to do before painting. In case anyone's interested, I think there's 17 skulls and 21 coins on this contemptor! Edited August 9, 2022 by frankendoodle65 Elzender, Dosjetka, BadgersinHills and 8 others 9 2 Back to top Link to comment Share on other sites More sharing options...
Pearson73 Posted August 10, 2022 Share Posted August 10, 2022 The arms look excellent, the shoulder details and trophy chains are ace. frankendoodle65 and Marshal Mittens 2 Back to top Link to comment Share on other sites More sharing options...
Marshal Mittens Posted August 11, 2022 Share Posted August 11, 2022 Looking really great! I need to do something to make mine look half as good, though I lack your conversion skill! That looks better than the SoH FW specific contemptor, imo. frankendoodle65 1 Back to top Link to comment Share on other sites More sharing options...
frankendoodle65 Posted August 11, 2022 Author Share Posted August 11, 2022 (edited) Thanks a lot guys! @Marshall Mittens I'm sure you'll do a great job with your contemptor, everything in your project log is great! To be honest I've never used plasticard to make trim or iconography like this before but it's surprisingly simple with a little time, patience and a sharp knife! I appreciate the greenstuff sculpting is a little more difficult if you're not used to it, don't talk yourself out of giving it a go though. This is probably the last pre paint update on the contemptor, unless someone has any great ideas for last minute additions or changes I'm hoping to get it primed on Saturday. After looking at some of the FW SoH minis I decided to extend the forehead trim down the nose line into a point. I also added a trim to the top of the torso, it felt like a bit of a blank area and I feel like it'll frame the head nicely once painted in gold. I know there's not a lot going on with the back, but I don't think it really needs anything to be honest. I've considered hanging chains from the reactor/engine, but I think I'm getting dangerously close to 40k chaos levels of over the top detailing already! The off white resin base doesn't show up well, but it started off like This and I've built up the rubble pile with cork and sand, added a couple of skulls and textured the road surface with AK wargame terrain asphalt. Edited August 11, 2022 by frankendoodle65 Metzombie, Trysanna, DaBoiKyknos and 13 others 13 3 Back to top Link to comment Share on other sites More sharing options...
Pearson73 Posted August 12, 2022 Share Posted August 12, 2022 Top notch, let's get some paint on! frankendoodle65 1 Back to top Link to comment Share on other sites More sharing options...
frankendoodle65 Posted August 12, 2022 Author Share Posted August 12, 2022 Thanks @Pearson73, I've just been out in the shed with some rattlecans so paint is now officially in progress! I had an idea that made perfect sense in my head, and I think I can make it work but I really should have practiced before potentially messing up a model I've already invested dozens of hours into! I thought I'd attempt a zenithal prime (not a technique I've ever tried before!) to speed up painting the black armour. However, my black primer was right at the end of the can, so it was intermittently cutting in and out mid spray and in my frustration and impatience I kept spraying and some areas got a little thick... Half an hour later I went back with grey primer, followed by white. Clearly army painter white spray isn't the best in the world because it seemed totally translucent apart from a few random white blobs and a slight gritty texture. So that's two spraying mishaps on one model! Luckily, my painting style is pretty heavy on drybrushing, washes and sponge weathering so I think I can get away with the bit of texture from the primers, hopefully it'll just blend in by the time I'm done. So the plan tomorrow is to pick out the cables, gun barrels etc. In a bright silver and then give everything a couple of coats of nuln oil which should hopefully bring the armour back down to black(ish) to form a good base for everything else. Hopefully there'll be a more interesting update in a day or two, I really just felt like venting after the mishap with the primer! batu, TheWarmaster, Trysanna and 2 others 4 1 Back to top Link to comment Share on other sites More sharing options...
Marshal Mittens Posted August 13, 2022 Share Posted August 13, 2022 It's hard to tell in a photo, but it doesn't look too bad. Maybe a tooth brush might be able to help get some of the grit off? frankendoodle65 1 Back to top Link to comment Share on other sites More sharing options...
frankendoodle65 Posted August 13, 2022 Author Share Posted August 13, 2022 Thanks @Marshall Mittens, the grittiness shows up more in person and in the original photo on my phone, but by the time it's displayed on the forum it seems a little softer, I expect there's some sort of image compression at work here? But that's a great suggestion thanks, I'm not sure I have a spare toothbrush knocking around but I'm sure I can find something to scrub it with. To be honest it's the white speckles that are bugging me more, particularly visible on the shoulders and top of the torso. I expect I can hide them with weathering though so I'm not too worried about it yet! I guess the lesson to be learnt here is to test out new techniques on a random monopose space marine instead of elaborately converted dreadnoughts! Marshal Mittens 1 Back to top Link to comment Share on other sites More sharing options...
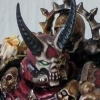
frankendoodle65 Posted August 13, 2022 Author Share Posted August 13, 2022 It's been too hot today so I've been hiding inside painting all day. I really got into the zone with this guy, I can't even remember the last time I painted an entire miniature in one day! Luckily as suggested by Marshall Mittens above, scrubbing with a stuff brush got rid of a lot of the grit from the primer and anything left got lost in the paintjob anyway. Trysanna, Dr_Ruminahui, LameBeard and 18 others 19 2 Back to top Link to comment Share on other sites More sharing options...
Pearson73 Posted August 14, 2022 Share Posted August 14, 2022 That was quick! Solid job mate, nice use of the Imperial Fists yellow as a spot colour. The discolouration on the base is nice too, makes it look more real. frankendoodle65 1 Back to top Link to comment Share on other sites More sharing options...
frankendoodle65 Posted August 18, 2022 Author Share Posted August 18, 2022 Thanks Pearson, I've always liked painting dirty, beat up yellow but never fancied a whole army of imperial fists, so a few casualties here and there will be great fun! Next up will be a squad if five chieftains from the Battle of Trisolian exemplary battle PDF. If these guys are all gang leaders they need to be pretty brutal with loads of individuality, I need to find a balance somewhere between my tactical marines and Praetors! I've ordered 3d printed shields and axes from Etsy, so in the mean time I'm working on the bodies and heads . From left to right; new mkvi torso sculpted to resemble the torso of the sons of Horus legion command from forgeworld. I've never quite understood why he has a tear drop shaped gem, but it gives a nice shape to the armour and looks pretty cool so I'm happy to copy it! Next is upscaled mkiv legs with a mkiii torso. I'm really pleased with how the head is looking on this guy, basically a miniature version of my contemptor. Guy in the middle is a new mkvi again with modified chest and groin armour (there must be a name for that!). I might carve out the belt buckle and sculpt some cabling similar to the FW reaver squad. Next is the new mkvi legs with a mkiii torso, nothing too exciting to show off here yet. And finally upscaled mkiv legs from the 40k tactical squad and a modified mkiv torso and pteruges. They'll all have the usual variety of skulls, chains, grenades, pouches etc. TheWarmaster, Dosjetka, CaptainFrederickson and 6 others 8 1 Back to top Link to comment Share on other sites More sharing options...
frankendoodle65 Posted August 19, 2022 Author Share Posted August 19, 2022 Going back pre plastic 30k, probably around 2013 ish I guess? I made some attempts at a loyalist sons of Horus force, it didn't get very far. But I made a standard bearer trying to copy the banner from the FW version, the banner itself was nice enough but the guy holding it was nothing to write home about... But with a few chains and skulls added, that banner is reusable, this is where it's at now... Already looks loads better, though I might move it to another guy as it's somewhat obscuring my favourite head! I've included another guy in the squad just to show a little progress there, I've added the cabling I mentioned in the previous post and I think it's a big improvement. I'm still waiting for chainaxes, shoulder pads and shields so progress may be a little slow until that arrives. phandaal, Elzender, Trysanna and 10 others 12 1 Back to top Link to comment Share on other sites More sharing options...
frankendoodle65 Posted September 6, 2022 Author Share Posted September 6, 2022 It's been a few weeks, took quite a while for the shields to arrive and waiting to carry on with these guys completely killed my hobby mojo! They finally arrived so I've made some progress, I'm really happy with how these guys are shaping up now - I just need to add some details to the shields and they'll be near enough ready for paint! You know this guy already, he's had some plasticard armour plates added to his belt and a nice beefy chainaxe. Side view shows just how plain these shields are. Some will get skulls, coins and chains, some will get the eye of Horus. Maybe even both on some! I'm loving this next guy, he's got so much attitude. I think the axe comes from an AOS blood warrior, it's been in my bits box for a while! Another AOS axe, this time combined with a thunderhammer shaft. This next guy still needs a little work, he somehow seems a bit generic. I'm all ears if anyone has any suggestions, I'm thinking he needs something adding to his chest plate. And I've added one more guy to the squad as I had a spare shield. Going for a Fafnir Rann vibe here, with the shield on his back and a "come at me bro" pose. He's based on a 40k CSM with some of the trim shaved off from his legs. And a back view - I'll add a strap to attach his shield to his backpack. The standard bearer hasn't changed since the last update, so that makes 6 guys if I'm counting right! I'll get some better photos in the lightbox after the final round of detailing and before painting. As always I appreciate any input and ideas, It's always good to get a fresh set of eyes on things. Trysanna, batu, Elzender and 6 others 8 1 Back to top Link to comment Share on other sites More sharing options...
frankendoodle65 Posted September 17, 2022 Author Share Posted September 17, 2022 Been a bit slow with the hobby progress lately, but I've made a start on painting the first three men of the chieftain squad. The teal armour is nearly finished - once I basecoat the gold and silver, everything will get a wash of agrax earthsade, which dulls down and dirties the armour nicely. I've added some detailing to the shields to give a bit of variety. The other two are just rocking their primer at the moment, I've decided to paint them in two smaller groups because there's a lot going on with these guys! Dr_Ruminahui, CaptainFrederickson, Trysanna and 7 others 9 1 Back to top Link to comment Share on other sites More sharing options...
Pearson73 Posted September 18, 2022 Share Posted September 18, 2022 Really liking those shield designs! Can't wait to see what the Iron Tenth get from the exemplary battles, I want to get building something funky. frankendoodle65 1 Back to top Link to comment Share on other sites More sharing options...
Marshal Mittens Posted September 18, 2022 Share Posted September 18, 2022 You have some really top notch conversions! Very inspiring! frankendoodle65 1 Back to top Link to comment Share on other sites More sharing options...

Recommended Posts
Create an account or sign in to comment
You need to be a member in order to leave a comment
Create an account
Sign up for a new account in our community. It's easy!
Register a new accountSign in
Already have an account? Sign in here.
Sign In Now