Search the Community
Showing results for tags 'Freeblade'.
Found 9 results
-
Moiraxes Part 5 – Finalized models
Bouargh posted a blog entry in AM Not-Stygies - A Blog about building a new Army
Hi Folks, Xmas period is now over and I have managed time between sweet potatoes and turkey in order to complete the assembly of the Moiraxes. Torso glueing and arms fitting has been a 10 sec job or almost. The main output expected was answering the key question: “Will my scheme balance the big grey block effect?”. I guess the answer is a “Yes”. Or at least, I am satisfied enough by the results. The bonish quadrant does the job (but I had little doubt about this as I had the same result on the Styrix). The red touches counterbalance the predominance of the Eshin grey too and gives the equilibrium needed without falling into something otT. Heads were made mainly red too for the armored masks, while the Mechanicum Skull gives the dark touch needed. Other heads are kept as spares for eventual future Armigers or to be traded in a bits fair. The two Moiraxes with Claw are very similar, with only difference brought by head swaps. The Laslock Moirax is, on the other hand, a kind of lone ranger with its specific and distinctive colour scheme, with red legs panels and a full red face plate. Weapons are also with red panels while pauldrons were kept as per its big daddy’s scheme, bone abd grey. I am quite satisfied with the result. These additions bring me something like 450pts to be added to my pool of units to be selected for while building my AdMech forces. It also opens the door to a Knight Force, although atm limited to the Questor Forge Pact detachment. And that’s it for 2025! See you next year. -
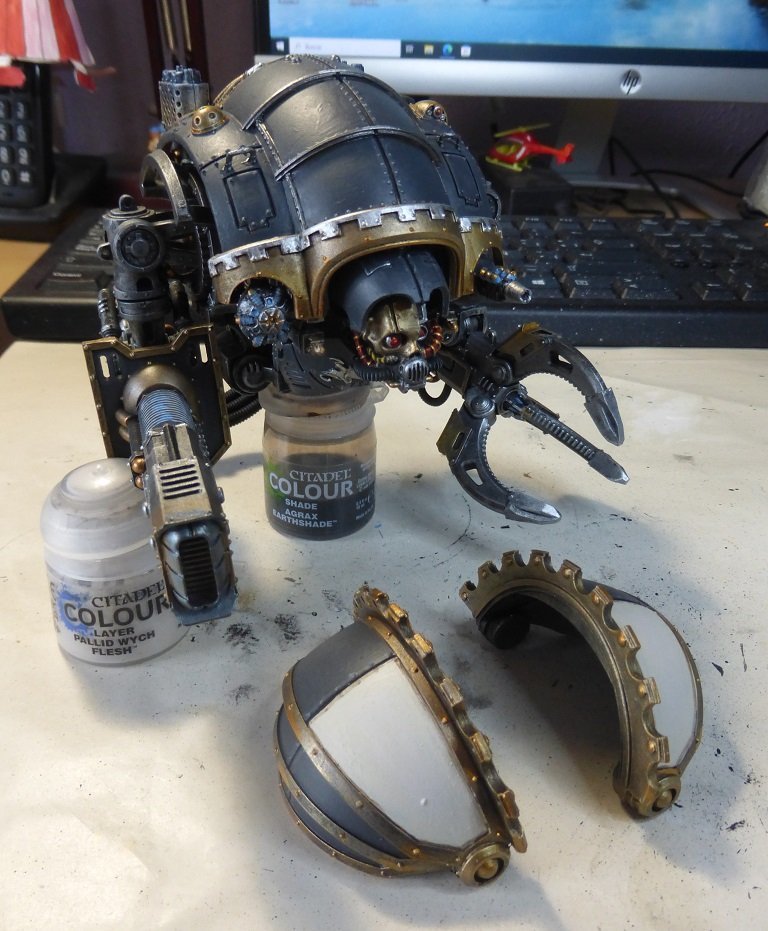
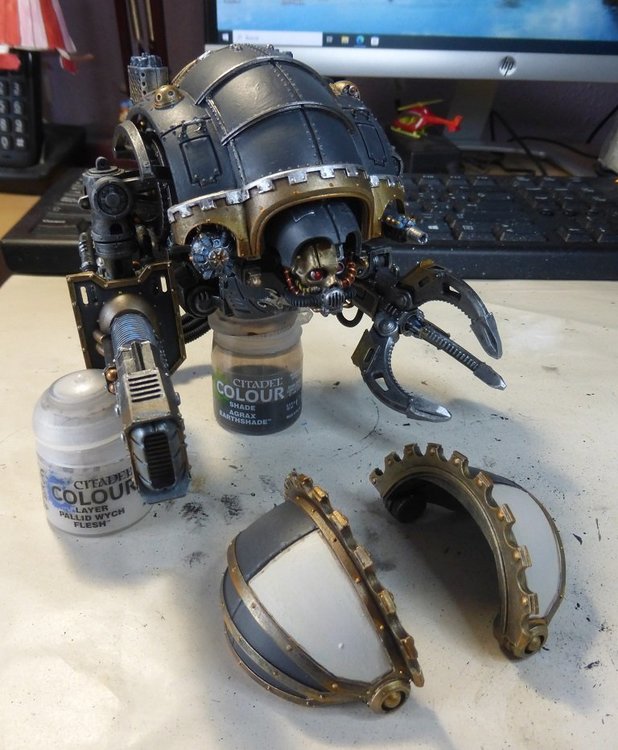
Hi Folks, So, the challenging step is now how to break the monochrome aspect of the Moiraxes.… Weapons can bring some interesting changes to a model thanks to colored cables, coils and somehow armor panels. The GW color scheme for the Moiraxes shown on the sites, all bone with red panels on the Laslocker, are a good example. I have decided to do the same for the latter, while the Gyges Claw bearers will get pauldrons with a touch or red. As my stripes attempt was a fail on the hull, I have decided to give up that way and go plain red on one panel instead. Work done on th pauldrons can be seen here: I have now allthe parts painted and I do need to step to the assembly and final glueing + decals. Nice little project so far.
-
Hi Folks, After painting, assembly and basing of the legs, paint job has continued with the cockpits. It has required some thinking steps before putting the first touch of color. Well not really as black undercoat and metal dry brush did not need that kind of auto reflexive step… Once metal has been done, the decision making was done by elimination: 1. Getting the back of the hull as per the one I have done for the Styrix: bronze back. 2. Keep the Eshin grey as a main color 3. Add some variations For the variation I have started trying red stipes on one half of the hull. Even If I made serious progresses in my precision cutting and pasting of tapping It has not been convincing, mainly because of the angle break of the upper hull which gave a odd outlook for the stripes. A second attempt with bicolor hull with one half red and a second one grey was not more convincing. So I have ended with plain grey and only a pair of hoods red. Variations will be brought by pauldrons instead. Now that I have 3 pairs of legs and cockpits painted, and despite the color break brought by the basing, the pre-assembled stuff looks very monolithic. I will need something the break this aspect with Pauldrons. Models are DEFINITIVELY in need of some relief. See you later when I will have made some progress on “how to bring depth and eye-catching impact on big grey blocks”.
-
Hi Folks, Following pre-building of the legs and carapace, instead of keeping going on with weapons, I have shifted to paint jobs. Starting with the legs. The idea was getting some progress while not being fully decided about how the carapace and cockpit will be done. My Korvax inspired scheme is rather easy to apply plain Eshin grey with recesses in Administratum grey and highlight with Mechanium Standard grey. But is there some room on the armor panels for some secondary color? On big chassis sure there is but on Moiraxes, space left available is limited. Though less limited on Moiraxes than on other types of Armigers. For these lads, I have decided to apply a limited amount of secondary color, aiming at 2 distinct patterns: a bonish one for the Gyges claw bearers and a red one for the Laslocker. A single leg as been set bicolor (the left one) in each case. After starting only with the lower panel I finally ended doing also the upper panel. Rest is easy: robots support largely the dry brushing as a main technique and as a result it goes fast painting these lads. The basing was also in line with my usual approach: Tan earth and Kislev Flesh brush applied on limited texture plus some tufts. Yet, the future Laslock Moirax received a deeper work with some ruins added, using old 3rd Ed. Plastic ruin floor, rocks and some left over bitz from Administratum buildings. I let you consider the job so far. Next step will be cockpits: now that I have ignited the paint job, I can’t stop in the middle of the way. See you.
-
Hi Folks, After a long time wondering if I might add a knight to my AdMech as a Freebalde in order to boost my armoured support, I succumbed to the charm of a Styrix knight some times ago. But the latter, even if it is a nice center piece, tends in some case to be under scoring and with a rather low Return on Investment. I might play it in the wrong way. Or it is a too obvious bullet catcher. Or a single Freeblade is not an optimum set up. Or everything at the same time. The diagnosis I set led me to seek for a different way of freeblading the armored support, moving toward a cadre of 3 Armigers. But which ones? Helverin and Warglaives are OK and the fact that the kits are now merged in a single box allows getting AdMech styled pauldrons even for Helverins. Yet I have decided moving toward Moiraxes instead. The lighting lock weapon type and the skull heads were to be accounted into my decision. I have indeed decided to get these for the look they have. Rule of Kool again. The 3 kits I bought were split into one Moirax with 2 LasLocks and a pair of Volkite with Claw chassis. Their advantages are that these are not Legendary units, but FW, which may account to their eligibility in some games easier than not updated Legends. And that they are Battleline too. So, in case of extending my gathering of Knights in the coming months, it might be a circumstantial benefit – for what it worths and for what it stays. Yet, as the base case for Freeblades is 1 big knight or up to 3 Armiger chassis, this addition opens the option for getting these 3 lads distributed at various places in the battleline with a potential survivability superior to a single knight. Firepower will be distributed and if I loose one or two in a turn, the third one will still have the possibility to do something. It is like getting the eggs out of the single basket. A kind of balanced approach that might be interesting to get in some cases (such as bright/dark lances heavy armies or when facing other knights for example). Initial steps after getting the models were cleaning and priming before starting sub-assemblies. Legs were quite OK to build, even if the instruction leaflet has at least one error for the pelvic area of the battle robots. But it was easily corrected. The upper body and pilot block was more or less smooth to assemble. Yet the usual suspects that are deformations for the resin parts due to demolding conditions were observed. How to solve this? One could have been treated by mean of gap filling, but this is really an option for small defects and bubbles or damages IMHO. In that case, the solution is hot bending just as for the more major deformation. A small bath in hot water (60°C approx.), plus a smooth bending in position, et voilà! A perfect result. When working with resin, hot pot is your friend! Rest of the job was rather straight forward, and the main sub-assemblies were done promptly. Next step will be weapons, and then I will be able to shift to paint job. Scheme will have to be decided first, even if I will try to stay aligned with my Styrix big brother and its color pallet inspired by House Korvax. See you for next steps probably after Seasons’ greetings.
-
Some WIP actualization of my styrix knight, to be used as a Freeblade in my Skitarii force. The colour scheme is inspired from Korvax Infernal household, turned loyalist. Iconography will disappear, letting room to.. I do not know yet. At the moment, upper part is almost complete and legs miss armour plates and scenic base. But I see the end. I should have enlisted it in 12 Months of Hobby, but I did not though when I started that I could do it in 1 month... Anyway, more pics in my blog as usual:
-

Version v2
874 downloads
Death's Redeemers custom chapter by commission of Kydoimos (possible Dark Angels successor). In addition to the described chapter, includes logos for a Freeblade Knight (intended for ion shield, and knee and ankle armor). (File version 2 adds a star with blood drop below the tip of the scythe. This new element has been added as a separate layer in the PDF, so you can toggle it off if you prefer just the winged scythe logo.) -
1413 downloads
By commission from Griz. Imperial Knights Freeblades. Includes all Freeblades in the 2015 Codex: Imperial Knights (excluding the Obsidian Knight, who appears on the sheet included with the Imperial Knight kit). Intended to be printed on clear deal paper and placed on a white/light color background - black logos can go on most backgrounds without an issue. Other notes: The main logo for Auric Arachnus has not been separated into carapace and shoulder sections - test fit and trim as needed. The logos for Dyros Kamata are shown complete and in tact. Recommend the House Hawkshroud livery for his ion shield, and all decals except the banner be severely distressed/damaged to achieve the 'run through a volcano' look. To blend the decals into the correct background color, I recommend placing the decals in position, set/seal the decal, and once dry use paint to blend the decal into the final background color. -
Hi there. A small (or not so small as we talk of towering war machines) question regarding Freeblades and/or Knight of the Cog associated to other Imperium forces. How do you recommend selecting the Knight type and its tooling up? Do you foresee a Knight configurated to compensate some weaknesses of the army - for example a HtH oriented Knight into a gunline AdMech? Do you rather foresee a Knight configurated in order to amplify a strong feature of the army - for example a big firing platform supporting an Adeptus Militarum armoured fist company? Something else, like an odd configuration developped to work on its own and do its business independantly of the rest of your main force/cool factor/Unit with a specific purpose-preferred enemy type? I am planning to include a Knight in an AdMech army (or at least I was until I decided to wait and see how it would end up with the 10thEd rules...). I am really hesitating between something like a Warden (Case 1. with gauntler) vs. a Castellan (Case 2.). I see Errant (with missile pod) as a potential mid run between the two. Other option would be a Styrix based on the Category 3. (Others - cool factor, which is by the way how I designed my AdMech force so far). As I also own a qite significan First born SW force, any mutualization option could be great although non mandatory. But seen that I have almost 20k Pts I can literally tool up any game type wity these SW, from Heavy armoured to deep strike only force. So any type of combination would probably fit, even if I play rather Gunline with counter attack in general. Any opinion, clue or advise? Thanks