Kierdale Posted March 31, 2012 Share Posted March 31, 2012 Very nice work, 'Six! The gold(bronze?) on the Sternguard is particularly nice...care to share the recipe? The green - particularly on the librarian - contrasts really nicely with the silver. And you did a good job on the face! Don't knock it. You could add a little flesh-grey mix as stubble across the top of his head, perhaps. The VVs also look great and you've done a great job on those powerswords! The huge axe looks like the haft is a bit bent, which detracts from an otherwise very impressive weapon! Could you straighten it? Perhaps add a long trailing purity seal wrapped round the haft too? That would break up the featureless length. Link to comment https://bolterandchainsword.com/topic/233362-silver-skulls-gideon-battle-tanks/page/4/#findComment-3028944 Share on other sites More sharing options...
SickSix Posted March 31, 2012 Author Share Posted March 31, 2012 Very nice work, 'Six!The gold(bronze?) on the Sternguard is particularly nice...care to share the recipe? Well there is a mixture of bronze and brass. To get a darker effect I used Vallejo Game Color Hammered Copper as a base and then a thinned highlight of VGC Brassy Brass and then a sepia wash. To get the brighter effect I used a base of VGC Brassy Brass and then a thinned highlight of VGC Bright Bronze with sepia wash. The green - particularly on the librarian - contrasts really nicely with the silver. And you did a good job on the face! Don't knock it. You could add a little flesh-grey mix as stubble across the top of his head, perhaps. I was very pleased with the green on the Libby. I am definitely going with green for my company color now. The face only looks 'decent' because the camera can't focus any closer! haha. I will work on it some more later. The VVs also look great and you've done a great job on those powerswords! The huge axe looks like the haft is a bit bent, which detracts from an otherwise very impressive weapon! Could you straighten it? Perhaps add a long trailing purity seal wrapped round the haft too? That would break up the featureless length. Thanks. The power swords were a pain in the but! I used the airbrush and masking technique. I had one power sword totally fail on my though as a huge chunk of paint came off with the tape! Luckily it was on the underside of sword so you couldn't really see it. I am going to try wet blending next time. The axe is slightly bent, however the connection between it and the model is very fragile and it will probably stay as is. It's actually better than it was as I did straighten it a little in hot water. And I will look at adding more detail and effects to the weapon later. Thanks for the compliments, tips and constructive critique! Link to comment https://bolterandchainsword.com/topic/233362-silver-skulls-gideon-battle-tanks/page/4/#findComment-3029073 Share on other sites More sharing options...
Pyroriffic Posted March 31, 2012 Share Posted March 31, 2012 I am truly loving watching these fellas take shape. They're pretty darned delicious. Link to comment https://bolterandchainsword.com/topic/233362-silver-skulls-gideon-battle-tanks/page/4/#findComment-3029375 Share on other sites More sharing options...
SickSix Posted April 1, 2012 Author Share Posted April 1, 2012 I am truly loving watching these fellas take shape. They're pretty darned delicious. THANK YOU! I consider it very high praise to receive a compliment from the Silver Skulls BL author! Link to comment https://bolterandchainsword.com/topic/233362-silver-skulls-gideon-battle-tanks/page/4/#findComment-3029514 Share on other sites More sharing options...
SickSix Posted April 4, 2012 Author Share Posted April 4, 2012 So having all black vehicles sucks. I am glad they are not 100% black though as I did mix black and a dark grey color. Anyways, here's my first attempts at highlighting vehicles. The pictures aren't great I know. But looking for feedback on whether it's too much or not enough or how to do it better. I don't know if you can really tell but there is a little 'bare metal' effect on the edges here and there so it looks like the paint was scraped away. Haven't attempted any real battle-damage effect yet. So any feedback is appreciated. Link to comment https://bolterandchainsword.com/topic/233362-silver-skulls-gideon-battle-tanks/page/4/#findComment-3031938 Share on other sites More sharing options...
Lachdannan Posted April 5, 2012 Share Posted April 5, 2012 I think the highlighting is good. if you really want to make it pop, then go for the next shade higher of grey and do the extreme edges. But they do look good as it is. For the battle damage, generally you need to have a colour underneath the metal stroke, like scorched brown or Charadon granite, to look like the paint had been scorched. I'd try one of these and then paint the metal. I think it will have a better effect than just going from black to metal. Link to comment https://bolterandchainsword.com/topic/233362-silver-skulls-gideon-battle-tanks/page/4/#findComment-3033240 Share on other sites More sharing options...
SickSix Posted April 6, 2012 Author Share Posted April 6, 2012 Thanks Brother Syth. I will probably use a dark grey under the metal as you suggest. Link to comment https://bolterandchainsword.com/topic/233362-silver-skulls-gideon-battle-tanks/page/4/#findComment-3033271 Share on other sites More sharing options...
SickSix Posted April 17, 2012 Author Share Posted April 17, 2012 And bow for something completely different... A teaser of the surprise birthday present for my brother from another mother Link to comment https://bolterandchainsword.com/topic/233362-silver-skulls-gideon-battle-tanks/page/4/#findComment-3041279 Share on other sites More sharing options...
SickSix Posted April 18, 2012 Author Share Posted April 18, 2012 So I have problems with fine detail, proper paint thickness and fast drying paint. This trio of problems became a frustrating nightmare trying to paint these damn wings! So I have to thin the paint a LOT (what you see is 4-5 coats) to avoid problems with the paint on the tip of the brush drying nearly instantly. I just can't figure out how some people seem to get good coverage in one pass and not have the paint dry on the brush. I guess white just really exasperates the problem. Link to comment https://bolterandchainsword.com/topic/233362-silver-skulls-gideon-battle-tanks/page/4/#findComment-3042205 Share on other sites More sharing options...
Dark Apostle Thirst Posted April 18, 2012 Share Posted April 18, 2012 You seem to be doing pretty good :( Link to comment https://bolterandchainsword.com/topic/233362-silver-skulls-gideon-battle-tanks/page/4/#findComment-3042410 Share on other sites More sharing options...
Rik Lightstar Posted April 18, 2012 Share Posted April 18, 2012 Hi Six, with drying issues are you using a "wet palette" and a "flow aid"(or medium) to thin your paints? Link to comment https://bolterandchainsword.com/topic/233362-silver-skulls-gideon-battle-tanks/page/4/#findComment-3042483 Share on other sites More sharing options...
SickSix Posted April 18, 2012 Author Share Posted April 18, 2012 Hi Six, with drying issues are you using a "wet palette" and a "flow aid"(or medium) to thin your paints? I have tried a wet palette. The issue is once the paint is on the brush and moved toward the model. I use water and have tried using Vallejo's air brush thinner but it doesn't seem as effective when brushing. Literally the paint on the end of the brush will dry while having a bulb of wet paint half way up the hairs. I am using a kolinsky brush. Link to comment https://bolterandchainsword.com/topic/233362-silver-skulls-gideon-battle-tanks/page/4/#findComment-3042488 Share on other sites More sharing options...
Bat33.1 Posted April 18, 2012 Share Posted April 18, 2012 So I have problems with fine detail, proper paint thickness and fast drying paint. This trio of problems became a frustrating nightmare trying to paint these damn wings! So I have to thin the paint a LOT (what you see is 4-5 coats) to avoid problems with the paint on the tip of the brush drying nearly instantly. I just can't figure out how some people seem to get good coverage in one pass and not have the paint dry on the brush. I guess white just really exasperates the problem. Try some Winsor & Newton Acrylic Flow Improver or possibly better still with Vallejo paints some Vallejo Retarder Medium. The retarder will slow drying times quite a bit depending on how much you add but it is designed to help with wet blending so should cure quick drying too. Link to comment https://bolterandchainsword.com/topic/233362-silver-skulls-gideon-battle-tanks/page/4/#findComment-3042760 Share on other sites More sharing options...
SickSix Posted April 18, 2012 Author Share Posted April 18, 2012 Thanks for the tip PJ1933. I will look for some of the vallejo stuff since I primarily use their paints. Link to comment https://bolterandchainsword.com/topic/233362-silver-skulls-gideon-battle-tanks/page/4/#findComment-3042762 Share on other sites More sharing options...
YoungWolf7 Posted April 20, 2012 Share Posted April 20, 2012 I have tried a wet palette. The issue is once the paint is on the brush and moved toward the model. I use water and have tried using Vallejo's air brush thinner but it doesn't seem as effective when brushing. Literally the paint on the end of the brush will dry while having a bulb of wet paint half way up the hairs. I am using a kolinsky brush. I suspect that your brush is actually too small. Try using a larger brush. I know it sounds counter-intuitive, but a larger brush holds more paint, keeping the paint wet longer in brush. The smallest brush I use usually is a WN Series 7 1 (full size). I use a 2 for the larger areas. Link to comment https://bolterandchainsword.com/topic/233362-silver-skulls-gideon-battle-tanks/page/4/#findComment-3044227 Share on other sites More sharing options...
SickSix Posted April 20, 2012 Author Share Posted April 20, 2012 I have tried a wet palette. The issue is once the paint is on the brush and moved toward the model. I use water and have tried using Vallejo's air brush thinner but it doesn't seem as effective when brushing. Literally the paint on the end of the brush will dry while having a bulb of wet paint half way up the hairs. I am using a kolinsky brush. I suspect that your brush is actually too small. Try using a larger brush. I know it sounds counter-intuitive, but a larger brush holds more paint, keeping the paint wet longer in brush. The smallest brush I use usually is a WN Series 7 1 (full size). I use a 2 for the larger areas. That's actually a very interesting point! I shall try a larger brush. I have been using a W&N 7 size 0. I believe I do have a size 1. I shall try it. Link to comment https://bolterandchainsword.com/topic/233362-silver-skulls-gideon-battle-tanks/page/4/#findComment-3044230 Share on other sites More sharing options...
YoungWolf7 Posted April 20, 2012 Share Posted April 20, 2012 Is it a mini (short bristles) or a full size (longer bristles)? I don't use the minis for that very reason. :lol: Link to comment https://bolterandchainsword.com/topic/233362-silver-skulls-gideon-battle-tanks/page/4/#findComment-3044241 Share on other sites More sharing options...
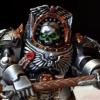
Tybrus Posted April 21, 2012 Share Posted April 21, 2012 A small update. I have got some Vallejo Model Air Chrome and I think it really stands out as my 'silver' highlight. I tried it first on my Terminators. And here is a WIP shot of the first two Dreadnoughts. Where is the skull from on the termi's? They look great! My guest would be tom blords? Link to comment https://bolterandchainsword.com/topic/233362-silver-skulls-gideon-battle-tanks/page/4/#findComment-3044369 Share on other sites More sharing options...
SickSix Posted April 21, 2012 Author Share Posted April 21, 2012 The helmets and the skull trophies are from Maxmini.com Thanks, I really want to finish all my Terminators, but of course I need to finish this darn furioso dread before I get back to my own army. Link to comment https://bolterandchainsword.com/topic/233362-silver-skulls-gideon-battle-tanks/page/4/#findComment-3044370 Share on other sites More sharing options...
Pyroriffic Posted April 24, 2012 Share Posted April 24, 2012 I like the latest pics; I like how bright the Air Chrome makes them look. Link to comment https://bolterandchainsword.com/topic/233362-silver-skulls-gideon-battle-tanks/page/4/#findComment-3046381 Share on other sites More sharing options...
SickSix Posted April 24, 2012 Author Share Posted April 24, 2012 So I saw these posted on Dakka..... I must have some! http://4.bp.blogspot.com/-Wg1hZkW9hw4/T3SWOge7rSI/AAAAAAAABDM/uCSdpfjCvCQ/s1600/warhammer40k_28mm_resin_skull_helmets_painted.jpg Of course I will have to assemble MOAR marines to use them..... Link to comment https://bolterandchainsword.com/topic/233362-silver-skulls-gideon-battle-tanks/page/4/#findComment-3047038 Share on other sites More sharing options...
rifter72 Posted April 24, 2012 Share Posted April 24, 2012 found the site for the skulls http://www.shapeways.com/shops/customminis Link to comment https://bolterandchainsword.com/topic/233362-silver-skulls-gideon-battle-tanks/page/4/#findComment-3047054 Share on other sites More sharing options...
Pyroriffic Posted May 14, 2012 Share Posted May 14, 2012 Have a conversion for Argentius, put together and painted by my Far Too Talented For His Own Good other half. http://img526.imageshack.us/img526/7442/argentius.jpg Link to comment https://bolterandchainsword.com/topic/233362-silver-skulls-gideon-battle-tanks/page/4/#findComment-3061035 Share on other sites More sharing options...
SickSix Posted May 14, 2012 Author Share Posted May 14, 2012 Oh wow. That is fantastic! /jealous Link to comment https://bolterandchainsword.com/topic/233362-silver-skulls-gideon-battle-tanks/page/4/#findComment-3061106 Share on other sites More sharing options...
SickSix Posted May 22, 2012 Author Share Posted May 22, 2012 So I have come to a stopping point on the Furioso for my friend. I would like to do a little more detail work but it's already a month late. I know one thing, my edge highlighting needs a LOT of work. This thing taught me a lot and showed me a lot of areas I need more practice on. I hope the receiver of this gift is pleased. Link to comment https://bolterandchainsword.com/topic/233362-silver-skulls-gideon-battle-tanks/page/4/#findComment-3066649 Share on other sites More sharing options...
Recommended Posts
Archived
This topic is now archived and is closed to further replies.