lamby Posted August 9, 2018 Author Share Posted August 9, 2018 This keeps getting better and better! That upper deck bit is a sweet conversion! Thanks hushrong! Decided to add more weight and depth to the removable upper deck, so added styrene and a GS/milliput mix: Then cut to shape and sanded smooth, and here's the result: I may end up going back in to add a line or two of rivets, but for now, it's done. Moving on - the gaps where the air-ballon support structures usually attach have been bugging me for a while, so time to fix that: Took two of these Gundam vent thingys: Which fairly obviously are the wrong shape, so a bit of styrene and GS/milliput shaping and sanding, and we end up with this: Thanks for looking!!! Master Toddius, hushrong, Exilyth and 1 other 4 Back to top Link to comment https://bolterandchainsword.com/topic/289365-inqusitor/page/20/#findComment-5141867 Share on other sites More sharing options...
hushrong Posted August 10, 2018 Share Posted August 10, 2018 Great update! All these little details just add much more to the mini and it's nice to see it at these stages. Really makes me appreciate the miniature more since we get see all the work that went into it. Link to comment https://bolterandchainsword.com/topic/289365-inqusitor/page/20/#findComment-5142216 Share on other sites More sharing options...
ElDuderino Posted August 10, 2018 Share Posted August 10, 2018 I love seeing this come together, very nice kitbashing. Especially since most of it is smooth curves, not a 90° angle in sight. Impressive! Link to comment https://bolterandchainsword.com/topic/289365-inqusitor/page/20/#findComment-5142226 Share on other sites More sharing options...
lamby Posted September 5, 2018 Author Share Posted September 5, 2018 Great update! All these little details just add much more to the mini and it's nice to see it at these stages. Really makes me appreciate the miniature more since we get see all the work that went into it. I love seeing this come together, very nice kitbashing. Especially since most of it is smooth curves, not a 90° angle in sight. Impressive! Thanks guys!! Just back from yet another work-related hiatus, so on with the show! With the more complicated phase of the build coming to an end (I think), time for more detailing. Made the helm pedestal using an old Warhammer gravestone and the larger Ironclad wheel: Added some more bits to the engine area (everything not sprayed black) including a sheet-styrene bulkhead - most of these bits will never really be seen of course... Then took the plumbing and gauge from this unused section of the Frigate: and attached it to the side hull: Plenty more to follow, thanks for looking! Master Toddius, Subtle Discord, Exilyth and 1 other 4 Back to top Link to comment https://bolterandchainsword.com/topic/289365-inqusitor/page/20/#findComment-5161041 Share on other sites More sharing options...
Subtle Discord Posted September 5, 2018 Share Posted September 5, 2018 A fine bit of 'bashing going on here. What's not to like? Link to comment https://bolterandchainsword.com/topic/289365-inqusitor/page/20/#findComment-5161050 Share on other sites More sharing options...
sockwithaticket Posted September 7, 2018 Share Posted September 7, 2018 The steering wheel is such a simple yet brilliant kitbash. Link to comment https://bolterandchainsword.com/topic/289365-inqusitor/page/20/#findComment-5163053 Share on other sites More sharing options...
Jackalwolf Posted September 9, 2018 Share Posted September 9, 2018 You sir are a madman. This is amazing! Perfect transport for the new rogue trader kill team! Link to comment https://bolterandchainsword.com/topic/289365-inqusitor/page/20/#findComment-5163796 Share on other sites More sharing options...
hushrong Posted September 10, 2018 Share Posted September 10, 2018 These details are knocking it out of the park. I love the helm you made, that is an awesome bash of bits to make a central part of your ship! Link to comment https://bolterandchainsword.com/topic/289365-inqusitor/page/20/#findComment-5164489 Share on other sites More sharing options...
lamby Posted September 15, 2018 Author Share Posted September 15, 2018 A fine bit of 'bashing going on here. What's not to like? The steering wheel is such a simple yet brilliant kitbash. You sir are a madman. This is amazing! Perfect transport for the new rogue trader kill team! These details are knocking it out of the park. I love the helm you made, that is an awesome bash of bits to make a central part of your ship! Thanks guys! So, another round of detailing over the last two weeks. Took the sealing tab off a honey squeeze-container: Spent some time on the Dremel-lathe: Ended up with this fill-in greeblie: Next up - took this vent thingy from the Frigate kit: And with some slice n dice and some fiddly styrene work: Moving on - been wondering for a while what to do with these wing stubs: Tried the wing minus the propellors: But didn't like them cos overall they seemed to unbalance the model. So I went on a bitz hunt through many, many containers of plastic crack, and eventually found a set of rocket-pods from a 1/35th scale Cobra (I think...) which with a bit of slice n dice ended up looking like this: Then finished up the week with some minor details: Next week I'll be gluing the hull halves on, building the last of the housing for the chin-turret, then a final round of detailing and the end is nigh! Thanks for looking! Kriegsmacht, hushrong, Master Toddius and 1 other 4 Back to top Link to comment https://bolterandchainsword.com/topic/289365-inqusitor/page/20/#findComment-5167143 Share on other sites More sharing options...
hushrong Posted September 15, 2018 Share Posted September 15, 2018 Another awesome update! As always I’m seriously loving the level of detail you are adding! lamby 1 Back to top Link to comment https://bolterandchainsword.com/topic/289365-inqusitor/page/20/#findComment-5167235 Share on other sites More sharing options...
Bjorn Firewalker Posted September 15, 2018 Share Posted September 15, 2018 Your kitbashing is well done. lamby 1 Back to top Link to comment https://bolterandchainsword.com/topic/289365-inqusitor/page/20/#findComment-5167237 Share on other sites More sharing options...
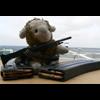
lamby Posted October 26, 2018 Author Share Posted October 26, 2018 Another awesome update! As always I’m seriously loving the level of detail you are adding! Your kitbashing is well done. Thanks guys! Meanwhile... Extremely short one pic update - Gun Skiff on the painting bench with first rust layer added and handy Ian McQue reference pic in the background! deathspectersgt7, hushrong and Master Toddius 3 Back to top Link to comment https://bolterandchainsword.com/topic/289365-inqusitor/page/20/#findComment-5179518 Share on other sites More sharing options...
hushrong Posted October 26, 2018 Share Posted October 26, 2018 Very happy to see some paint on there! lamby 1 Back to top Link to comment https://bolterandchainsword.com/topic/289365-inqusitor/page/20/#findComment-5179549 Share on other sites More sharing options...
lamby Posted October 30, 2018 Author Share Posted October 30, 2018 Very happy to see some paint on there! Thanks hushrong! Hoping I can do it justice! Painting at last - slowly, but still... Need to do a test run of some Tamiya spray colors as I don't own an airbrush. So, following the first layer of Vallejo Flat Brown, did some drybrushing/speckling with GW Ryza Rust, then some sponging-on of GW Leadbelcher to get this: I really like this effect, so much of the hull below the 'waterline' will be bare metal/rust - adds interest because the whole model won't be just one or two painted surfaces. Following a protective gloss varnish coat, sprinkled salt onto the wet surface: Unfortunately the water-method seems to dissolve a lot of the salt, so I will have to invest in some cheap hairspray - also, with hairspray as the medium between the gloss coat and the sprayed color layer, you can selectively remove areas with a bit of light scrubbing with a stiff brush or toothbrush or even a toothpick. Then sprayed Tamiya Flat White over the top: Which left me with this effect: Now, you might notice the Flat White has flowed around the salt and left a small raised edge - this was due to over-eager spraying on my behalf. While I'm okay with the result, I'll be redoing it next weekend (no hobby time during the week at the moment.) Things I'm going to change are: Brush on a Ryza Rust/VJ Orange mix to lighten the VJ Flat Brown rusty undercoat; Let the gloss coat dry overnight; Crush the salt more so the chips are smaller and more random - also sponge on liquid frisk in some targeted areas where I need the rust to show through; Spray the Tamiya Flat White in a series of layers with drying time between them. Thanks for looking! ranulf the revenant, Sgt. Blank, Markus_ and 4 others 7 Back to top Link to comment https://bolterandchainsword.com/topic/289365-inqusitor/page/20/#findComment-5181417 Share on other sites More sharing options...
Pearson73 Posted October 30, 2018 Share Posted October 30, 2018 Those are some great looking rust and weathering effects. lamby 1 Back to top Link to comment https://bolterandchainsword.com/topic/289365-inqusitor/page/20/#findComment-5181448 Share on other sites More sharing options...
Mechanist Posted October 31, 2018 Share Posted October 31, 2018 from the photo the raised areas add to the effect I'd be tempted to leave them. Though I do get that pictures can be deceiving so I'm looking forward to seeing more work. lamby 1 Back to top Link to comment https://bolterandchainsword.com/topic/289365-inqusitor/page/20/#findComment-5182299 Share on other sites More sharing options...
Brother-Chaplain Kage Posted October 31, 2018 Share Posted October 31, 2018 I've had similar results when I experimented with the salt technique and is why I prefer the hairspray chipping. This thing is going to look incredible when you get it finished. lamby 1 Back to top Link to comment https://bolterandchainsword.com/topic/289365-inqusitor/page/20/#findComment-5182519 Share on other sites More sharing options...
lamby Posted November 6, 2018 Author Share Posted November 6, 2018 Those are some great looking rust and weathering effects. from the photo the raised areas add to the effect I'd be tempted to leave them. Though I do get that pictures can be deceiving so I'm looking forward to seeing more work. I've had similar results when I experimented with the salt technique and is why I prefer the hairspray chipping. This thing is going to look incredible when you get it finished. haha - no pressure then... Thank you kind sirs! Second test run for the Gun Skiff with hairspray, salt and Tamiya spray colors: Bit of salt overkill - after this test I've decided to use a mix of the larger salt bits from the previous post and this regular size: And here's the result after masking the flat white spray and applying the blue: Using the hairspray makes it easier to get the salt to stick but I did leave it on for too long before spraying the colors, so it was a bit sticky at this stage - so, since the Tamiya sprays are gloss anyway, I applied Tamiya flat clear spray to knock it back to matte. I'll do some test with painting over the matte coat with oil washes and some lighter blue highlights, but I think I now have a decent recipe and - more importantly - a sequence of layers to paint the actual Gun Skiff next weekend. Also noted that on average 80% of people who commented (across 4 forums) said they liked the overdone paint effect, so I'm taking that onboard and will 'wet' spray on the final version, rather than here where it was about 3 light 'dry' coats. Finally, I now have an Instagram account inquisitor_lamby, where I will post updates to my blog, now renamed from The Dying Ground to Inqu][sitor Thanks for looking! hushrong, Grotsmasha and Master Toddius 3 Back to top Link to comment https://bolterandchainsword.com/topic/289365-inqusitor/page/20/#findComment-5186358 Share on other sites More sharing options...
Mechanist Posted November 6, 2018 Share Posted November 6, 2018 Looking good there. The rest of the skiff is going to be brilliant. lamby 1 Back to top Link to comment https://bolterandchainsword.com/topic/289365-inqusitor/page/20/#findComment-5186404 Share on other sites More sharing options...
hushrong Posted November 6, 2018 Share Posted November 6, 2018 Some great experimenting going on here! lamby 1 Back to top Link to comment https://bolterandchainsword.com/topic/289365-inqusitor/page/20/#findComment-5186483 Share on other sites More sharing options...
lamby Posted November 19, 2018 Author Share Posted November 19, 2018 Looking good there. The rest of the skiff is going to be brilliant. Some great experimenting going on here! Thanks guys! A painting update! Missiles first: Vallejo Sand sponge-chipped with GW Leadbelcher: Then the hairspray + salt technique with the Tamiya Racing White on the upper decking - this particular white is a pain to work with, to get decent coverage it has to be almost too thick: On this side you can see an ugly and unrealistic straight edge of rust vs paint - my masking was rushed, so lesson learned there - I went back in after this pic with a toothpick and scraped away at the straight white edge to get a more natural look: Third time lucky on the upper turret DuskRaider, hushrong and Grotsmasha 3 Back to top Link to comment https://bolterandchainsword.com/topic/289365-inqusitor/page/20/#findComment-5194119 Share on other sites More sharing options...
Dosjetka Posted November 19, 2018 Share Posted November 19, 2018 The black that shows through on the turret looks good from that angle and with that light. Almost looks like impact marks that have been left unattended for a long time, allowing rust to develop around it. I'd say leave it as-is. :tu: lamby 1 Back to top Link to comment https://bolterandchainsword.com/topic/289365-inqusitor/page/20/#findComment-5194300 Share on other sites More sharing options...
hushrong Posted November 20, 2018 Share Posted November 20, 2018 This is getting better and better! You are applying some great technique for the weathering! Link to comment https://bolterandchainsword.com/topic/289365-inqusitor/page/20/#findComment-5195074 Share on other sites More sharing options...
lamby Posted November 21, 2018 Author Share Posted November 21, 2018 The black that shows through on the turret looks good from that angle and with that light. Almost looks like impact marks that have been left unattended for a long time, allowing rust to develop around it. I'd say leave it as-is. This is getting better and better! You are applying some great technique for the weathering! Thanks guys! Another painting update - applied the salt+hairspray technique to the lower turret using the Tamiya Light Blue - which is much more user-friendly than the Racing White! Also applied the hairspray in a 3 lighter coats instead of the drenching I gave it in the second test - the lighter coats appear to give better control over the actual chipping process: Next up - applying the blue to the hull itself. Thanks for looking! DuskRaider, Grotsmasha, Cpt. Bannockburn and 2 others 5 Back to top Link to comment https://bolterandchainsword.com/topic/289365-inqusitor/page/20/#findComment-5195381 Share on other sites More sharing options...
Bjorn Firewalker Posted November 21, 2018 Share Posted November 21, 2018 You paint weathering effects in an impressively detailed and realistic manner. Why is there so much rust? Is acid rain common on the world where your vehicle operates? lamby 1 Back to top Link to comment https://bolterandchainsword.com/topic/289365-inqusitor/page/20/#findComment-5195402 Share on other sites More sharing options...
Recommended Posts
Create an account or sign in to comment
You need to be a member in order to leave a comment
Create an account
Sign up for a new account in our community. It's easy!
Register a new accountSign in
Already have an account? Sign in here.
Sign In Now