Cilu Posted December 19, 2017 Share Posted December 19, 2017 (edited) This project is just getting started since I first today got the last parts needed for the conversions that I have in mind, but first of a bit of background so that you guys can follow where I'm coming from and what my thought process looks/looked like. About 17-18 years ago I started started to read books and I fell in love with SciFi and Fantasy. During a trip to our local hobbystore I got introduced to the Warhammer 40K books, specifically William Kings Ragnar Blackmane books and my god where they good! I was and I am hooked on the 40K universe because of these books. I continued to read pretty much everything 40K and Space Marine related from there on out. About a year after that I dabbled a bit with the models but well being about 14 years old and not really having anyone to guide my painting I found out that I was pretty bad at it. Fast forward to February this year. I needed a mental outlet, something that would require complete focus if it was to be good and it had to be something that would pull me away from my high stress job. Well I remembered how demanding it was to paint properly good Warhammer minis and after having watched Duncans paint tutorials I decided that I wanted to get back into the hobby and this time go all in. So since about February I've been painting (a lot). When 8th dropped I was blown away by the really, really nice models and thought to myself that the Wolves of Fenris needed some reinforcements after the last attack by Magnus. So Primaris Wolves it was. When I then unpacked the minis in the Dark Imperium box I was actually a bit disappointed by the "easy to build" models that came with the box and that those models not really were as modular as I was used to from the standard marines. Well I went out and bought the Primaris Captain and expected actually the same very ridged type of model but was positively surprised that it had way more parts then the other marines and then an idea started to form in my head... I wanted Ragnar Blackmane in all his badassness in my army, but after having looked at the model GW is offering I concluded that it would not be the oldschool metal model. I took a long hard look at the Primaris Captain and I could see Ragnar or at the beginning I could make out certain things that would have potential to become the young king. So by looking at above images I started my hunt for parts and pieces that would transform above Captain into above Ragnar. I had recently bought the Skyhammer Wolf Pack and with those came some heads that would fit the bill perfect, see below picture: So good news the head would not be a problem Well next on the list would be the wolf pelt and even worse the wolf head shoulder pad. When I came back from my last 10 week work trip and whilst being on it I started to look into manufactures of parts and pieces that weren't GW produced (BTW that's also how I found this Forum ) and found bit by bit different vendors and producers. So whilst browsing Spellcrow I found what I had been looking for at that point for some weeks, the shoulder pad: Next step was his wolf coat. I thought about converting some of the existing backpieces that I got the Skyhammer box but quickly decided that wouldn't really fit what I had in mind. Then I thought about using green stuff to adapt the cape that came with the box. I browsed the web and found some really nice pictures from people who'd done it but again didn't really fit my idea and picture that had been generated in my head... Whilst again browsing different bit makers I stumbled upon the amazing bits from KFStudio on Facebook! There I not only found the perfect wolf pelt for the cape but furthermore also found the perfect "loincloth" to get rid of that lantern that the Primaris Captain comes with! See images below: Nice! Now I only needed Frostfang and of course Ragnars powerpack with the two wolfheads. I had sadly already used those packs for my Grey Hunter pack leaders so I needed a new one. Enter the GW Space Wolves Upgrade Pack as seen below: Well the powerpack looks about right so that's nice, though I am thinking about cutting the wolf head part of and then convert one of the Mk X powerpacks. Pretty much cut the exhaust part of above the round thing, transplant the wolf heads on top of that and then on top of that place the iron halo from the MK X pack, picture below so that you can see the two parts next to each other: I'm not quite sure what to do with that part since I do like the regular power pack, but fluff wise it would kinda be a missed opportunity not to individualize the Mk X pack and by that show that the Blackmanes embrace their new brothers to the pack. I'm open to suggestions here, so feel free to sway me either way As for Frostfang you can see on the Ragnar mini that the chainsword has skull at the bottom of the handle and I was unsure how to fix that until I realized that the sword you get with the spruce is for the right hand whilst the Primaris Captain points his sword with his left hand and lo and behold the Primaris Captains powersword has a skull as endpiece for the handle. Russ is looking down on this project! As a final piece I needed a base. I'm not a huge fan of building my own bases so whilst looking for some good bases for my regular marines I was on the lookout for some special 40mm ones as well for the special minis and found some. I have narrowed it down to 2 but I'm not sure about which one would fit the best especially because the captain minis foot is already placed upon a piece of stonework (I know, I know I could just grind it off but well... I don't quite know if I want that). So here are the 2 contenders: Again feel free to comment your thoughts in regards to it. I will over the next week update this topic with more images from the marines I already have painted and will also start on the groundwork for Ragnar. Furthermore I have started on a conversion of the Primaris Captain in Gravis armour there will come pictures as well from that project in this thread Sorry for the wall of text and the big pictures but I hope that you with this flood of information now really can see where I'm coming from and what i envision. Edit: I will use the Mastercrafted Assault bolter variant for Ragnar since I personally think that that variant is more like him then the Stalker Bolter. Edited December 19, 2017 by Cilu Bryan Blaire 1 Back to top Link to comment https://bolterandchainsword.com/topic/342490-ragnar-blackmane-and-company-primaris-style/ Share on other sites More sharing options...
The_Stray_Idea Posted December 19, 2017 Share Posted December 19, 2017 Awesome concept. Looks like you have done your research and taken your time selecting your bits. I look forward to seeing how this project progresses. Link to comment https://bolterandchainsword.com/topic/342490-ragnar-blackmane-and-company-primaris-style/#findComment-4963408 Share on other sites More sharing options...
Cilu Posted December 20, 2017 Author Share Posted December 20, 2017 Well as promised here is the first step of my update in regards to the Blackmane Company. When I first got the Dark Imperium box I started with the Primaris Captain in Gravis Armour and the following was the result: The result in book was okay, but I never really loved the result. Fair warning my paint skill wasn't as good as it is now and I personally think I've come a long way over the last months. In the beginning of December I then decided that the model had to be changed. Especially since I had fiddled around with the paintjob further and kinda experimented with some new techniques in regards to laying shadows. So I orderd a new Gravis Captain and this time I wanted to make it custom and way more aggressive looking. First step was the Bolterfist. I found some inspiration online and the following is the very first step of the custom job on which I will work on and off as inspiration comes and goes. So updates will be infrequent. I call the following Wolfclaw Bolter: I removed the fingers and replaced them with the claws from the Mk III powerfist which are pretty much just claws... A wolf needs claws ;) First layer of basecoat was applied so that I could see if I was forced to go back in and change the conversion or if it already fit. Sadly this is as far as I have come until now, as mentioned it is a side project which will only be worked on when I find/get an idea that would fit the concept and of course when I posses the parts needed for the conversion ;) Link to comment https://bolterandchainsword.com/topic/342490-ragnar-blackmane-and-company-primaris-style/#findComment-4964086 Share on other sites More sharing options...
Cilu Posted December 20, 2017 Author Share Posted December 20, 2017 UPDATE ON RAGNAR Well this evening I decided I couldn't wait anymore and I slowly started cleaning up the Captain and assemble the body so that I can take a look at how the different parts would look on it and just to get started: There were surprisingly big mold lines on this mini so those I've taken care of now. Whilst assembling him I spotted that his pistol holster is a separate part and that got me thinking. I ordered a bunch of bits a couple of weeks ago from different GW sets for an entirely different idea that I'm slowly developing but more on that when the time comes for that. So I went into my bits box and found the following: The pistol in the middle is the one that comes with the model and it is kinda boring especially for an character if you guys can follow? The 2 next to it are holsters from World Eaters. I kinda like the look from the one on the right because there is more going on and the size of the bit is fitting as well. So now I am pondering if I just should change it. The little container that is attached to the original part I would exchange for one of the following: My tendency is for either a single grenade or the water flask. The double grenade set is maybe a bit to big but I haven't tested that yet. The book doesn't really fit in general I think since we're talking Space Wolves not i.e. Black Templars or Ultramarines. Again I'm open to suggestions on both the gunholster and of course the side bit so feel free to chime in :) Link to comment https://bolterandchainsword.com/topic/342490-ragnar-blackmane-and-company-primaris-style/#findComment-4964115 Share on other sites More sharing options...
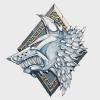
Cilu Posted December 20, 2017 Author Share Posted December 20, 2017 +++UPDATE+++ Ragnar - Day 1 Today assembly started on Ragnar and personally I think I made a lot of progress on the mini. So lets start with the body: First step was changing the standard lantern and loincloth into something more fitting for a Wolf from Fenris. I just cut the cloth of and let the pin that is on the back of the belt be. The loin pelt comes standard with the cutout for the beltbuckel so no need to change anything on that front which is nice. Next step was converting the powersword into Frostfang. This was really straight forward, I just cut the swords of above the hands and changed them out. Now the Chainsword has the proper handle with the skull on the end just like Frostfang on the GW Ragnar mini. The only thing that had to be thought about was making sure that the skull on the sword is pointing upward and the exhaust from the motor down. So having finished those 2 things I started to assemble the actual mini as shown below: I mentioned in my last post that the mold lines were quite big and on the above images you can see the finished cleanup and the amount of milliput I had to use to smooth it out. Personally I found the gaps in the neck area really big on this guy so that's where I had use the most. Well I'm babbling and you guys are probably already more then a little familiar with those problems :D Last step for today was the head: The pictures above show the heads I used to create the Ragnar head. I wanted to mimic the GW look and well Ragnars topknot is iconic under the Wolves so making a mini without it would be a complete miss in my book. The problem with the standard topknot head that comes with the Grey Hunter packs is that it won't fit with the Mk X neck armour. Furhermore the way the arm is placed the end of the hair would be blocking the shoulderguard and/or the powerpack depending on which way I let the mini look. I was already set on the topknot head with the open mouth and the sideburns since he looks like the GW model. So looking through my heads I found the scout head with the topknot. I just cut that of and the topknot from the other head and interchanged them. Then I took the earpiece from the scout as well so that Ragnar has both ears covered and not just a blank spot on the left side of his face. After having glued on the knot and let it harden I took another look at the result and was... well let's face it... not happy... at all. So in comes the milliput or greenstuff. I took a small amount of it and sculpted it in the back around the endpiece so that it would look like the hair would be pulled up. Now I have to wait till tomorrow before I can do anything else since the milliput has to harden for 4-6 hours. DaveyBoy74 1 Back to top Link to comment https://bolterandchainsword.com/topic/342490-ragnar-blackmane-and-company-primaris-style/#findComment-4964753 Share on other sites More sharing options...
Ahistorian Posted December 23, 2017 Share Posted December 23, 2017 A great start, I look forward to seeing the rest of the project! Cilu 1 Back to top Link to comment https://bolterandchainsword.com/topic/342490-ragnar-blackmane-and-company-primaris-style/#findComment-4966955 Share on other sites More sharing options...
Cilu Posted January 2, 2018 Author Share Posted January 2, 2018 +++ UPDATE+++ Happy new to everyone! So it's been Christmas and New Years so lots and lots of family events and friends that had to be visited and spend time with so little time to paint and build sadly but finally I'm back at it and here is a progress report of Ragnar. Please remember everything is still WIP so if you see some edge highlights that aren't spot on yet just remember that I haven't tidied it up yet nor have I gone over them with a second more bright colour. So first I started with the standard SW paintcoat: As you can see the model is not completely assembled yet. I did that because A) I couldn't have painted the chestpiece properly and B) I still needed to figure out which pieces had to be placed in what order. Next I put on some more pieces and details. I then finally could start working on and finishing my absolutely favorite piece of the whole mini, the fur coat! Finished as you can see it on above pictures the used leather look was achieved with about 8-10 coats of paint and wash and the fur itself (though still WIP since I haven't finished all the details) I am currently at... ehm... I think 12-15 coats. It's a bit hard to remember since I had to go over the basecoat with washes, then the base again, then again some wash, then the dry brushing came with some more very light uses of wash... so yeah. Well you guys properly know what I am talking about :D Currently Ragnar is at the following stage: As you can see I still got ways to go before I am finished but I am confident that I maybe can finish him in the next week. As always all critique and ideas are highly appreciated so feel free to comment. BTW I am thinking about stripping the main body because I think the base paint is a bit blotchy but what do you guys think? Link to comment https://bolterandchainsword.com/topic/342490-ragnar-blackmane-and-company-primaris-style/#findComment-4972050 Share on other sites More sharing options...
Cilu Posted January 19, 2018 Author Share Posted January 19, 2018 Well guys it took me some weeks to find the time to finish Ragnar (though base is still WIP). First of I couldn't quit find the time and secondly I chose to strip him because I personally thought that the base coat was a bit to blotchy. So here he is without his base: C&C is of course most welcome :) Aramis K, Bjorn Firewalker and Surreal Cruelty 3 Back to top Link to comment https://bolterandchainsword.com/topic/342490-ragnar-blackmane-and-company-primaris-style/#findComment-4988112 Share on other sites More sharing options...
Bjorn Firewalker Posted January 20, 2018 Share Posted January 20, 2018 Great job! Link to comment https://bolterandchainsword.com/topic/342490-ragnar-blackmane-and-company-primaris-style/#findComment-4988211 Share on other sites More sharing options...
Recommended Posts
Create an account or sign in to comment
You need to be a member in order to leave a comment
Create an account
Sign up for a new account in our community. It's easy!
Register a new accountSign in
Already have an account? Sign in here.
Sign In Now