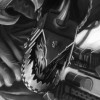
Pandoras Bitz Box Posted November 17, 2018 Share Posted November 17, 2018 I have been working on a Khornate Knight for my friend, and one of the things I was working on was claws coming out of the armour trim, using the Forge World Renegade Knight as reference. I was asked if I could give some step by step instructions by someone who visited my thread, who wanted to also use that technique. Ive copied what I wrote on my thread here just in case anyone else would find it useful, a few people there seemed to really like it! Claws/Teeth Growing out of Chaos Armour Trim These are the two tools I used for this, they are the two I use the most of my metal tools You can use a silicone shaper too if you have one, they are really good. For lubricating my tools use oil or I just rub them on my face because you don't need much at all. 1. I mixed an equal amount of yellow and blue by just smushing and rolling it between my thumb and finger. it doesn't very long, probably less than a minute. 2. once its a uniform colour, I break of a little piece, mould it into a cone and then push it into place on the armour. 3. I use the tool with the flat tip to press the edges of the cone onto the surrounding plastic This helps adhere the Green Stuff to the plastic with its larger surface area. 4. Next I just lick my fingers and very gently pulled at the surface of the cone to get the desired Claw shape. if you pulled too much, just push it back down and try to tease it back again by pulling on the surface, careful not to remove it accidentally. 5. Next I used the pointed too to drag some shallow grooves into the claw. Just be sure not to press too hard, you can always do another pass on the same groove. 6. Finally, I very carefully used the too with the flat tip to get the curve and angle I wanted. Then this stage is complete. LET THE GREEN STUFF CURE! I can't stress this bit enough. Green Stuff dries like plastic so if you don't like how something looks you can cut it away. Its always a good idea to plan what you want to do and do it in passes, allowing the green stuff to cure in between. It is very tempting to do too much, maybe you're very eager or have some green stuff left over... but it's pretty harrowing if you have so far done a job your really happy with, only to accidentally press one of your thumbs into a bit of work that is still soft, or slip with a tool or something. I do the same with eyes as I have done here, but I just roll Green Stuff balls out of spare Green Stuff, cut them in half once cured and glue them on. sculpting eyelids around the eyes then means you wont damage the eyeball, just like sculpting the trim around these claws once they have cured. LET THE GREEN STUFF CURE! 7. Next pass starts with mixing up more stuff and then I press a small triangle of it pointing away from the claw. 8. Next, just like last time I start pressing the sides down to meet the plastic, and shape it around the claw. 9. Next step i refined the shape using the flat tipped tool, trying to get a small step to match where the Trim meets the armour plate and a ridge down the middle. (You can see some lines it it already because I forgot to take a photo so I had to do this bit twice) 10. Lastly to complete the claw, I added some detail to this part of the claw. pushing the tip of the flat ended tool into the Green Stuff. Then either gently dragging grooves out with the same tool or the pointed one. I also used the pointed too to get a sharper line where the trim meets the armour. Then you're done! If that tutorial is of use to only one person, that's good enough for me. if you have any questions I can help with, feel free to ask. if you want some more advanced Green Stuff advice then feel free to visit one of my WIP threads and ask away, or check out Brother Chaplain Kage's Thread of Stuff as he has a lot of experience with Green Stuff. Link to comment https://bolterandchainsword.com/topic/351250-sculpting-clawsteeth-growing-out-of-chaos-armour-trim/ Share on other sites More sharing options...

Recommended Posts
Archived
This topic is now archived and is closed to further replies.