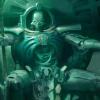
Boc Posted June 27, 2023 Author Share Posted June 27, 2023 Not much of an update, but got most of the work done for the top carapace and doc oc headtacles Still need to add more chaosy things on top but somewhat undecided at the moment gaurdian31 and Firedrake Cordova 2 Back to top Link to comment Share on other sites More sharing options...
gaurdian31 Posted June 27, 2023 Share Posted June 27, 2023 2 more tentacles! Go full Doc Oc! Link to comment Share on other sites More sharing options...
Boc Posted July 3, 2023 Author Share Posted July 3, 2023 On 6/27/2023 at 10:12 AM, gaurdian31 said: 2 more tentacles! Go full Doc Oc! I've only got one more though Been a very, very slow week. Having to travel overnight now each week for work, so slowing me down a good bit. Managed to get an hour or so in tonight, so started on armor plates and weapons. Thinking that I'll finish the legs first, since I've still got to get the other gatling and battle cannon put together Firedrake Cordova and Dr_Ruminahui 2 Back to top Link to comment Share on other sites More sharing options...
Boc Posted July 16, 2023 Author Share Posted July 16, 2023 Been a super busy first half of July with RL obligations and travel meaning I didn't have much paint time. Finally sat down tonight and cranked on the Despoiler, glopping on the base edge so that in the morning I'd only have to do decals, damage, weathering, basing, varnish and all done. Then, when i was happily putting paints back on the rack, i saw it. And i was sad. Havoc missile pod, not even based yet. Nooooooo! Still that shouldn't take TOO long so I'm still optimistic about finishing tomorrow, but we'll see. Grotsmasha, Zebulon and Rusted Boltgun 3 Back to top Link to comment Share on other sites More sharing options...
Firedrake Cordova Posted July 16, 2023 Share Posted July 16, 2023 You're painting forces of the Dark Powers ... isn't treachery to be expected from them? In all seriousness though, it looks good. Boc 1 Back to top Link to comment Share on other sites More sharing options...
Boc Posted July 17, 2023 Author Share Posted July 17, 2023 20 hours ago, Firedrake Cordova said: isn't treachery to be expected from them? It's still rude of them lol I was able to finish up the missile pod and the decals in about 4 hours today. Finishing touches tomorrow! I don't want to spoil the look, so in the meantime here's my thoughts on the towering mechanic: ZeroWolf and Firedrake Cordova 1 1 Back to top Link to comment Share on other sites More sharing options...
Boc Posted July 18, 2023 Author Share Posted July 18, 2023 (edited) Definitely a mad dash the last two days to get him finished. Halfway through the month and I still need to finish a Lancer and a War Dog. Aaaaahhhhh This is a fun comparison of just before going into decals+weathering and after. Probably five hours from start to finish for that part. Rest of the photos in the spoiler! Spoiler Edited July 18, 2023 by Boc Dr_Ruminahui, Urauloth, tinpact and 2 others 3 2 Back to top Link to comment Share on other sites More sharing options...
Firedrake Cordova Posted July 18, 2023 Share Posted July 18, 2023 Very nice. It's amazing the difference just the weathering makes in the before/after images! You're making great progress Boc 1 Back to top Link to comment Share on other sites More sharing options...
Boc Posted July 23, 2023 Author Share Posted July 23, 2023 Not a whole lot to report on here. Have just about finished the subassemblies for the Lancer. I'll be painting it in sections like I did the Despoiler though haven't quite figured out how i want to chaosify it. Link to comment Share on other sites More sharing options...
Boc Posted July 25, 2023 Author Share Posted July 25, 2023 Primed and ready to go! Trying to work on my airbrush technique and I'd found a video where they used a gray to white gradient and applied contrasts over it, rather than preshade deep black to bright white. Of course I painted the red THEN the white...so if got to figure out how the heck to fix the white overspray lol Now as I've said, I'm colorblind. So I stick to a pretty scripted "these are what I've used, so I will continue to use only these," which of course now I've broken. So need some feedback, is this red above close to these reds? I still need to apply Reikland wash to the Lancer, but am not sure if the color is close enough or if I need to start over with the top. Also some other stuff with some work on it Firedrake Cordova 1 Back to top Link to comment Share on other sites More sharing options...
Firedrake Cordova Posted July 25, 2023 Share Posted July 25, 2023 You're definitely making good progress, churning through those stompy robots As to the colours, the red on the previous models looks "purer" (basically, a middle-bright red, if that makes sense), whereas the one you've just painted looks like it's leaning a bit more to the rust (brown) side of the red spectrum. Of course, lighting and white balance can play tricks, so ... do you have an image with both of them next to each other? Boc 1 Back to top Link to comment Share on other sites More sharing options...
Boc Posted July 28, 2023 Author Share Posted July 28, 2023 A little bit more work done. Tried touching up the white overspray on the top with...middling results. Need to dry brush the screaming skull of the Dark Mechanicum icon and the exhaust stacks, then paint the access door and panels green. Starting to finish the basic steps and apply armor panels. The legs themselves are done except for weathering, just need the armor plates down here finished. Lastly, completely finished up the lance! Opted for a brass handle and silver tip, with frost contrast to give it a bit of a power weapon effect. Pretty happy how it turned out. That's it for now! Elriks Hobbies just picked up the old Secret Weapons IP this week, so I've excitedly placed an order for huge skull bases. Super pumped, no more goop walls! Firedrake Cordova 1 Back to top Link to comment Share on other sites More sharing options...
Boc Posted July 31, 2023 Author Share Posted July 31, 2023 Shield is all finished up, and my trusty assistant is holding it in place while the glue dries I THINK that was the last of the painting left to do on him. I may need to color the dot in the middle of the shield but we'll see. Gloss varnish is already applied on the places I'll be putting decals, so tomorrow night should be able to crank out a lot as long as I get out of work at a decent hour. Definitely not getting to the Tyrant this month Firedrake Cordova 1 Back to top Link to comment Share on other sites More sharing options...
Grotsmasha Posted July 31, 2023 Share Posted July 31, 2023 1 minute ago, Boc said: my trusty assistant is holding it in place while the glue dries This thing has been a god-send for assembling anything that requires super glue, Boc 1 Back to top Link to comment Share on other sites More sharing options...
lhg033 Posted July 31, 2023 Share Posted July 31, 2023 9 hours ago, Grotsmasha said: This thing has been a god-send for assembling anything that requires super glue, +1 on this thing. If they ever sell the arms separately I'd buy several more. It is awesome for holding things together for gluing or even for just for holding smaller sub assemblies when painting (particularly with contrast paints/shades where you want things to flow in the same directions with gravity) Love the knights. Boc 1 Back to top Link to comment Share on other sites More sharing options...
Boc Posted July 31, 2023 Author Share Posted July 31, 2023 Had to call in to work today so I made the most of it and finished up my Lancer! The model is huge, so pretty much impossible to get into a decent photo since my photo setup is super ghetto. Very happy how he turned out Dr_Ruminahui, ZeroWolf, Spazmolytic and 2 others 3 2 Back to top Link to comment Share on other sites More sharing options...
ZeroWolf Posted July 31, 2023 Share Posted July 31, 2023 Nice work! Boc and Firedrake Cordova 1 1 Back to top Link to comment Share on other sites More sharing options...
nilsh Posted August 1, 2023 Share Posted August 1, 2023 Very nicely done. ZeroWolf, Boc and Firedrake Cordova 2 1 Back to top Link to comment Share on other sites More sharing options...
Boc Posted August 7, 2023 Author Share Posted August 7, 2023 First off, one of the better local painters has been pushing me to start using enamels and oil washes. Finally bit three bullet today and tried out AKs grime line. I've had this Centurion/Sergeant sitting around for about a decade waiting to get based, so I figured it'd be a good guinea pig. Here's the progression: Probably should've diluted it some rather than straight out of the bottle lol. I applied the enamel, waited about 90 minutes, then got to cleaning him up. Happy enough with how it's made him dirtier, but all I had were a microfiber cloth for cleaning glasses and q tips, so the nooks and crannies were really hard to get to. Ah well. Got a little big of work done on the Stalker for the Call to Arms. All of the silvers and golds done. Tomorrow I think will be red trim, then dry brushing and initial washes. Grotsmasha and LameBeard 2 Back to top Link to comment Share on other sites More sharing options...
Boc Posted August 8, 2023 Author Share Posted August 8, 2023 Got the decals and some battle damage done on the Stalker. He's got a shiny varnish on for a reason too... tomorrow the top half is going to get absolutely dunked in grime wash. Because why not? He looks too clean. LameBeard and Firedrake Cordova 2 Back to top Link to comment Share on other sites More sharing options...
Boc Posted August 9, 2023 Author Share Posted August 9, 2023 And the Stalker is all done and I'm officially in love with enamel grime washes from AK. Here's the progression photos of the finishing touches Top left, decals and damage all done, gloss varnish applied Top right, somewhat liberal application of grime wash. Tastefully applied, I swear I didn't dunk it Bottom left, enamel cleaned off after ~2 hours to dry Bottom right, based and matte varnish Total actual work from top left to bottom right... maybe an hour? If that? Hardest part was cleaning off with a microfiber cloth that kept getting snagged on the spikey stuff. Really happy with what I think is high impact low effort. Because I'm lazy. More pics of the Stalker in the spoiler section below Spoiler Kythnos, Firedrake Cordova, tinpact and 2 others 4 1 Back to top Link to comment Share on other sites More sharing options...
Firedrake Cordova Posted August 10, 2023 Share Posted August 10, 2023 That looks great! As you say, the grime wash worked very well Boc 1 Back to top Link to comment Share on other sites More sharing options...
nilsh Posted August 10, 2023 Share Posted August 10, 2023 Looks really great, oils and enamels gives very nice effects. It's just a shame that they're so messy to work with. Boc and Firedrake Cordova 1 1 Back to top Link to comment Share on other sites More sharing options...
Boc Posted August 13, 2023 Author Share Posted August 13, 2023 Thanks for the feedback! I procrastinated moving my hobby stuff out of the soon to be new baby's room, so got the first couple hours to work on the Tyrant. Primed everything, put on base layers, and then was a bit too sloppy with the contrast paints. I'll spot fix those later, too lazy now. It's still not glued together at all expect for the top frame and legs, but I used blue tac to hold it together to see how it was coming. Firedrake Cordova 1 Back to top Link to comment Share on other sites More sharing options...
Boc Posted August 20, 2023 Author Share Posted August 20, 2023 (edited) As I think I mentioned, I had to get a new display cabinet since the one I had opens on the side and where the new place for it is I needed one that opens from the front. Finally got it moved today and set up, so here are the first full Sons of Horus CSM/CK warband photos. Only 3 legionaries missing since their arms broke off while moving them. Had to replace some arms on the war dogs, once I finish the painting set up in the basement work space I'll get them touched back up. Edited August 20, 2023 by Boc tinpact, Bouargh, Rusted Boltgun and 6 others 3 6 Back to top Link to comment Share on other sites More sharing options...

Recommended Posts
Create an account or sign in to comment
You need to be a member in order to leave a comment
Create an account
Sign up for a new account in our community. It's easy!
Register a new accountSign in
Already have an account? Sign in here.
Sign In Now