Iron Father Ferrum Posted October 10, 2010 Author Share Posted October 10, 2010 So, Silas the Librarian is complete! As my first-ever Librarian paint job and not liking the Codex Libby paint scheme, I struggled at first to decide how to accentuate his otherworldly nature in painting (I've already covered some of the bitz-inclusions, which helped I think). The first thing I did paint-wise to distinguish him was a reversal of how I usually paint eyes. Normally, I dab Skull White in the eye sockets and then plant a dot of Chaos Black center-mass to create a normal eye. I attempted the reflected-light scheme that I've seen on several other Libby models and failed miserably, so I decided to simply reverse the norm. I painted the eye sockets black then dotted them with white, giving him pupil-less eyes in dark, sunken sockets. While far from flashy, the effect is suitably odd and fits nicely. The second thing I decided was that I was going to paint his force weapon blade differently. Normally -- yes, even for power weapons -- I just paint them like regular blades with metallics. I deviated from this norm with the Iron Father who was the start of this thread, but I didn't want to repeat that for a force weapon. My first attempt was to use the techniques shown here: http://www.games-workshop.com/gws/content/...005&start=2 but that turned out looking like garbage because my hand's not steady enough to get the lines thin enough. So I scraped the paint off and decided to give the lightning effect that is so popular a try. It took me three attempts to refine my technique enough to get thin enough lines and a random enough pattern to pull it off, but overall I'm rather proud of it. I have a tendency to go overboard on deliberate highlights, so forcing myself to go easy on the Skull White took some effort. I think it came out pretty good, all things considered. The blade was primered black, basecoated Mordian Blue, with the lightning effect raised up from Enchanted Blue, Ice Blue, and Skull White. Front: http://i62.photobucket.com/albums/h96/DTRI/PICT0262.jpg Side: http://i62.photobucket.com/albums/h96/DTRI/PICT0263.jpg Oblique, showing off detail work: http://i62.photobucket.com/albums/h96/DTRI/PICT0264.jpg Sword-blade: http://i62.photobucket.com/albums/h96/DTRI/PICT0265.jpg Next, I am going to do those Devastators if it kills me. Link to comment https://bolterandchainsword.com/topic/208313-dxfs-wip-thread-more-iron-hands/page/4/#findComment-2532851 Share on other sites More sharing options...
Pork Chop Express Posted October 13, 2010 Share Posted October 13, 2010 You know, that torso does look really cool for a librarian! I like the tubing; it fits. I like how the sword came out too. Link to comment https://bolterandchainsword.com/topic/208313-dxfs-wip-thread-more-iron-hands/page/4/#findComment-2535580 Share on other sites More sharing options...
Dosjetka Posted October 14, 2010 Share Posted October 14, 2010 Really nice sword, but the armour really could do with a watered-down layer of Chaos Black (the black is dusty/chalky) and then a few higlights (look at February's WD for a good guide). Ludovic Link to comment https://bolterandchainsword.com/topic/208313-dxfs-wip-thread-more-iron-hands/page/4/#findComment-2535949 Share on other sites More sharing options...
Iron Father Ferrum Posted October 19, 2010 Author Share Posted October 19, 2010 Uhhh. . . the black is *supposed* to look dusty. It's part of the paint scheme, a way to add definition to a flat black surface and tie the model into its base at the same time (notice the big gray rock he's standing on?). So, after a brief hiatus, I've picked up my brushes again and started work on my Devastators. Not a lot of progress, but things are at least taking a step in the right direction. Group Shot: http://i62.photobucket.com/albums/h96/DTRI/PICT0266.jpg Sarge: http://i62.photobucket.com/albums/h96/DTRI/PICT0268.jpg Link to comment https://bolterandchainsword.com/topic/208313-dxfs-wip-thread-more-iron-hands/page/4/#findComment-2540551 Share on other sites More sharing options...
Iron Father Ferrum Posted October 23, 2010 Author Share Posted October 23, 2010 Sarge, and two plasma cannons ready to immolate the enemy! http://i62.photobucket.com/albums/h96/DTRI/PICT0269.jpg http://i62.photobucket.com/albums/h96/DTRI/PICT0270.jpg http://i62.photobucket.com/albums/h96/DTRI/PICT0271.jpg Link to comment https://bolterandchainsword.com/topic/208313-dxfs-wip-thread-more-iron-hands/page/4/#findComment-2543310 Share on other sites More sharing options...
Iron Father Ferrum Posted November 6, 2010 Author Share Posted November 6, 2010 aaaaaand after a hiatus, I went back and finally finished the last two Devastators, carrying a pair of heavy bolters. That chalkiness to the white paint is going to piss me off to the day I die. http://i62.photobucket.com/albums/h96/DTRI/PICT0272.jpg Link to comment https://bolterandchainsword.com/topic/208313-dxfs-wip-thread-more-iron-hands/page/4/#findComment-2555126 Share on other sites More sharing options...
Dosjetka Posted November 6, 2010 Share Posted November 6, 2010 Looking good mate :P Keep it up. As for the chalkiness, water down your paints a bit more and it should do the trick :) Ludovic Link to comment https://bolterandchainsword.com/topic/208313-dxfs-wip-thread-more-iron-hands/page/4/#findComment-2555128 Share on other sites More sharing options...
Iron Father Ferrum Posted November 15, 2010 Author Share Posted November 15, 2010 So. Been out of touch for a while, I know. I got hooked on IA9 and then the Dark Eldar codex; between one and the other, I painted up some Fire Angels. Specifically, the pictured members of Tactical Squad Revok from pages 94-95 of IA9. They're not 100% the same, of course, but I'd like to think I got close enough. Sadly, I was so enthused with this project that I forgot to take WIP shots -- so here's just the boys, ready to take the field against Tyrant of Badab. The Squad http://i62.photobucket.com/albums/h96/DTRI/PICT0273.jpg Vergeant Sergeant Revok http://i62.photobucket.com/albums/h96/DTRI/PICT0274.jpg Brother Malsan http://i62.photobucket.com/albums/h96/DTRI/PICT0278.jpg Brother Mordu http://i62.photobucket.com/albums/h96/DTRI/PICT0277.jpg Brother Leaor http://i62.photobucket.com/albums/h96/DTRI/PICT0275.jpg Brother Dreaux http://i62.photobucket.com/albums/h96/DTRI/PICT0276.jpg Link to comment https://bolterandchainsword.com/topic/208313-dxfs-wip-thread-more-iron-hands/page/4/#findComment-2562385 Share on other sites More sharing options...
Iron Father Ferrum Posted December 19, 2010 Author Share Posted December 19, 2010 So. Been doing thinkings, and I need some Iron Hands Chapter-specific stormshields. Well, one, as in singular, for a Chapter Master. I've checked MaxMini, Scibor, and Chapter House and the only one of the three that has a stormshield that really fits is Chapter House, which is ok but not exactly full of awesome (seen here). The only other option I can think of is Lysander's shield; and I don't like the normal ones you get out of a Terminator box (too small, for starters). Anyone else got any preferences? Conversion suggestions? Bright ideas? Link to comment https://bolterandchainsword.com/topic/208313-dxfs-wip-thread-more-iron-hands/page/4/#findComment-2593068 Share on other sites More sharing options...
Dosjetka Posted December 19, 2010 Share Posted December 19, 2010 Check this thread out over on Warseer (as soon as the bandwidth is normal again ;) ). Maybe you can ask him how he made that shield :) Ludovic Link to comment https://bolterandchainsword.com/topic/208313-dxfs-wip-thread-more-iron-hands/page/4/#findComment-2593220 Share on other sites More sharing options...
Krucious Arkanadae Posted December 19, 2010 Share Posted December 19, 2010 they look great, the old scupts are very well done and ive always loved the iron hands even though im ablood angels player. A few tips and or ticks that could improve finishing, thining your paints with water will always give yoou a smoother finish. And white on top of black always goes down better with a lite foundation on top of the black first. A good way to make gold not too shiny and gold is to mix bestial brown and burnished gold 50 50 then taking pure burnished gold and whipping all the excess of the brush untill there is only flecks of paint, go over the 50 50 mix already laid down lightly to get some glimmer to it, looks nice try it out. Link to comment https://bolterandchainsword.com/topic/208313-dxfs-wip-thread-more-iron-hands/page/4/#findComment-2593225 Share on other sites More sharing options...
Iron Father Ferrum Posted December 19, 2010 Author Share Posted December 19, 2010 Ok, I'm going to break this down. they look great, the old scupts are very well done and ive always loved the iron hands even though im ablood angels player. Thanks. I do try. A few tips and or ticks that could improve finishing, thining your paints with water will always give yoou a smoother finish.And white on top of black always goes down better with a lite foundation on top of the black first. Sadly, I am still deployed in Iraq. I don't have a palette handy, and there's no LGS down the street where I can pick one up. As for the white, I always put down Fortress Gray as a base coat first and then put the Skull White on top. A good way to make gold not too shiny and gold is to mix bestial brown and burnished gold 50 50 then taking pure burnished gold and whipping all theexcess of the brush untill there is only flecks of paint, go over the 50 50 mix already laid down lightly to get some glimmer to it, looks nice try it out. Again, paints not available. I had to bring what I have with me back from mid-tour leave since the military postal service doesn't like liquids in their mail. And its not whipping, its wiping. But that's definitely something to give a try when I get back (soon); as gold goes, I still haven't gotten a hang of the whole final-highlighting-gold-with-silver that the 'Eavy Metal team enjoys using so often. Got any tips for that? Link to comment https://bolterandchainsword.com/topic/208313-dxfs-wip-thread-more-iron-hands/page/4/#findComment-2593284 Share on other sites More sharing options...
Iron Father Ferrum Posted December 21, 2010 Author Share Posted December 21, 2010 Right, so. I promised more Fire Angels, so here's the rest of the Tactical Squad. http://i62.photobucket.com/albums/h96/DTRI/PICT0279.jpg http://i62.photobucket.com/albums/h96/DTRI/PICT0280.jpg http://i62.photobucket.com/albums/h96/DTRI/PICT0281.jpg http://i62.photobucket.com/albums/h96/DTRI/PICT0282.jpg http://i62.photobucket.com/albums/h96/DTRI/PICT0283.jpg http://i62.photobucket.com/albums/h96/DTRI/PICT0284.jpg Link to comment https://bolterandchainsword.com/topic/208313-dxfs-wip-thread-more-iron-hands/page/4/#findComment-2595212 Share on other sites More sharing options...
MagicMan Posted December 21, 2010 Share Posted December 21, 2010 Looking nice man, especially liking the chapter symbols on the shoulder. I think i prefer your iron hands though! Just had a look through the thread, and the sternguard/librarian were very cool. Link to comment https://bolterandchainsword.com/topic/208313-dxfs-wip-thread-more-iron-hands/page/4/#findComment-2595287 Share on other sites More sharing options...
Dosjetka Posted December 21, 2010 Share Posted December 21, 2010 http://i62.photobucket.com/albums/h96/DTRI/PICT0282.jpg How d'you do the combat knife on this chap? Ludovic Link to comment https://bolterandchainsword.com/topic/208313-dxfs-wip-thread-more-iron-hands/page/4/#findComment-2595531 Share on other sites More sharing options...
Dwarfkernow Posted December 21, 2010 Share Posted December 21, 2010 I'm wigging out waiting on my Mk.III suits, so I set aside mini-me for a moment to convert up a combi-flamer for my Sternguard. I didn't have any spare combi-meltas or -plasmas to convert, so I chopped up a stock bolter using the Night Lord Captain's combi-flamer as inspiration. It ain't pretty, but I think it came out decent. I cut away the bolter's foreguard, then clipped off and repositioned the magazine to a top-mount. Then I took the flamer snout and promethium bottle off of a standard SM flamer and glued them in place as shown. Not pretty, but functional. http://i62.photobucket.com/albums/h96/DTRI/PICT0217-1.jpg Hi mate, Hope you are home soon? I love the combi-flamer/bolter do you mind if I borrow the idea? Looking forward to seeing more. Take it easy Dwarfkernow Link to comment https://bolterandchainsword.com/topic/208313-dxfs-wip-thread-more-iron-hands/page/4/#findComment-2595549 Share on other sites More sharing options...
Iron Father Ferrum Posted December 21, 2010 Author Share Posted December 21, 2010 By all means, bro, use it. I call it the Medusa-pattern. Link to comment https://bolterandchainsword.com/topic/208313-dxfs-wip-thread-more-iron-hands/page/4/#findComment-2595703 Share on other sites More sharing options...
Dosjetka Posted December 22, 2010 Share Posted December 22, 2010 http://i62.photobucket.com/albums/h96/DTRI/PICT0282.jpg How d'you do the combat knife on this chap? Ludovic ? Link to comment https://bolterandchainsword.com/topic/208313-dxfs-wip-thread-more-iron-hands/page/4/#findComment-2596078 Share on other sites More sharing options...
Iron Father Ferrum Posted December 22, 2010 Author Share Posted December 22, 2010 http://i62.photobucket.com/albums/h96/DTRI/PICT0282.jpg How d'you do the combat knife on this chap? Ludovic ? Sorry bro, didn't see that post before. My bad. In any case. On one of the Devastator sprues, there's a hand holding a textured handle which is designed to be used for holding one of the meltabombs or ammo boxes that are likewise on said sprue. All I did was clip off the hand from a bolt pistol hand and glue that hand on instead. The combat blade's grip was clipped below the crossguard and glued on on top; the skull on the bottom of the hilt was clipped from the bottom of one of the scroll cases that come on Tactical Squad sprues. There's two of them, sort of hanging together, and have skulls on the bottom. There's one hanging from the belt of my Librarian earlier in this thread; on the standard Tactical sprue with the arms and bolters, its between the row of purity seals and the unhelmeted head. So I just clipped one of the skulls off, cleaned it up a bit, and glued it to the bottom of the handle that extends from the fist. And boom! Combat blade held at the ready. Link to comment https://bolterandchainsword.com/topic/208313-dxfs-wip-thread-more-iron-hands/page/4/#findComment-2596128 Share on other sites More sharing options...
Iron Father Ferrum Posted April 8, 2012 Author Share Posted April 8, 2012 And now I'm back in the saddle and ready to keep this rolling. Next up on my worktable is an Honor Guard squad for my Iron Hands. The whole squad is being mildly converted from the new-style Techmarines, and will consist of the following five individuals: Chapter Champion: Thunderfire Cannon crewman with relic blade Chapter Banner Bearer: Techmarine with relic blade and auspex (as a Servitor Control Unit) on a Terminator base, with a servitor carrying the Chapter Banner Guard #1: Limited Edition Techmarine with relic blade Guard #2: Limited Edition Techmarine with power weapon Guard #3: Techmarine with power weapon So, after a little bit of paint and some cutting, here's step one of the Champ: http://i62.photobucket.com/albums/h96/DTRI/P1000095.jpg So I clipped the blade and bottom off of a cog-toothed LE Techmarine axe, then did the same to the two-handed thunder hammer from the Death Company box, and combined the two. I then went back and clipped the arms from the same axe-arm and one of the bolter-arms in order to get the bulkier pauldrons. I'm going to trim the skull off of the back of the right hand -- I don't like how it looks compared to the giant augmetic left hand. I did some test-fittings and the arms aren't quite wide enough to stretch the right arm all the way to the shoulder socket, but a little experimental gouging of the pauldron on that side should leave a large enough space to make it least look right upon casual inspection. We'll see how it comes out. Link to comment https://bolterandchainsword.com/topic/208313-dxfs-wip-thread-more-iron-hands/page/4/#findComment-3034879 Share on other sites More sharing options...
Iron Father Ferrum Posted April 10, 2012 Author Share Posted April 10, 2012 So, I've got the main part of my champ done. I decided to paint them all in silver-metallics to go with the Morlocks from Fulgrim, which were described as not having the solid black of the Legion/Chapter, but instead to have a pure iron paint to their armor. He's going to have one of the big Techmarine backpacks -- they all are -- I just need to do a little converting first before I start painting it. I figure I'm going to mount a servo-skull from the Dev set on there, as well as having a bolter on some sort of arm or mechadendrite so that his weaponry is all represented on the model. Here he is: http://i62.photobucket.com/albums/h96/DTRI/P1000099.jpg http://i62.photobucket.com/albums/h96/DTRI/P1000100.jpg http://i62.photobucket.com/albums/h96/DTRI/P1000096.jpg Link to comment https://bolterandchainsword.com/topic/208313-dxfs-wip-thread-more-iron-hands/page/4/#findComment-3035869 Share on other sites More sharing options...
Andrew J Posted April 26, 2012 Share Posted April 26, 2012 Really like the new ideas for the honor guard squad. The first guy looks good. Keep it up! Link to comment https://bolterandchainsword.com/topic/208313-dxfs-wip-thread-more-iron-hands/page/4/#findComment-3048405 Share on other sites More sharing options...
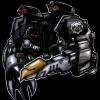
Iron Father Ferrum Posted June 2, 2012 Author Share Posted June 2, 2012 So I'm unboxing my Storm Talon. Specifically, I'm looking at all the bits and parts that I'll be needing to cut, trim, excise, and in other way remove to achieve a successful conversion to make the Storm Talon look better than it does as a stock, ugly, chunky aircraft. So on to the pictures! http://i62.photobucket.com/albums/h96/DTRI/IMAG0161.jpg http://i62.photobucket.com/albums/h96/DTRI/IMAG0162.jpg First up, here's the box. The damn thing is the size of a Land Raider box, and I cannot imagine why they'd need that big a box for what is, from its photos in WD, only slightly larger than a Rhino. And in the second pic, you can see that a lot of that vertical space is wasted; that went for that size box, I imagine, so they could fit all the pieces on just two LR-sized sprues. http://i62.photobucket.com/albums/h96/DTRI/IMAG0163.jpg In the third, I'd laid out the components; this is everything in the box except the instructions and the transfers sheet. http://i62.photobucket.com/albums/h96/DTRI/IMAG0165.jpg So point the first in slimming this thing down is getting rid of the ridiculous swivelling gun mounts for the chin assault cannons. You can see here the cannon bits fit nicely into the boxed-out area where the actual swivel mount is supposed to go. You can see the fixed part of the chin-swivel above where I'm holding the gun; that part will have to get cut out at least partially to ensure a clean fit for the guns. http://i62.photobucket.com/albums/h96/DTRI/IMAG0166.jpg And here we see a close-up of the mounts for the cheek-guns. These also are going to get cut off so I can post the cheek guns directly to the fuselage. Link to comment https://bolterandchainsword.com/topic/208313-dxfs-wip-thread-more-iron-hands/page/4/#findComment-3076150 Share on other sites More sharing options...
Iron Father Ferrum Posted June 2, 2012 Author Share Posted June 2, 2012 So, first, to settle accounts, here's a quick shot of my three Razorbacks for the Tenebrae Lux competition. http://i62.photobucket.com/albums/h96/DTRI/IMAG0167.jpg As for the Storm Talon, here's two more pics of the cheek gun mounts getting ground down. The first is a comparison of a trimmed one (right) to an untouched one (left). The second picture is of a missile pod "mounted" on the trimmed down cheek mount. Brings it in nice and close, slims it down. http://i62.photobucket.com/albums/h96/DTRI/IMAG0168.jpg http://i62.photobucket.com/albums/h96/DTRI/IMAG0169.jpg Link to comment https://bolterandchainsword.com/topic/208313-dxfs-wip-thread-more-iron-hands/page/4/#findComment-3076275 Share on other sites More sharing options...
Iron Father Ferrum Posted June 2, 2012 Author Share Posted June 2, 2012 And here's a frontal view with all of the weapons now mounted to the fuselage. Slimmed down and sleeker on the sides, clustering them up like them gives its front a more pugnacious aspect that I hadn't really considered. You be the judges, and let me know what you think. http://i62.photobucket.com/albums/h96/DTRI/IMAG0170.jpg Link to comment https://bolterandchainsword.com/topic/208313-dxfs-wip-thread-more-iron-hands/page/4/#findComment-3076339 Share on other sites More sharing options...
Recommended Posts
Archived
This topic is now archived and is closed to further replies.