shortysl Posted September 26, 2013 Share Posted September 26, 2013 Nice conversions Brother, I think you should give your namesake a Plasma pistol for the extra CC attack and a Storm shield carried by a servitor/watcher for added protection He wouldn't get the additional attack if he has a Storm Shield. Link to comment https://bolterandchainsword.com/topic/270200-avoghais-5th-company-and-support-update-etl-adds-on/page/3/#findComment-3476065 Share on other sites More sharing options...
Master Avoghai Posted September 26, 2013 Author Share Posted September 26, 2013 Nice conversions Brother, I think you should give your namesake a Plasma pistol for the extra CC attack and a Storm shield carried by a servitor/watcher for added protection He wouldn't get the additional attack if he has a Storm Shield. Yup, that´s why I'm thinking about a combi flamer and a storm shield since I'll lose the attack anyway... Link to comment https://bolterandchainsword.com/topic/270200-avoghais-5th-company-and-support-update-etl-adds-on/page/3/#findComment-3476075 Share on other sites More sharing options...
Interrogator Stobz Posted September 26, 2013 Share Posted September 26, 2013 Ah yes, the old "...can never claim..." rule. Please excuse my brainfart. :D s Link to comment https://bolterandchainsword.com/topic/270200-avoghais-5th-company-and-support-update-etl-adds-on/page/3/#findComment-3476084 Share on other sites More sharing options...
shortysl Posted September 27, 2013 Share Posted September 27, 2013 Ah yes, the old "...can never claim..." rule. Please excuse my brainfart. :D s To be fair, I've never understood why a veteran marine, with centuries of combat experience, has never figured out how to smash someone in the face with the edge of his shield! Maybe in the next rulebook Storm Shields should allow either an extra Attack or a 3+ Invulnerable Save, chosen in each round of combat? Link to comment https://bolterandchainsword.com/topic/270200-avoghais-5th-company-and-support-update-etl-adds-on/page/3/#findComment-3477193 Share on other sites More sharing options...
Dark Rage Posted September 28, 2013 Share Posted September 28, 2013 Nice conversions when I did mine I actually started off with a sword as well but thought the mace would be better of. I like the sword pose in the right hand. Good stuff! DR Link to comment https://bolterandchainsword.com/topic/270200-avoghais-5th-company-and-support-update-etl-adds-on/page/3/#findComment-3478441 Share on other sites More sharing options...
Master Avoghai Posted September 29, 2013 Author Share Posted September 29, 2013 Just to compare http://i2.photobucket.com/albums/y50/Masteravoghai/Dark%20angels/AAA92E21-88DC-4850-8331-E6E334FF0066-2616-0000035213408E77_zps5a89ad61.jpg http://i2.photobucket.com/albums/y50/Masteravoghai/Dark%20angels/4AAAB2D3-C5C6-49EB-B357-008F4C54C2DA-2590-00000350993AAC16_zps75d806da.jpg Link to comment https://bolterandchainsword.com/topic/270200-avoghais-5th-company-and-support-update-etl-adds-on/page/3/#findComment-3479452 Share on other sites More sharing options...
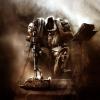
Bryan Blaire Posted October 2, 2013 Share Posted October 2, 2013 Really like the appearance of the combi-flamer version! Very ominous appearance. Shave that chalice off and he will look great! Should look fantastic with some paint. Link to comment https://bolterandchainsword.com/topic/270200-avoghais-5th-company-and-support-update-etl-adds-on/page/3/#findComment-3482704 Share on other sites More sharing options...
Master Avoghai Posted October 2, 2013 Author Share Posted October 2, 2013 It's actually a hand flamer by FW, you can see the weapon here I've used it to convert a combi flamer. But for Avoghai, I think I'll use the combi flamer Tigrus. I've ordered the bitz and should receive them tomorrow. So it seems that the second version has the most votes on every forums I've posted it, let's go for it then... Link to comment https://bolterandchainsword.com/topic/270200-avoghais-5th-company-and-support-update-etl-adds-on/page/3/#findComment-3482872 Share on other sites More sharing options...
Master Avoghai Posted October 3, 2013 Author Share Posted October 3, 2013 Thanks to the quick response of bitzarium.com, I've been able to end my conversion yesterday. http://i2.photobucket.com/albums/y50/Masteravoghai/Dark%20angels/22A21C05-C9C6-4E7F-B9DA-E37F2EC4485D-2535-000003C651FCAB24_zps2f7efa05.jpg http://i2.photobucket.com/albums/y50/Masteravoghai/Dark%20angels/5fd288f1-2b94-4634-acdf-e99735500ce9.jpg C&C welcome Link to comment https://bolterandchainsword.com/topic/270200-avoghais-5th-company-and-support-update-etl-adds-on/page/3/#findComment-3484052 Share on other sites More sharing options...
Tanhausen Posted October 3, 2013 Share Posted October 3, 2013 Nice nice nice :) Link to comment https://bolterandchainsword.com/topic/270200-avoghais-5th-company-and-support-update-etl-adds-on/page/3/#findComment-3484099 Share on other sites More sharing options...
JJD Posted October 3, 2013 Share Posted October 3, 2013 I really like this, very well done. Which kit is the sword from? Link to comment https://bolterandchainsword.com/topic/270200-avoghais-5th-company-and-support-update-etl-adds-on/page/3/#findComment-3484112 Share on other sites More sharing options...
Bryan Blaire Posted October 3, 2013 Share Posted October 3, 2013 Fantastic, Master Avoghai! The blade is from the RW Command Squad/Black Knights box, JJD. Link to comment https://bolterandchainsword.com/topic/270200-avoghais-5th-company-and-support-update-etl-adds-on/page/3/#findComment-3484313 Share on other sites More sharing options...
JJD Posted October 3, 2013 Share Posted October 3, 2013 I thought it must be as it's a kit I don't have yet.Thanks Link to comment https://bolterandchainsword.com/topic/270200-avoghais-5th-company-and-support-update-etl-adds-on/page/3/#findComment-3484497 Share on other sites More sharing options...
Dark Rage Posted October 4, 2013 Share Posted October 4, 2013 Very nicely done, really like how the pose turned out, great stuff. DR Link to comment https://bolterandchainsword.com/topic/270200-avoghais-5th-company-and-support-update-etl-adds-on/page/3/#findComment-3485987 Share on other sites More sharing options...
Cactus Posted October 4, 2013 Share Posted October 4, 2013 He's just too badass for words. After seeing the many excellent conversions around here I'm starting to regret gluing my Dark Vengeance characters together so hastily. Link to comment https://bolterandchainsword.com/topic/270200-avoghais-5th-company-and-support-update-etl-adds-on/page/3/#findComment-3486014 Share on other sites More sharing options...
Master Avoghai Posted November 5, 2013 Author Share Posted November 5, 2013 So now currus belli has started and I shall not fail 3 of my tanks are already primed : http://i2.photobucket.com/albums/y50/Masteravoghai/Dark%20angels/32279346-EB70-4D4B-B0B3-F0692B739417-9076-00000D662800EB96_zps45c6e7f7.jpg Half of the work is done, thanks army painter :lol: Link to comment https://bolterandchainsword.com/topic/270200-avoghais-5th-company-and-support-update-etl-adds-on/page/3/#findComment-3513806 Share on other sites More sharing options...
facmanpob Posted November 5, 2013 Share Posted November 5, 2013 Yay, go Ironwing! I like the converted Seraphicus model very much! Link to comment https://bolterandchainsword.com/topic/270200-avoghais-5th-company-and-support-update-etl-adds-on/page/3/#findComment-3513809 Share on other sites More sharing options...
The_Chaplain Posted November 5, 2013 Share Posted November 5, 2013 good stuff man, thanks for the link. Link to comment https://bolterandchainsword.com/topic/270200-avoghais-5th-company-and-support-update-etl-adds-on/page/3/#findComment-3513960 Share on other sites More sharing options...
Master Avoghai Posted November 6, 2013 Author Share Posted November 6, 2013 Just a message to turn a page... I've finally found time and courage to put my old RW on ebay. The models have evolved, my painting skills have evolved... I felt necessary to make another RW project. After 2 days online, someone finally clicked on the "Buy it now" link and I'm now back from sending the package. I hope those models will bring him all the satisfaction they brought to me Memories : http://i2.photobucket.com/albums/y50/Masteravoghai/EBay%20Saim%20Hann/9362C1BE-A154-4507-A71E-7ED648DB80D2-7825-00000C10687B6CEE_zps8713e4d6.jpg http://i2.photobucket.com/albums/y50/Masteravoghai/EBay%20Saim%20Hann/DE481E3C-7999-4385-9D11-A3E99709EA05-7825-00000C1072045093_zps5f10ce0d.jpg http://i2.photobucket.com/albums/y50/Masteravoghai/EBay%20Saim%20Hann/99224D16-240B-463F-8069-8977FB678759-7825-00000C107B266C31_zpsa7ab048e.jpg Now... My Ravenwing is dead... Long live my Ravenwing! :-P Link to comment https://bolterandchainsword.com/topic/270200-avoghais-5th-company-and-support-update-etl-adds-on/page/3/#findComment-3515079 Share on other sites More sharing options...
Spaced Hulk Posted November 6, 2013 Share Posted November 6, 2013 Excellent work throughout this thread mate! Really like the Contemptor Dread and the Deathwing Champion, and your Seraphicus conversion is very similar to how I'm planning to model my own Chapter Master. Very well done, keep up the good work! Link to comment https://bolterandchainsword.com/topic/270200-avoghais-5th-company-and-support-update-etl-adds-on/page/3/#findComment-3515247 Share on other sites More sharing options...
Tanhausen Posted November 7, 2013 Share Posted November 7, 2013 Long live! Link to comment https://bolterandchainsword.com/topic/270200-avoghais-5th-company-and-support-update-etl-adds-on/page/3/#findComment-3515917 Share on other sites More sharing options...
Master Avoghai Posted November 8, 2013 Author Share Posted November 8, 2013 I needed to post this tutorial for ages, so now let's do it! Inspired by Elmo work, I needed to make the Nephilim and DT swapable... The kit is costly enough to have to buy 2 of them! So how to do? FIRST : READ ENTIRELY THIS TUTORIAL BEFORE STARTING CUTTING ANYTHING. YOU'LL SEE THAT I RECOMMEND DOING THING LATER. Material : I use 2 types of magnets: - rare earth -magnetic tapes : typically those used for magnetizing the bases. They're thin but only can be used for small parts because they're weaker. they're also can be use as a magnet oposition for a rare earth rather than metal. The principal advantge of this technic is that they're easy to cut. http://i2.photobucket.com/albums/y50/Masteravoghai/Dark%20angels/CB7381AF-F639-4D7E-A02F-70EF8C9419C5-1950-000001D0D6BC6B89.jpg Process I've started by preparing the weapons. First I've mounted them to see how I could deal with that. Once the glue has dried I've firts checked how they fit on their localization : good news they could fit without magnets. You can place them and they'll stand by themselves. Howhever Magnetizing is necessary for the future. Due to the weapons swap you are likely to increase the size of their location. So it's better to secure it. So I've started by cutting magnetic tapes using the pieces as templates then glued them on the back http://i2.photobucket.com/albums/y50/Masteravoghai/Dark%20angels/27AB65BA-ABAE-41EF-AD77-ED49E659C57B-1950-000001D0E3F9F21D.jpg Then for the internal part WARNING! Before cutting, put the magnetized weapons on the tape, you'll see it will accept sticking in certain positions, due to magnetic fields... So you'll need cut the tape in the right position http://i2.photobucket.com/albums/y50/Masteravoghai/Dark%20angels/384B4F7A-366C-406A-8E12-26BEE94DFE56-1950-000001D0EDA13416.jpg Check that the weapon fit correctly and then glue the weapon slot under the wing. http://i2.photobucket.com/albums/y50/Masteravoghai/Dark%20angels/9DA59680-F02D-4CC1-9FBC-3B48B301A4BF-1950-000001D0F745811C.jpg Central weapon : Here again, use the weapon as template and cut magnetic tapes at the proper size. http://i2.photobucket.com/albums/y50/Masteravoghai/Dark%20angels/47DCFB32-2508-4AF8-9CEA-F605909A15E1-1950-000001D116C1FAD5.jpg The rift cannon is the only one receving a rare earth because it had room for it inside. Just use one big and powerful enough so that the magnetic field could stick on the tape inside the weapon slot. To test it, just put a point of cyanoacrylate, put the magnet and check if you feel a magnetic field on a free magnetic tape. If not, just remove the rare earth and glue a bigger one. http://i2.photobucket.com/albums/y50/Masteravoghai/Dark%20angels/A4DF0C0C-DDBB-4870-99DC-956859DC261D-1950-000001D12267EA05.jpg Put a magnetic tape inside the nose of the plane. http://i2.photobucket.com/albums/y50/Masteravoghai/Dark%20angels/4ECB59FA-6FB6-4CFF-8B7E-48BE91371C5F-1950-000001D1048C5537.jpg The bomb : THAT'S WHERE I'VE MADE A MISTAKE THAT I LUCKILY WAS ABLE TO CORRECT SO WARNING!!!!!!!!! I first thought I could simply put a magnetic tape on the hull, but then the bomb wouldn't have fit because the fixiation would have been external. So I dig a hole to put a tape inside but I totally cross the hull and therefore had nothing to glue the tape on.... Gah Finally I've made the hole just big enough to put a little rareearth using cyano to secure it on the edge... Not perfect but It was the only solution at this point The ideal solion would have been to glue a magnetic tapes INSIDE the hull But I've had already glued the superior part THEREFORE IT IS VERY IMPORTANT TO START BY MAKING THE HOLE AND GLE THE TAPE BEFORE GLUING THE SUPERIOR PART Just dig and put a magnetic tape BIGGER than the hole inside the hull with the magnetic part just appearing by the hole. If you decide to put a rare earth because you want a tougher solution it is also better to work before because it allows you to put a plastic part to prevent the magnet to move is the glue eve comes to break... http://i2.photobucket.com/albums/y50/Masteravoghai/Dark%20angels/B0F546A7-835B-4494-81E9-C388126CD529-1950-000001D12A7BC89C.jpg Then I've just add a little piece of magnetic tape on the bomb. Note that I've left the little pin on the front because it preven it to turn... http://i2.photobucket.com/albums/y50/Masteravoghai/Dark%20angels/F548D9DD-489B-4124-97D0-74A7668E0807-1950-000001D133C1C6B3.jpg Then the heavy bolters. They receive a rare earth. Simple. Standard. http://i2.photobucket.com/albums/y50/Masteravoghai/Dark%20angels/F622B0CC-6F56-4D0F-BC6F-22B35374EC83-2816-000003DE4DCE2F7A.jpg The rear part So... I've started by perparing the antennas/decorations location by removing entirely the plastic. http://i2.photobucket.com/albums/y50/Masteravoghai/Dark%20angels/C3E764E6-CE73-427A-9F63-F8484D8133F5-2816-000003DDEBF7129E.jpg DON'T STICK THE MAGNETIC TAPE NOW!!!! Then mount the antennas and the DT decorations This is the most difficult step and the most sensible. For antennas it's pretty simple, just put a rare earth inside. http://i2.photobucket.com/albums/y50/Masteravoghai/Dark%20angels/0D98E4BA-0CB5-491B-8BF1-6CE965AAFAA8-2816-000003DE07C27660.jpg http://i2.photobucket.com/albums/y50/Masteravoghai/Dark%20angels/279765EE-7278-4261-88E0-B450A4EC94C6-2816-000003DE1033396E.jpg The critical parts lies on the lateral decorations. Indeed they are thin and you'll have to put a rare earth. Why not a magnetic tape? It's possible but risky...Indeed you'll have to remove the little form behind the decoration and then glue a magnetic tape of the same form at this place. If it works, ok... But if the pieces is too big to stand with a tape, since you've remove a part of the thickness of the piece and therefore have less room to dig to insert a rare earth Maybve a good solution is to glue a tape BEFORE removing the extra thickness then check if it stands, and if so remove the magnetic tape to pull the extra thickness off...But I prefer the rare earth Digging must be careful. dig a little, check is the piec is ok on the other side, then go on, stop, check etc... http://i2.photobucket.com/albums/y50/Masteravoghai/Dark%20angels/8E4C8970-57F9-4EF5-8F29-DF41F3475FEB-2816-000003DDCD7CF4D2.jpg You risk to touch a little of the railings but it's ok http://i2.photobucket.com/albums/y50/Masteravoghai/Dark%20angels/536ADE97-3CFC-416A-BC13-4F30A0BC8803-2816-000003DDD5548C88.jpg That's why I didn't want you to glue the magnetic tape on the hole : this allow you to check if your rare earth dosn't pass through the hole. http://i2.photobucket.com/albums/y50/Masteravoghai/Dark%20angels/94960B21-D8DB-42AA-A8A1-9E39064A5030-2816-000003DDBCC054BF.jpg Once you've checked you can glue the magnetic tape. http://i2.photobucket.com/albums/y50/Masteravoghai/Dark%20angels/9E048B6D-AA7C-4249-A99C-EE2C5E663056-2816-000003DDFACCAD6E.jpg http://i2.photobucket.com/albums/y50/Masteravoghai/Dark%20angels/AA97D951-2065-4150-9396-956ABE6B4F98-2816-000003DE00FAF735.jpg For the superior part it's easy as one 2 three Just glue a magnetic tape on both superior parts and inside the hull. http://i2.photobucket.com/albums/y50/Masteravoghai/Dark%20angels/6E94A0DE-04F1-4D91-8798-071ACD3E530E-2816-000003DE24641DD2.jpg I've juste secured the inside magnet to prevent it to fall inside the hull by adding plastic bars. http://i2.photobucket.com/albums/y50/Masteravoghai/Dark%20angels/032FB9DE-4B0C-4436-9517-4B5366B08916-2816-000003DE2A6661C3.jpg check the magnetic fields like for the wings weapons then glue the magnetic tapes on the superior parts http://i2.photobucket.com/albums/y50/Masteravoghai/Dark%20angels/C3065593-C14B-4878-A9A5-108BDF447367-2816-000003DE35B83FA4.jpg Then check it fits http://i2.photobucket.com/albums/y50/Masteravoghai/Dark%20angels/B9164440-4859-412C-AAA4-1AE869FD2133-2816-000003DE456A6FE3.jpg http://i2.photobucket.com/albums/y50/Masteravoghai/Dark%20angels/E04FBCC3-4838-44DB-9800-B6895BA2CA6A-2816-000003DE3EB9AEEA.jpg That's all! For he rest I've glued the flyer as described in the box. Please note that to simplify, I've decided not to make the tail removable and also to glue the inferior parts (HB racks) rather than making them swappable with the little gravity system of the DT... I hope you've appreciated this tutorial! Cheers! Link to comment https://bolterandchainsword.com/topic/270200-avoghais-5th-company-and-support-update-etl-adds-on/page/3/#findComment-3516791 Share on other sites More sharing options...
The_Chaplain Posted November 8, 2013 Share Posted November 8, 2013 Absolutely fantastic tutorial! If you don't mind my asking what are the dimensions (heightXwidth)of the recessed panel where the rift cannon is mounted? Link to comment https://bolterandchainsword.com/topic/270200-avoghais-5th-company-and-support-update-etl-adds-on/page/3/#findComment-3516953 Share on other sites More sharing options...
Master Avoghai Posted November 9, 2013 Author Share Posted November 9, 2013 Well good question... :unsure: The problem is : my flyer and it's weapon are in the bottom of a nice case since I rarely use it so I don't have it handy to give you this information... Link to comment https://bolterandchainsword.com/topic/270200-avoghais-5th-company-and-support-update-etl-adds-on/page/3/#findComment-3517512 Share on other sites More sharing options...
elmo Posted November 9, 2013 Share Posted November 9, 2013 Ahhh young Padawan - taught you well have I. Great work on the tutorial I have always avoided the magnetic tape as I did not think it would be strong enough but glad to see it worked for you. Mine is in the box still waiting for a suitable challenge from SG.... but I will have to have a good look at your tutorial to steal ideas when I get to building mine. Link to comment https://bolterandchainsword.com/topic/270200-avoghais-5th-company-and-support-update-etl-adds-on/page/3/#findComment-3517582 Share on other sites More sharing options...
Recommended Posts
Archived
This topic is now archived and is closed to further replies.