WarriorFish Posted May 14, 2014 Share Posted May 14, 2014 Killing two xenos with one stone, that's the type of efficiency we like. No waste of the Emperor's supplies round here ;) Link to comment https://bolterandchainsword.com/topic/289301-numerican-night-watch-plog/page/3/#findComment-3687785 Share on other sites More sharing options...
march10k Posted May 15, 2014 Author Share Posted May 15, 2014 I don't remember these guys painting up so quickly, lol. I finished five bases, painted 2 autocannons, and primed the other three, with some work done on number three. I should be done with this in 1-2 days and back on track with the avenger and the stormtroopers. Yay, me! Link to comment https://bolterandchainsword.com/topic/289301-numerican-night-watch-plog/page/3/#findComment-3687915 Share on other sites More sharing options...
WarriorFish Posted May 15, 2014 Share Posted May 15, 2014 Excellent news, well done! I'll be back to see their pictures in a couple of days :P Link to comment https://bolterandchainsword.com/topic/289301-numerican-night-watch-plog/page/3/#findComment-3688154 Share on other sites More sharing options...
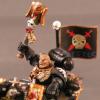
march10k Posted May 17, 2014 Author Share Posted May 17, 2014 Autocannon squad done...here they are with the preexisting squad in the background: And here are the new ones by themselves: ...and my plan for next week changed slightly, I only need four new autocannons, so one to go before it's back to work on the avenger. Link to comment https://bolterandchainsword.com/topic/289301-numerican-night-watch-plog/page/3/#findComment-3690607 Share on other sites More sharing options...
WarriorFish Posted May 17, 2014 Share Posted May 17, 2014 Great to see your progress as always, you're really churning them out :) Link to comment https://bolterandchainsword.com/topic/289301-numerican-night-watch-plog/page/3/#findComment-3690857 Share on other sites More sharing options...
march10k Posted May 17, 2014 Author Share Posted May 17, 2014 Given how long it takes to do an aircraft, and that I have three aircraft, a superheavy, and ten more infantry left in my first vow, I feel like I'm moving too slowly, lol Link to comment https://bolterandchainsword.com/topic/289301-numerican-night-watch-plog/page/3/#findComment-3691136 Share on other sites More sharing options...
WarriorFish Posted May 17, 2014 Share Posted May 17, 2014 It's all relative ;) My progress will change now I'll be moving on to infantry. Unfortunately I'm slow with troops and the scheme is fairly time consuming... Link to comment https://bolterandchainsword.com/topic/289301-numerican-night-watch-plog/page/3/#findComment-3691141 Share on other sites More sharing options...
march10k Posted May 19, 2014 Author Share Posted May 19, 2014 Made some progress on the avenger...took three tries to get the tail sections to stay on long enough for the glue to harden. Painful! And then the touch-up... More progress to report, but pics will come later...the undersides of the wings are basecoated and the center landing gear is almost finished. I might get that, the details on the undersides of the wigs, and maybe the big gun done today. Link to comment https://bolterandchainsword.com/topic/289301-numerican-night-watch-plog/page/3/#findComment-3693393 Share on other sites More sharing options...
march10k Posted May 26, 2014 Author Share Posted May 26, 2014 Oh, for the love of Him-on-Earth! Are we done with the website fixes so I can post an update that actually sticks? Link to comment https://bolterandchainsword.com/topic/289301-numerican-night-watch-plog/page/3/#findComment-3696482 Share on other sites More sharing options...
march10k Posted May 27, 2014 Author Share Posted May 27, 2014 Avenger just needs the cockpits done, I'm soooo close now! And I also primed and basecoated the shadowsword while still on the sprue. Pro Tip: If you prime a superheavy while it's still on the sprue, buy two cans of primer...I ran out on the last frame! Link to comment https://bolterandchainsword.com/topic/289301-numerican-night-watch-plog/page/3/#findComment-3697118 Share on other sites More sharing options...
WarriorFish Posted May 27, 2014 Share Posted May 27, 2014 Excellent, the next update will be it completed! :D Keep up the great work :) Link to comment https://bolterandchainsword.com/topic/289301-numerican-night-watch-plog/page/3/#findComment-3697391 Share on other sites More sharing options...
march10k Posted May 28, 2014 Author Share Posted May 28, 2014 Well, the rear-facing cockpit is done, and it will probably turn out to have been the harder one, due to the gun penetrating the canopy. I guess in the fluff this "defensive heavy stubber" would be useful against gargoyles, harpies, and hang-gliding cultists, but how often is a valid target going to be above and behind an avenger on the tabletop? It's purely decorative!!! (actually, the guy back there is, too...he has a control panel buried under the gun, but, really, what's he doing? Long range scanning? Communications? He's completely superfluous! I call him the "never die alone moral support officer," the guy in front does the flying and shoots all of the real guns. Heh...I forgot to rotate this one before uploading it. I was going to paint the frame that's molded onto the canopy, but it would literally mean painting over 2/3 of it, giving the gunner a tiny vision slit to the rear and making it impossible to see much inside the cockpit...so...transparent plasteel it is! Link to comment https://bolterandchainsword.com/topic/289301-numerican-night-watch-plog/page/3/#findComment-3699775 Share on other sites More sharing options...
march10k Posted May 29, 2014 Author Share Posted May 29, 2014 Yay!!!! Now, on to the Shadowsword! Link to comment https://bolterandchainsword.com/topic/289301-numerican-night-watch-plog/page/3/#findComment-3700047 Share on other sites More sharing options...
WarriorFish Posted May 29, 2014 Share Posted May 29, 2014 Well done, but aren't you going to paint the canopies? They look a little weird without anything on the metal bars. Link to comment https://bolterandchainsword.com/topic/289301-numerican-night-watch-plog/page/3/#findComment-3700291 Share on other sites More sharing options...
march10k Posted May 29, 2014 Author Share Posted May 29, 2014 I see you didn't read the text I sandwiched in between two pics: I was going to paint the frame that's molded onto the canopy, but it would literally mean painting over 2/3 of it, giving the gunner a tiny vision slit to the rear and making it impossible to see much inside the cockpit...so...transparent plasteel it is! Especially the rear gunner's canopy...it's half metal! You wouldn't be able to see in or out. I may someday go back and try to scrape off a lot of the rivets and just paint a canopy frame the way I would have sculpted it. Anyway, I started on the shadowsword....it's not as enormous as I feared...I will be able to put it on top of a skyshield for 4++ when it's done, muahahahahaha! It is, however, a royal PITA, I swear I spent two "someone shoot me" hours painting track for one side last night, and I still have two pieces. Anyway, good progress on one flank of the tank, here are pics: Here's the rest of what goes on the side (not counting the sponsons), I'll end up leaving the ladder off until the camo is applied at the end of the project. Link to comment https://bolterandchainsword.com/topic/289301-numerican-night-watch-plog/page/3/#findComment-3700890 Share on other sites More sharing options...
march10k Posted May 30, 2014 Author Share Posted May 30, 2014 Well, one side is done, but for the sponsons and the camouflage...now I have to do it all over again for the other side. It's not that bad, except for painting the tracks...that's a PITA! Link to comment https://bolterandchainsword.com/topic/289301-numerican-night-watch-plog/page/3/#findComment-3702234 Share on other sites More sharing options...
WarriorFish Posted June 1, 2014 Share Posted June 1, 2014 Yeah the tracks are a bit of a pain especially in-between the wheels and even more so when you consider that hardly anyone will ever look :P You're making good progress though, you'll have it all put together before you know it :) Link to comment https://bolterandchainsword.com/topic/289301-numerican-night-watch-plog/page/3/#findComment-3703523 Share on other sites More sharing options...
march10k Posted June 1, 2014 Author Share Posted June 1, 2014 Yes, but anyone who's ever built one himself will look, eh? Just to keep you honest...Well, the second flank is halfway done, I hope to finish it by tonight and start on the hull. Link to comment https://bolterandchainsword.com/topic/289301-numerican-night-watch-plog/page/3/#findComment-3703713 Share on other sites More sharing options...
march10k Posted June 2, 2014 Author Share Posted June 2, 2014 Well...the hull is together...sort of...what a nightmare! Five pieces that have to fit together perfectly, and then match up with about 12 holes in EACH flank of the tank...but at least I can finally see her taking shape....it won't be long now! Link to comment https://bolterandchainsword.com/topic/289301-numerican-night-watch-plog/page/3/#findComment-3704360 Share on other sites More sharing options...
WarriorFish Posted June 2, 2014 Share Posted June 2, 2014 Some good clamps you've got there! I hope you've got something to cushion the model though so it doesn't get damaged. This is why I glued it mostly together before painting mine, I was worried I might bodge it somehow otherwise! Link to comment https://bolterandchainsword.com/topic/289301-numerican-night-watch-plog/page/3/#findComment-3704582 Share on other sites More sharing options...
march10k Posted June 2, 2014 Author Share Posted June 2, 2014 The clamps are rubber, I know from previous projects that they don't mar the paint...besides, doing touch-ups concurrently with the camouflage after the hull is assembled wouldn't be extra work at all. Now, speaking of which, I had my mind set on hexagonal urban camo, but the fifteen rivets per square inch are in the way! Neither of the methods that I've considered (stencils or tracing paper to lay down the pattern, hand painting the camo in either case) is looking promising. I may have to forget digitization and just freehand an analog pattern with a number 2 pencil... Link to comment https://bolterandchainsword.com/topic/289301-numerican-night-watch-plog/page/3/#findComment-3704878 Share on other sites More sharing options...
hendrik Posted June 2, 2014 Share Posted June 2, 2014 Or you could shave away some rivets,the original baneblades didn't have that many either! Link to comment https://bolterandchainsword.com/topic/289301-numerican-night-watch-plog/page/3/#findComment-3705145 Share on other sites More sharing options...
WarriorFish Posted June 2, 2014 Share Posted June 2, 2014 Is that more or less work than painting them? :P Link to comment https://bolterandchainsword.com/topic/289301-numerican-night-watch-plog/page/3/#findComment-3705160 Share on other sites More sharing options...
march10k Posted June 2, 2014 Author Share Posted June 2, 2014 Well, the application of camouflage has begun, it needs to be done before much more assembly occurs: Each splotch gets two coats of paint, some of those pictured haven't been repainted yet...it's relatively slow going with a charcoal pencil to design each splotch and a lot of plate to cover, but I'm happy with the results. I was planning on just four colors, three shades of gray and the blue-gray, but in the end I went for small splashes of black and white, the "islands" of medium, dark, and blue-gray weren't breaking up the light gray basecoat enough for my liking, so I started connecting islands with "bridges" of white and black. Six colors...not what I planned, but I'm liking the results. /edit/ I started using black and white to "connect islands," but since then I've added small splotches on the edges of islands to shrink and reshape the light gray space, as well. /edit again/ Well, it's been a very productive night, as you can see. The turret, the top/front of the hull, and one flank has camouflage. I also built the sponsons just far enough that I can hang them in place for painting without having glued much together at all. Painting and assembling the weapons comes later, priority is the camo, which I might be able to finish tomorrow. Link to comment https://bolterandchainsword.com/topic/289301-numerican-night-watch-plog/page/3/#findComment-3705451 Share on other sites More sharing options...
WarriorFish Posted June 3, 2014 Share Posted June 3, 2014 A couple of coats covers well, it's coming along nicely now. I'm eager to see it finished and it doesn't look like I'll have long to wait! :D Link to comment https://bolterandchainsword.com/topic/289301-numerican-night-watch-plog/page/3/#findComment-3705818 Share on other sites More sharing options...
Recommended Posts
Archived
This topic is now archived and is closed to further replies.