MitchH311 Posted December 3, 2015 Share Posted December 3, 2015 I'd love to know where you sourced the "dreads" from? Awesome work mate, a really nice conversion so far. Link to comment Share on other sites More sharing options...
Soric Posted December 3, 2015 Share Posted December 3, 2015 The dreads look pretty cool and will definetly make Minghati stand out. Looking forward to seeing how you do the shield :D Link to comment Share on other sites More sharing options...
CommodusXIII Posted December 3, 2015 Share Posted December 3, 2015 The dreads look like mechadendrites from the Myrmidon set. Link to comment Share on other sites More sharing options...
Ace Debonair Posted December 4, 2015 Share Posted December 4, 2015 This is magnificent stuff! Link to comment Share on other sites More sharing options...
EdT Posted December 5, 2015 Author Share Posted December 5, 2015 More progress to report today. @MitchH311, the big dreadlocks come from Archmagos Draykavac, while the little ones are from the Scyllax Automata. Glad people think they add something; it should look quite distinctive when combined with some of the other adornments I have in mind. So, the first bit of good news is that the Las-Spear is done. I cleaned up all the greenstuff work so hopefully when painted you won't notice it against the resin, wrapped wire around the haft to add some visual interest (I got through two and a bit spools, as you can see- it won't be as garish when painted!) and used some of the absolutely fantastic flexible pipe fittings from Zinge to add some detail to the styrene-wrapped bit immediately behind the connection point. This also hopefully serves as a way of blending the two segments visually, so it's not as obviously tacked on. Finally, I realised that I'd made a slight mistake on my measurements, and the pistons that strengthen the connection between the weapon and the arm were just a tiny bit too short now I'd repositioned the connector. Luckily this wasn't too much of a problem- I just cut the piston and extended it by a few milimetres with greenstuff. Next, I got to work on an important but boring job. I’ve mentioned before how my biggest inspiration in putting Mingati together comes from JeffTibbetts’ magnificent Queen Bee. One of the things I particularly loved about it was the way that thousands of years of successive paint jobs were suggested by the use of liquid greenstuff on the armour panelling, giving everything a subtle texture and a wonderful sort of patina that the painting brought out beautifully. I don’t have any liquid greenstuff, but I have plenty of acrylic medium, which as far as I can tell is more or less the same thing; so having masked off certain sections of the armour plating using blu tack, I put down a layer of medium over those bits that remained. I did too layers of this, using the blu-tack to mask different areas each time. Once this dried, it was easy to pick off the few bits that had got onto the trim, and gave the rest of the plating a nice sense of relief. Here's a little collection of armour plates showing how this process really scuffs up the smooth surfaces that were there before. Finally, I got on with adding vegetation to the base. I started off by adding small grass tufts to some areas; But soon moved on to adding the tall grass, which I attached by putting down another coat of the Vallejo Brown Earth and pressing it in. Once dry, this meant that everything was quite firmly attached. Here's where I got to- I still need to add some short tufts, but hopefully things are looking quite Serengeti-like now! Link to comment Share on other sites More sharing options...
Bjorn Firewalker Posted December 6, 2015 Share Posted December 6, 2015 Impressive work on the base. Link to comment Share on other sites More sharing options...
Mechanist Posted December 6, 2015 Share Posted December 6, 2015 This is shaping up nicely. It's going to look fantastic once done. Seeing your progress is the kick in the arse to get some green stuff mixed up for the next layer on my chaos knight. Link to comment Share on other sites More sharing options...
EdT Posted December 10, 2015 Author Share Posted December 10, 2015 Hi all. I thought I'd write something on a personal note before I add any update (that'll come soon). I’ve really enjoyed making Mingati, but that’s the problem; I’ve enjoyed it too much. This project has belatedly made me realise that even the limited time I have to devote to painting and modelling is taking me away from the things that really matter in life. I have too much stuff colonising too large a chunk of the living room, spend way too much money on resin that could be better used elsewhere, and am thinking too much about modelling projects when I could be considering other things. As a result, I’ve decided that once Mingati is assembled and painted, I’m going to down tools for good; he’ll be my last model before I leave the hobby permanently. Bluntly, either the hobby goes or my girlfriend does; and there’s never going to be any contest there. It’s quite strange to consider cutting off something which ultimately is a vehicle for creative expression that I really enjoy, but I suppose it gives me more of an opportunity to concentrate on my writing. It’s surprisingly liberating, really. In the coming weeks, I’ll be selling off my bits box drawer by drawer. People might want to keep an eye on ebay for that, as it’s ridiculously extensive and will be something of a bonanza. If anyone is looking for a very specific bit for a conversion, I may have it so do drop me a PM and I’m sure we can work something out. I’ll really miss this community. Saying this makes me determined to make Mingati absolutely the best he can possibly be; so there will be more progress to show on him soon. It’s not the end quite yet. Link to comment Share on other sites More sharing options...
AlphariusOmegon108 Posted December 10, 2015 Share Posted December 10, 2015 Sad to see you go, but like always, real life comes first. When you put your stuff on ebay, please send me a PM, I might consider buying of some stuff of you, sure we can make a deal :) Link to comment Share on other sites More sharing options...
Noctem Cultor Posted December 10, 2015 Share Posted December 10, 2015 Sorry to hear that, but its the right call. I hope this last project turns out as you hope. Link to comment Share on other sites More sharing options...
Black_out Posted December 10, 2015 Share Posted December 10, 2015 It's a shame to hear you'll be leaving us but I'm sure we all understand your decision and like said above, real life comes first. I wish you the best of luck with your writing and any other future endeavors! With all that having been said......UPDATES?!?!?! Link to comment Share on other sites More sharing options...
Teetengee Posted December 10, 2015 Share Posted December 10, 2015 :( You do you though, whatever makes you happy at the end of the day, is the most important thing for you to do. Link to comment Share on other sites More sharing options...
CommodusXIII Posted December 10, 2015 Share Posted December 10, 2015 It's always sad to hear, but I took a 10-year break myself so it's perfectly understandable. I'll keep an eye out for any AdMech bits lots you unload. Link to comment Share on other sites More sharing options...
gaurdian31 Posted December 10, 2015 Share Posted December 10, 2015 I'll be amongst the sad but understanding to see you go. I haven't commented before but your heresy thread was awesome and so has this one. You put so much into each model it is inspiring and the fluff you write is great. You will be missed for sure but as you are not gone yet I am sure we can look forward to some awesome updates! Link to comment Share on other sites More sharing options...
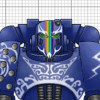
EdT Posted December 10, 2015 Author Share Posted December 10, 2015 Thanks all. I can''t deny that it's a real wrench, but it's for the best I think. I've started packing up my bits box, and the first tranche of listings have gone on ebay, if anyone is interested- do a search for "big bag of warhammer" to find them. There's plenty more to come- this is just the weapons! Anyhow, I promised some progress. Firstly, I positioned and pinned Mingati’s legs. I wanted to use one big pin to connect both legs rather than two smaller ones connecting a leg each- it seemed like it’d provide a much stronger bond. However, it’s also much more fiddly to get a single, straight pinhole all the way through, as everything has to align perfectly yet still give the pose I want. My solution was rather time consuming, but it worked ok thankfully. First I drilled a hole right through the hip joint from one leg recess to the other; then I positioned the left leg more or less how I wanted it using blue tack. On the right leg, the foot was already pinned to the lower leg, so that was fine; I glued the knee together normally, then used Vallejo Still Water (which I’ve found far more useful as a glue or gloss varnish alternative than as a scenic product) to form a temporary bond between the upper leg and the hip. This gave me enough of a bond to keep everything in place, but could also be taken apart with a bit of force and with no damage to the components. The only downside is that it takes a while to dry, so I had to sit there holding everything in place with no hands free for about fifteen minutes. Once the Still Water had dried, I removed the blu-tacked leg, carefully took the whole thing off the base and then returned to my pin hole. Now the leg joint was in, I could just continue drilling through the hip, meaning that everything was aligned. Once that was done, I pulled the leg off, scraped off the residue (Still Water dries like pva), and did exactly the same on the other leg. I don’t have any photos of this process, as sadly I’m not (yet) fitted with mechandrites and needed both hands to hold everything in place! But this is the result; two legs positioned how I want them, with a single pin running right through the hip joint to keep everything stable. The next step will be to add the cabling. At present it’s not glued- I want to paint first- but it’s nice to see some visible progress. It also gives a sense for the first time of just how tall Mingati will be once done, which is handy for me, not just in visualisation terms but also in terms of adding a few bits and bobs to the torso that will stretch more or less to the ground. The other bit of progress? Well, I sat down and painted Mingati’s chest heraldry. At present it’s not quite done- it’s a too bright and needs to be scuffed up with everything else- but I think it’s translated from the screen to the model reasonably well. Things aren’t 100% perfect on it- the small cogged device in particular is a little muddy and needs some work- but I don’t mind that really. Real Masai shields are often quite rough, and I imagine that Miterienanka will have painted it on himself. Here’s a photo. This naturally brings me on to how I want the rest of Mingati to be painted. The robotic skeleton isn’t an issue really- I’m planning on shamelessly copying JeffTibbetts’ wonderful grubby metal recipe from the Queen Bee for that element of the model. The front-facing armour and carapace is a bit more of an issue. Colours are not a problem- it’ll have to be red, white and black, obviously, but a conventional colourful heraldic scheme really doesn’t fit Mingati’s character, and would be too busy in any case. After some pondering, I realised that, as ever, the solution lies in my desire for Mingati to be presented as a regular Kalenjinite warrior, albeit one that happens to be made of metal and who is the size of a house. This means that the armour plating will be a rather scuffed metallic black (with a steel trim, I think); you’ll see that the chest plate has got a metallic basecoat on, and that’s my starting point. I’ll add multiple light coats of black ink to this that will really darken the whole thing down; once it’s weathered and spots of rust/corrosion are added, it should have some interest to it, especially given the texturing I’ve done. I want a bit more detail too, although ideally I want this aspect to be quite subtle. Take a look at this postcard of some Masai warriors, especially at their legs. The patterning comes from red ochre, which the Masai use very heavily to decorate their bodies. I want to replicate that on Mingati- I’m thinking of adding simple stripes, zig zags and the like on top of the metallic black armour using an iron oxide weathering powder. This is a contrasting colour, but also has the advantage of being matte. At this point I’m not sure if I want to do these markings using masking tape or by hand- the former may be too clean, but the latter might be too messy! It also occurs to me that any use of white spirit to mix with the pigment might stop the masking tape from , well, masking. A bit of experimentation is probably in order. Link to comment Share on other sites More sharing options...
ChromeZephyr Posted December 10, 2015 Share Posted December 10, 2015 Like I said in your other thread, I'll miss seeing your wonderful projects...but you're certainly going out with a bang! :) Magnificent work. Link to comment Share on other sites More sharing options...
JeffTibbetts Posted December 11, 2015 Share Posted December 11, 2015 I'm feeling very bittersweet here. I somehow missed this thread and I just read the whole thing after readying that you're leaving the hobby. I understand the decision's probably already made, but I'd be remiss if I didn't say I think it's a shame. You have a talent, sir, and a dedication to see it put to stunning use. While I'm proud to see how much my work on the Queen has inspired you, it's tough for me to think this is probably your last model. I, myself, am a family man and, much to my chagrin, my wife and my daughter have no interest in the hobby. This clearly puts a limit on my time, but in no way do I feel like can't hobby. My Knight took me a year and a half. I worked on it off and on when I could, and took long breaks. Like, weeks or months. While they don't hobby, both of my ladies support it and understood and tolerated the incredible amount of work that went into my Queen. Both of them are proud of my achievement, and they like to see me happy. I'm in no way saying your lady-friend isn't tolerant or something. Only that hobby and relationships don't have to be mutually exclusive. I want to see this Knight finished because it's incredible. Your vision and execution are both top-notch. It's unique, fresh and deadly. I should also mention that I once sold off or just tossed almost all my old hobby stuff at one point in my life (the original Rogue Trader!!!), and it's been one of my deepest regrets. Link to comment Share on other sites More sharing options...
Bjorn Firewalker Posted December 11, 2015 Share Posted December 11, 2015 Good job on the feathered shield. Link to comment Share on other sites More sharing options...
Lemainus Posted December 13, 2015 Share Posted December 13, 2015 I have to echo Jeff's sentiments, man. It would be a poor partner that would demand you permanently stop something you're so good at, care so much about, and clearly enjoy. I know it's a bad argument to use personal anecdote as evidence, but I hope you guys come to some compromise, where she's getting the attention she needs and you can still create things like this. Everything in balance. I sincerely hope ya'll have an honest round of communication and come up with a solution. Not to be a jerk or anything. I don't want to come off as judgmental. But in my experience, ultimatums breed resentment and become sticking points for arguments. Link to comment Share on other sites More sharing options...
EdT Posted December 14, 2015 Author Share Posted December 14, 2015 No update this time I'm afraid- it's been rather busy- but I will have something soon. I need to get going on the Ion Gauntlet Shield, for a start! Thanks all for the thoughtful posts. @Lemainus, you'd be completely right to say that ultimatums are never a good idea- in this case, this is entirely a decision made of my own accord. Thanks too @JeffTibbetts for your perspective, and your kind words re Mingati. I entirely agree that hobby and relationships don't have to be mutually exclusive- but for the time being I think my time can be better spent elsewhere. The problem I have at present is trying to cover too many bases- something has to give, and that's got to be the hobby. I'll definitely finish Mingati, and that stops me from going cold-turkey entirely; he'll take well into the New Year, and it's a nice way of tapering things off. After that, perhaps I'll come back newly decluttered? I'm not sure. But for the time being, I think this is the right thing for me to do. Anyhow, there will be an update soon- I promise! And in the meantime, if I'm allowed, here is a summary of the bits box stuff I've put up to sell so far. There will be lots more soon! Link to comment Share on other sites More sharing options...
Lemainus Posted December 15, 2015 Share Posted December 15, 2015 Looking forward to the updates, and, for what it's worth... if it's your decision and it's one you're eager to make, go for it. :] Link to comment Share on other sites More sharing options...
Daemon2027 Posted December 15, 2015 Share Posted December 15, 2015 Really impressive. It's nice to see you take an idea, a be a theme not commonly used, and so expertly apply it to the model. Link to comment Share on other sites More sharing options...
EdT Posted December 19, 2015 Author Share Posted December 19, 2015 Some progress to show this morning. Firstly, I did something subtle. Hopefully it's not very obvious- the shoulder of the raptor is greenstuffed, to allow the new position of the arm, so today I painted it to blend in. I'm really glad that my greenstuffing managed to mimic the texture of the shoulder around it, and it's rather satisfying that matching the colours wasn't more of a chore. What else? Well, having pinned the legs I went ahead and glued them in place. Having done this, I then went to add the cabling that joins the two; but as I did so, I discovered a bit of a problem. Basically, my chosen pose is outside what the hip pistons (which I'd completely forgotten about) are designed to handle. The right leg's piston doesn't have enough space, while the left leg's piston needs to be way longer than the stock piece. This is a bit of a pain but not insurmountable- the right leg piston just needed a bit of cutting down, while the left leg one is currently curing, having been extended with greenstuff. Frustratingly, Mingati's pose isn't quite mechanically possible given the range of movement he is meant to have. However, it's only just out, and everything looks ok, so the only real damage is to my own sense of verisimilitude. While I was at this, I also drilled a small pin in the torso (which I still need to finish) and a accompanying hole in the hips; this means that the bulk of Mingati can stand up for the first time! This will help a lot when it comes to posing. One final thing; I've been moving forward on getting my test colourscheme right. You might remember that last time I had a metallic basecoat on; well I've now darkened this considerably using multiple coats of heaivly watered-down black ink and the odd silver drybrush to bring out the detail. It still needs more work- I think it needs another coat or two of the ink- but it's getting there. I really like how the relief is coming out. Once the bolts are picked out, the trim is done and the weathering goes on, I can start on the really scary bit- the red ochre markings. Link to comment Share on other sites More sharing options...
depthcharge12 Posted December 19, 2015 Share Posted December 19, 2015 Ugh tell me about those pistons, I had to honestly cut one of them down to the nub just to wedge it in for glueing: http://i911.photobucket.com/albums/ac316/treacyjohn2/1A0DCBBE-FEA8-44C0-BE42-DCA5120BC3B8_zpsvzwpjmme.jpg It's hard to see in that but the left one was cut all the way down. The only way you wouldn't have to do that is if your knight had a really wide stance. Link to comment Share on other sites More sharing options...
malika666 Posted December 20, 2015 Share Posted December 20, 2015 A bit late in the game perhaps, but this might still inspire you: http://io9.gizmodo.com/african-inspired-space-opera-yohance-is-going-to-be-our-1748879750 I echo the sentiments other have been expressing, it's a shame to see you go, but sometimes these things just happen. I'm very curious to see what other kinds of projects (outside of this hobby) you have. If you put the same kind of dedication in those as you do in this stuff, it might be quite epic. Speaking of which, you mentioned something about writing? Where can we find more of your other work? :) Link to comment Share on other sites More sharing options...

Recommended Posts
Archived
This topic is now archived and is closed to further replies.