CommodusXIII Posted February 9, 2016 Share Posted February 9, 2016 Now, it's really hard for me tell what you've converted here. That's a good thing, really, since that means your stuff is blending in sensibly. For starters, it looks like you wrapped the 'handle' of the spear and that's a really cool touch. Similarly, I can't tell if you added that cabling hanging out the back of the shoulder joints, but it looks awesome. I love the ad-hoc look it lends to the piece. I don't want to speak for Ed, but I've been following this closely and I think I can help point you in the right direction: Spear haft wrapping Cabling behind the shoulder joints Link to comment https://bolterandchainsword.com/topic/315513-mingati-an-east-african-knight-titan-project/page/6/#findComment-4300978 Share on other sites More sharing options...
JeffTibbetts Posted February 9, 2016 Share Posted February 9, 2016 Ah, quite right about the conversion bits I missed. Thanks for that. The last time I read through this thread I was skipping a lot because I was so distracted about EdT's post about quitting the hobby... It's worth climbing through all this again. Link to comment https://bolterandchainsword.com/topic/315513-mingati-an-east-african-knight-titan-project/page/6/#findComment-4301155 Share on other sites More sharing options...
EdT Posted February 10, 2016 Author Share Posted February 10, 2016 Thanks everyone- really glad people are enjoying this! I have to say that it's a real pleasure for me seeing Mingati gradually coming together day by day; it's a very slow process but a satisfying one, and I think it may point a way forward- of which more later. I've never really been one for sub-assemblies, but with this project it's been so obviously essential that I've forced myself to be disciplined- I've really liked how it's gone. No photos yet but I've been working on the arms a bit this evening- they now have the basic metallic patina, and now I need to start painting the details. The next modelling job (yes, I'm putting off the carapace and the Ion Shield) is to sort the right shoulder pauldron, which will have a very large pelt dangling off it and give me the opportunity to do a bit more animal print, which I've really enjoyed painting. As this may interact with the las-spear, I need to get that done and attached before I start the greenstuffing! Thanks for your thougts and suggestions, @JeffTibbetts! I'm glad you approve of the whole thing; it's suddenly looking as if finishing this project might not be so far off after all. I'm really glad that the conversion work blends in reasonably well with everything else; I'm so used to everything by now that I've long since lost the ability to work out whether it's seamless or not! Hopefully these relatively small things add up to a very personalised model. On the meat, I was thinking about this sort of thing- there seems to be a whole subculture of people over here who pop a joint of meat in their car bonnet, drive somewhere for the day and then enjoy a roast dinner when they get there. It seems a good way for an itinerant Knight Scion to make sure he has a good meal- obvously in reality there probably would be some foil involved to keep the moisture in, but I felt that would obscure what I was getting at. You're right that as it stands it perhaps doesn't look cooked enough- after considering a few options I figured the best way to suggest that sort of charred crustiness was to add some texture, so first off I mixed some sand textured medium and some black paint and added a coat. Sadly, this wasn't textury enough, so I've put on another coat, this time of pumice-effect paint. Hopefully once that's dry I can put some browns and blacks on there to really emphasise the cooked skin- peel that off and underneath hopefully it'll be lovely and pink and moist! Good point on the elbow too- while the broad pose of the arm is now fixed, I think I can get a lot of variation in terms of how much it's roated round at the shoulder. Still some scope for experimentation there, I hope. @Augustus b'Raass, Thanks. As it happens, I may have some good news there. I'm not promising anything, but with some fingers crossed I think I may have found a good compromise to let me continue doing some hobby stuff while also making the whole thing have a much smaller footprint in my flat (and indeed my life!). As an arty person herself my girlfriend agrees that it's a shame for me to stop entirely; she's a very good artist and so when we get a place toegether in the summer we can have a shared hobby space. I reckon that if I sell off my bits box and all my existing models, that will make a big difference- and then with all that stuff gone, if I concentrate on very long-term individual projects like Mingati (which I then sell on ebay when done) then that scratches the itch while being pretty low impact. This leads me towards larger individual models like Knights etc which have scope for lots of personalisation and let me take considerable time over. I have a couple of suitable things lined up in case this works out- I might model Mingati's opponent, for a start, although it wouldn't be something I could post here! We shalll see though- fingers crossed, as I say... Link to comment https://bolterandchainsword.com/topic/315513-mingati-an-east-african-knight-titan-project/page/6/#findComment-4302297 Share on other sites More sharing options...
JeffTibbetts Posted February 10, 2016 Share Posted February 10, 2016 That last paragraph makes me happy. My work here is finished. ;) Link to comment https://bolterandchainsword.com/topic/315513-mingati-an-east-african-knight-titan-project/page/6/#findComment-4302319 Share on other sites More sharing options...
EdT Posted February 20, 2016 Author Share Posted February 20, 2016 It's update time, and one of the lovely things about being at this stage of the project is that the fiddling around the edges is over- everything I do now seems to make an appreciable difference to the finished look of Mingati. Won't be too long until he's finished, hopefully! My last update showed Mingati's arms; his las-cutter is still half done, but I have managed to get the Ion Shield arm fully painted. Now I just need to build the shield itself, but one difficult step at a time. Here's a photo; I actually quite liked it attached to the 40mm base, as it looked like some crazy Mechanicus slapping machine. I figured it would be fine, but it's satisfying to see how easily the Thunderstrike Gauntlet from the plastic Warden blends so nicely into the Cerastus resin structure. But that's not all. I mention above the difficult steps remaining- I now have two main modelling jobs left, the Ion Shield and the roll-bar on the top carapace. Once these are done then Mingati will not take long at all to be finished. Until this morning there was a third difficult job left to do, and that was the red ochre patterning on the armour plates. This was intimidating me a bit, to be honest; I never like painting patterns and straight lines, and if I got it wrong I ran the risk of messing up the overall paint-job and having to do a lot of work to get back to where I started. At first, I tried deliniating everything with masking tape- but the tape was too thick, it took ages to apply, and I didn't think it would have looked right had I applied paint that way. So I did something uncharacteristic and figured I'd just do it by hand- and after a quick experiment on a bit of styrene, I was confident enough to give it a go. What I did, essentially, was to soak my brush in white spirits, stick it in a little pile of iron oxide weathering pigment, and then brush the result on each armour plate in as straight an even line as I could muster. I tried to vary the pattern on each segment of armour, and ensure it wasn't too overpowering. The end result was fairly satisfying; while it was a little rough, considering that in real life this would doubtless be applied by a Cyber-Mandril with a big bucket of animal fat mixed with ochre, it had the desired effect. I particularly liked how it was obviously something that had been applied over the slightly beaten up, rusty armour than a paint job. Here are the shin and groin plates. There are still several steps to follow before I can call the armour truly finished; I need to distress the ochre a bit (I imagine it runs a bit when rained on, so I'll soak a cotton bud in white spirit and run it down the plates in a few places), seal the end result and then attach it to Mingati himself. With that done, I'll then need to add the bead strands, paint them and finally give everything a bit of a dust weathering job. Still though, I feel appreciably closer to finishing Mingati than I did this morning; and here's a nice shot of him with his ochre-daubed armour on and his new arm. Link to comment https://bolterandchainsword.com/topic/315513-mingati-an-east-african-knight-titan-project/page/6/#findComment-4312880 Share on other sites More sharing options...
Brother Pheidias Posted February 20, 2016 Share Posted February 20, 2016 That looks incredible. Most characterful Knight evva! Link to comment https://bolterandchainsword.com/topic/315513-mingati-an-east-african-knight-titan-project/page/6/#findComment-4312890 Share on other sites More sharing options...
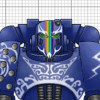
EdT Posted February 20, 2016 Author Share Posted February 20, 2016 Thank you! I'm pleased with how he's coming together, and I rather like the cumulative effect of all the red ochre lines- it almost suggests musculature in a weird sort of way. Once the beads are on Mingati, he should look properly distinctive. Quick update- I weathered and patterned the chest plate. This turned out to be slightly warped when I tried to put it on, but luckily it glued on fine under a bit of tension. Here's the plate on its own; ...and here's Mingati in full. Now the chest plate is on, I can do the beads and the head- another big bit of the jigsaw falls into place. Link to comment https://bolterandchainsword.com/topic/315513-mingati-an-east-african-knight-titan-project/page/6/#findComment-4312987 Share on other sites More sharing options...
oldschoolsavant Posted February 20, 2016 Share Posted February 20, 2016 Are you absolutely sure about this whole retirement thing ? ;) Is the shield heraldy going to be replicated on a shoulder or anywhere else ? I'll reserve judgement for now, but it's very striking....... Link to comment https://bolterandchainsword.com/topic/315513-mingati-an-east-african-knight-titan-project/page/6/#findComment-4313000 Share on other sites More sharing options...
Bjorn Firewalker Posted February 20, 2016 Share Posted February 20, 2016 Impressive work. I like the shield, but it looks larger than a standard Knight's tilting plate. I wonder if it provides any in-game benefits, like Sanctuary (see "Heirlooms of the Knightly Houses" in the 7th Edition Codex). Link to comment https://bolterandchainsword.com/topic/315513-mingati-an-east-african-knight-titan-project/page/6/#findComment-4313123 Share on other sites More sharing options...
Rangaman Posted February 21, 2016 Share Posted February 21, 2016 Crazy good! Link to comment https://bolterandchainsword.com/topic/315513-mingati-an-east-african-knight-titan-project/page/6/#findComment-4313522 Share on other sites More sharing options...
BeatTheBeat Posted February 21, 2016 Share Posted February 21, 2016 Still managing to hit the sweet spot on every single part, and the whole model is coming together insanely well. Soon there, keep it up!Cheers,BTB Link to comment https://bolterandchainsword.com/topic/315513-mingati-an-east-african-knight-titan-project/page/6/#findComment-4313698 Share on other sites More sharing options...
JeffTibbetts Posted February 22, 2016 Share Posted February 22, 2016 Agreed with what you're saying: it really is coming along in leaps and bounds now. Link to comment https://bolterandchainsword.com/topic/315513-mingati-an-east-african-knight-titan-project/page/6/#findComment-4314592 Share on other sites More sharing options...
Augustus b'Raass Posted February 22, 2016 Share Posted February 22, 2016 We should really petition Pixel Toys to make this another free skin when it´s finished. Who joins me in another Twitter campaign when he's finished?? Link to comment https://bolterandchainsword.com/topic/315513-mingati-an-east-african-knight-titan-project/page/6/#findComment-4314647 Share on other sites More sharing options...
JeffTibbetts Posted February 22, 2016 Share Posted February 22, 2016 I'd be down! Link to comment https://bolterandchainsword.com/topic/315513-mingati-an-east-african-knight-titan-project/page/6/#findComment-4314939 Share on other sites More sharing options...
TheHaplessHeretic Posted February 22, 2016 Share Posted February 22, 2016 Love this idea and it looks awesome so far, can't wait to see it finished :D Link to comment https://bolterandchainsword.com/topic/315513-mingati-an-east-african-knight-titan-project/page/6/#findComment-4314989 Share on other sites More sharing options...
Kelborn Posted February 23, 2016 Share Posted February 23, 2016 Looking so good! But as it will end soon, I really feel like this: https://www.youtube.com/watch?v=3leP_C9IXYg :( Link to comment https://bolterandchainsword.com/topic/315513-mingati-an-east-african-knight-titan-project/page/6/#findComment-4315996 Share on other sites More sharing options...
Morningshadow Posted February 23, 2016 Share Posted February 23, 2016 I have no idea how this is the first time I'm seeing this thread! That model is all kinds of win! The attention to detail and the concept to execution on this model is amazing! I could go on and on with more superlatives but this is now one of my favorite modeling projects to follow. Between you and Jeff's Queen Bee I have plenty of motivation to finally get started on my own knights. Link to comment https://bolterandchainsword.com/topic/315513-mingati-an-east-african-knight-titan-project/page/6/#findComment-4316156 Share on other sites More sharing options...
EdT Posted February 24, 2016 Author Share Posted February 24, 2016 Thanks all! I'm glad people feel it's coming together. More soon I hope. @OldSchoolSoviet, the shield is not quite as striking in person, but I know what you mean; it is a tad obtrusive at the moment. I think it needs another pass at the weathering, and when the beads go on it will jar a little less. Now, a small announcement. As Mingati is getting close to being done I've started thinking about my next project- and the good news is that there will be a next project! It's all at a very early stage, but it will be an opponent for Mingati- and as the filthy Xenos are involved, I won't be posting my progress there but rather here. I hope people find it interesting; it'll be a while before there are any models posted, but it does show some of my preliminary thinking. Link to comment https://bolterandchainsword.com/topic/315513-mingati-an-east-african-knight-titan-project/page/6/#findComment-4317538 Share on other sites More sharing options...
GhostMalone Posted February 24, 2016 Share Posted February 24, 2016 Dude I'll be following this filthy xenos project as well just to see your genius at work Link to comment https://bolterandchainsword.com/topic/315513-mingati-an-east-african-knight-titan-project/page/6/#findComment-4317558 Share on other sites More sharing options...
DaBoiKyknos Posted February 24, 2016 Share Posted February 24, 2016 Hey, I just checked your other works on the Ammo Bunker. Some I did like, some I didn`t which is fair I think (some had a little to much john blanche vibe for my personal taste). I do like that thousand sons barge (though I didn`t really understood the idea behind it, is it a vehicle for sorcerors to practise magic at?) and some of the WIP´s . Anyways, the inspiring thing to me at the moment is more, that you and your girlfriend came to good terms with your modelling. I think hobbies are a thing which can satisfy you and keep you in balance, it`s a difficult thing if beloved others are not respecting you doing things like that (although such time and money absorbing (and a little nerdy) things like GW projects can raise eyebrows and questions, of course). I wish you (two) the best, keep doing what you like and show some pics of your projects every now and then. Cheers! Link to comment https://bolterandchainsword.com/topic/315513-mingati-an-east-african-knight-titan-project/page/6/#findComment-4317574 Share on other sites More sharing options...
KrautScientist Posted February 24, 2016 Share Posted February 24, 2016 As I've said over at the Ammobunker, that is fantastic news! Very glad to hear you're not leaving us! :) Link to comment https://bolterandchainsword.com/topic/315513-mingati-an-east-african-knight-titan-project/page/6/#findComment-4317676 Share on other sites More sharing options...
zefig Posted February 25, 2016 Share Posted February 25, 2016 This has been an awesome project to follow so far and I look forward to seeing more! The paint job is really striking! The blog has been quite inspirational, and got me to actually do some work on my own knights last night. Link to comment https://bolterandchainsword.com/topic/315513-mingati-an-east-african-knight-titan-project/page/6/#findComment-4318491 Share on other sites More sharing options...
Ace Debonair Posted March 3, 2016 Share Posted March 3, 2016 This is absolutely magnificent. EDIT: Oops, I seem to have destroyed half of my post somehow. Good to hear you're not leaving the hobby forever, EdT! Link to comment https://bolterandchainsword.com/topic/315513-mingati-an-east-african-knight-titan-project/page/6/#findComment-4324895 Share on other sites More sharing options...
EdT Posted March 3, 2016 Author Share Posted March 3, 2016 Thanks all. A bit more progress to show this afternoon. So today I thought I would spend a bit of time on the strings of beads hanging from Mingati. My initial go at this- I posted a photos upthread- used wire as the string holding the beads together, but it wasn't quite right- it didn't sag under the weight of the beads as I wanted, and didn't rest on the model in a natural way. As a result, I decided to use good old fashoned thread- while this wasn't as strong as the wire, it would look much better and I'd be fixing the end result in place using glue anyhow. This was a great idea, but there was one downside- it's so much more difficult to string beads on wire, particularly if you have stubby fingers like I do! It's also reallly difficult for my clumsy hands to tie decent knots. But I had to try- so after much cursing, I eventually tied a thread to one of the girder shoulder-suppports on Mingati's torso, and started stringing. Then the beads fell off, so I tried again. Then the knot untied. In the end, I employed a needle to give me some fine motor control, although threading that was not exactly fun either- I'd never be much of a tailor. I eventually realised that the longer the thread I used the better, as it's easier to cut it back and have too much at the other end of the bead string then run out halfway through. Here's an in=progress shot; I'm hoping that partially obscuring the heraldry will make it dominate the model slightly less. Anyhow, thi was really depressing, fiddly work and took way too long, but here's what I currently have... I've secured each end with some superglue and will get the exact positioning of the bead strings fixed in place later. With alternating ebony and ivory beads I think it should look quite distinctive painted up. Now I just need to do some at the wiast, shins and rear... Link to comment https://bolterandchainsword.com/topic/315513-mingati-an-east-african-knight-titan-project/page/6/#findComment-4325269 Share on other sites More sharing options...
Teetengee Posted March 3, 2016 Share Posted March 3, 2016 All of your pictures seem dead right now.Also, I can second using far larger lengths of thread than will be in the final product as a way to ensure workability; I tied a noose with dental floss recently for some nurgle and it made life so much easier. Link to comment https://bolterandchainsword.com/topic/315513-mingati-an-east-african-knight-titan-project/page/6/#findComment-4325371 Share on other sites More sharing options...

Recommended Posts
Archived
This topic is now archived and is closed to further replies.