duz_ Posted September 18, 2019 Share Posted September 18, 2019 Enough Astartes gushing for now fellas ;) Got my Shrike pre ordered last night via my friends new game store Looking forward to having him hopefully this weekend! :D Link to comment https://bolterandchainsword.com/topic/358015-primaris-shrike/page/6/#findComment-5391685 Share on other sites More sharing options...
thewarriorhunter Posted September 18, 2019 Share Posted September 18, 2019 Nice, I plan on just getting the supplement for now. Models will come in time. I'm dropping some money on a commission to have custom designs worked up for my chapter so... hobby budget is gone for the month. Link to comment https://bolterandchainsword.com/topic/358015-primaris-shrike/page/6/#findComment-5391789 Share on other sites More sharing options...
Shadow Captain Vyper Posted September 18, 2019 Author Share Posted September 18, 2019 We are all goons on this blessed day. Link to comment https://bolterandchainsword.com/topic/358015-primaris-shrike/page/6/#findComment-5392134 Share on other sites More sharing options...
DreamIsCollapsing Posted September 19, 2019 Share Posted September 19, 2019 All hail to the first posting a Primaris shrike with his beaky helmet on. Link to comment https://bolterandchainsword.com/topic/358015-primaris-shrike/page/6/#findComment-5392772 Share on other sites More sharing options...
ShinyRhino Posted September 20, 2019 Share Posted September 20, 2019 Anyone know if he comes with a transfer sheet? The studio paint job appears to use a command RG symbol on his right pad. Link to comment https://bolterandchainsword.com/topic/358015-primaris-shrike/page/6/#findComment-5393434 Share on other sites More sharing options...
9x19 Parabellum Posted September 20, 2019 Share Posted September 20, 2019 He does NOT come with a transfer sheet. He has the side-hip beakie helm, but you'll have to cut off some gear bits (ammo pouch, and decorative raven heads) in order to mount it. If you choose to do another kind of head, it's an easy enough swap too, as it's just the standard marine head with a mounting peg at the bottom. Link to comment https://bolterandchainsword.com/topic/358015-primaris-shrike/page/6/#findComment-5393497 Share on other sites More sharing options...
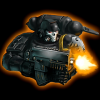
9x19 Parabellum Posted September 20, 2019 Share Posted September 20, 2019 All hail to the first posting a Primaris shrike with his beaky helmet on. Ask and you shall receive. Sorry for the bad photos. Mini photography (and a cracked lens) are not my strong suit: Edit: you'll note I did not attach the "bling" hanging from his belt. That is intentional; I will paint that on sprue and put it on afterwards. I also have to do some mould line removal, but I wanted to be the first up with his helmet :-) Link to comment https://bolterandchainsword.com/topic/358015-primaris-shrike/page/6/#findComment-5393532 Share on other sites More sharing options...
duz_ Posted September 20, 2019 Share Posted September 20, 2019 Omg that looks AMAZING!!! How difficult was it to extract the helmet? Did you salvage the rest of the kit it was attached too and did you have to do any modifications to mount the helmet? Link to comment https://bolterandchainsword.com/topic/358015-primaris-shrike/page/6/#findComment-5393552 Share on other sites More sharing options...
thewarriorhunter Posted September 20, 2019 Share Posted September 20, 2019 I'm assuming that's the helmet from his belt? It seems like I was right and it's not that difficult to remove from the pouches and use normally? Link to comment https://bolterandchainsword.com/topic/358015-primaris-shrike/page/6/#findComment-5393554 Share on other sites More sharing options...
9x19 Parabellum Posted September 20, 2019 Share Posted September 20, 2019 Omg that looks AMAZING!!! How difficult was it to extract the helmet? Did you salvage the rest of the kit it was attached too and did you have to do any modifications to mount the helmet? Thanks Duz! Not difficult at all. Just used a standard (and brand new...that's the key) Xacto blade. I was able to salvage the rest of the kit, yes. His ammo pouches are attached to his waist around the back as normal (can't see it in the picture). For mounting the helmet, I just used a little bit of sprue and shaved it down to resemble the "mounting peg" that you find on many of the primaris style heads (depending on kit). It was no problem at all. Total conversion work was under 10 minutes. I'm assuming that's the helmet from his belt? It seems like I was right and it's not that difficult to remove from the pouches and use normally? Correct, Warriorhunter, it is the helmet from his belt. As said above, very easy to separate it from the ammo-pouches and use normally. Just use a very sharp xacto. I even have the dangling raven skull decorations and I'm going to mount them probably hanging from his jetpack somewhere (haven't decided yet). Link to comment https://bolterandchainsword.com/topic/358015-primaris-shrike/page/6/#findComment-5393560 Share on other sites More sharing options...
SkimaskMohawk Posted September 20, 2019 Share Posted September 20, 2019 Huh, I actually don't really care for the end result. Maybe its because it just looks like a corvus helm and it breaks the proportions I'm used to. Might have worked better with full phobos armour, but his current suit is a little too bulky. Link to comment https://bolterandchainsword.com/topic/358015-primaris-shrike/page/6/#findComment-5393587 Share on other sites More sharing options...
dode74 Posted September 20, 2019 Share Posted September 20, 2019 I like it. Nice work. I'll be collecting mine tomorrow so look forward to trying it out. Link to comment https://bolterandchainsword.com/topic/358015-primaris-shrike/page/6/#findComment-5393625 Share on other sites More sharing options...
Nusquam Posted September 20, 2019 Share Posted September 20, 2019 That makes him immensely better imho. Link to comment https://bolterandchainsword.com/topic/358015-primaris-shrike/page/6/#findComment-5393635 Share on other sites More sharing options...
9x19 Parabellum Posted September 21, 2019 Share Posted September 21, 2019 Huh, I actually don't really care for the end result. Maybe its because it just looks like a corvus helm and it breaks the proportions I'm used to. Might have worked better with full phobos armour, but his current suit is a little too bulky. Well then we will just have to agree to disagree. Link to comment https://bolterandchainsword.com/topic/358015-primaris-shrike/page/6/#findComment-5393666 Share on other sites More sharing options...
Claws and Effect Posted September 21, 2019 Share Posted September 21, 2019 I actually like Shrike's bare head. It's a nice change from deciding between a bald head or a mohawk for every helmetless model. Link to comment https://bolterandchainsword.com/topic/358015-primaris-shrike/page/6/#findComment-5393672 Share on other sites More sharing options...
thewarriorhunter Posted September 21, 2019 Share Posted September 21, 2019 Given that I'll be getting rid of all of the bird bits when I get mine I may just go with a regular reiver head for mine. Link to comment https://bolterandchainsword.com/topic/358015-primaris-shrike/page/6/#findComment-5393680 Share on other sites More sharing options...
Dracos Posted September 21, 2019 Share Posted September 21, 2019 That would be a good switch for a <Counts As> version of Shrike. I'll likely steal that idea :) Link to comment https://bolterandchainsword.com/topic/358015-primaris-shrike/page/6/#findComment-5393706 Share on other sites More sharing options...
Tyberos the Red Wake Posted September 21, 2019 Share Posted September 21, 2019 I have a hard time picturing this model with any helmet style other than the beakie. I wonder how it would look with the standard Intercessor head, that one's my favorite Primaris helmet, followed by the Infiltrator helmet. Link to comment https://bolterandchainsword.com/topic/358015-primaris-shrike/page/6/#findComment-5393728 Share on other sites More sharing options...
thewarriorhunter Posted September 21, 2019 Share Posted September 21, 2019 Seeing the different angles I feel like the jump pack is too big... I wonder how much work would be needed to drop the top set of jets/grav bits? Link to comment https://bolterandchainsword.com/topic/358015-primaris-shrike/page/6/#findComment-5393938 Share on other sites More sharing options...
Kouran Posted September 21, 2019 Share Posted September 21, 2019 0 work. You can leave the jet pack without the top part and it actually looks good. I had serious doubts before decide to go with the complete version. Link to comment https://bolterandchainsword.com/topic/358015-primaris-shrike/page/6/#findComment-5394019 Share on other sites More sharing options...
Marshal Reinhard Posted September 21, 2019 Share Posted September 21, 2019 the photo above with the beakie on, is the head further back than usual to fit the beakie inside the gorget? Link to comment https://bolterandchainsword.com/topic/358015-primaris-shrike/page/6/#findComment-5394024 Share on other sites More sharing options...
Archon_77 Posted September 23, 2019 Share Posted September 23, 2019 I echo the ease of removing the belt helm... just a little patience and a sharp xacto is no problem. I built mine last night and am very happy with it (pictures coming in the painting challenge thread). Some thoughts: 1. Removing the helm leaves a hole in his back above his buttplate where the helm "plugs" in. This can be greenstuffed over, but I chose to remove his chest grenades and placed them over this hole. It looks AMAZING and is the perfect size. 2. If you remove the helm you'll need to put something in place to prop his now helmeted head in the proper location/angle. Another spot where greenstuff would work, but I chose to instead use a piece of sprue... specifically the Round peglike structures that ring the outside. This allowed me to shave it off and sculpt the peg till I got the angle JUST right. 3. The wall that he rests on normally didn't work at all for me ... waaay too tall. It can be cut in half with a jeweler's saw or tin snips with a minimum of effort, and has a nice natural bevel that serves as a good boundary and gives an option to perch him on the top half of the wall OR the bottom. I went with the latter. 4. The double wing jetpack is VERY cool, but you don't have to assemble it as shown and have many ways to customize it's look based on how you put it together. It has a LOT of very small pieces that have to fit into other small ones, so DONT overglue and be sure you bring your patience and steady hands. Link to comment https://bolterandchainsword.com/topic/358015-primaris-shrike/page/6/#findComment-5394969 Share on other sites More sharing options...
Claws and Effect Posted September 23, 2019 Share Posted September 23, 2019 I actually built him 95% as is. I swapped out his right pad for the Sgt pad from the upgrade sprue, and his left pad for one that has a scroll on it. Going to write his name on it with a micro pen. I actually painted him really close to GWs paintjob as well. I liked the model enough that I didn't really find a whole lot I wanted to change. Haven't put his boot claws on yet. I'm trying to decide if I want to flip them over or omit them entirely. Link to comment https://bolterandchainsword.com/topic/358015-primaris-shrike/page/6/#findComment-5394984 Share on other sites More sharing options...
thewarriorhunter Posted September 23, 2019 Share Posted September 23, 2019 I liked the model enough that I didn't really find a whole lot I wanted to change. Haven't put his boot claws on yet. I'm trying to decide if I want to flip them over or omit them entirely. I'm curious to see how they look if you flip them around. I haven't picked mine up yet, gotta get my redemptor and decal game going first. Link to comment https://bolterandchainsword.com/topic/358015-primaris-shrike/page/6/#findComment-5394990 Share on other sites More sharing options...
Biscuittzz Posted September 23, 2019 Share Posted September 23, 2019 No use starting a new thread over it but I just got my collectors edition codex and Shrike in the post. Shrike is amazing and on first glance as already said the helmet will be an easy cut and swap. Also got Feirros who'll become an RG techmarine for now. The limited edition codex....the artwork on the inside of the cover is the White Scars heraldry shield rather than ours. Not massively outrageous but when you pay extra for these things you should be getting top of the line stuff let alone mess ups. For those with a keener eye, in the normal marine codex, our army picture is captioned as Iron Hands as well. Editors were asleep when our turn came around. Link to comment https://bolterandchainsword.com/topic/358015-primaris-shrike/page/6/#findComment-5395039 Share on other sites More sharing options...
Recommended Posts
Archived
This topic is now archived and is closed to further replies.