
Second attempts at magnetizing - Questoris knight
Entry posted by Bouargh in Call to Arms 2026
182 views
DISCLAIMER: This time it worked!
Hi folks,
I couldn't stay on the previous failure. I had to try again.
This time I have favoured a different chassis, a Questoris. And has I had spare parts left for the unused plastic bits of my Styrix, I got rid of some of the issues mentionned previously such as the lack of spare parts for weapon mounts...
There was therefore less potential issues than on a Castellan.
As previously I made a serious series reviewing of "magnetizing 1o1" lectures from Youtube. And I went for my own version, not that distinct of what is sorted out in the recommended videos by the algorhythm, but anyway not exactly similar. And I have been quite pleased by the result.
But first, the scope; And as I have been explained decades ago when I was a junior, it is as important to stress out what is within thta what is out of scope. So, what is out of scope:
- magnetizing ball joint of the torso; can't see the interest. Some claim is it for storage issues but it is not that obvious to me
- magnetizing full arms; same purpose claimed, same fate
- magnetizing carapace top heavy weapon; there are more convenient ways such as extending the stem of the weapon and leaving the small hole clear and clean. I'll pass this time
- magnetizing the machine gun; because I am too clumsy and may ruin the model. Safer passing this one too
I will therefore stick to magnetizing only the arm weapons; this a first batch made out of the rapid fire battle cannon, the gartling gun and the big chainsaw. I will add other weapons later on (power glove...).
The step by step procedure I've used is quite simple:
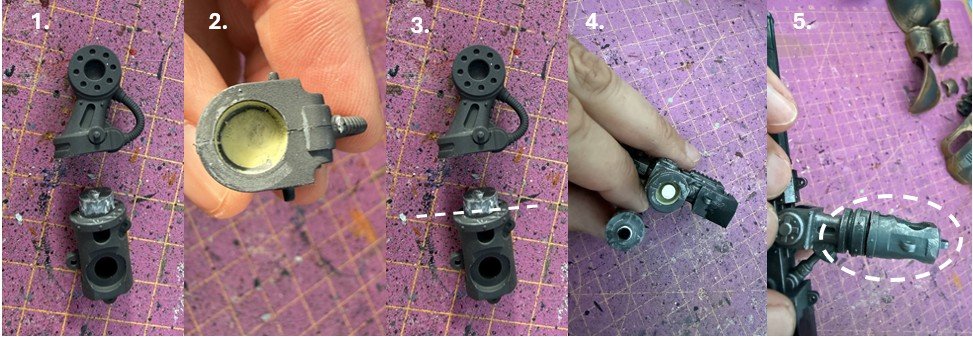
- Clean the arm rod so that it can be plugged into the weapon mount. Clean 2 of these (you will see later why)
- Use this plug to pack down some milliput used to fill the weapon mount, allowing getting a flat surface inside. This is where the magnets will be glued.
- Cut the excess plastic, but only on 1 arm rod. If you choose wisely your magnets, the cut height will correspond to the total height of 2 magnets. So no extra drilling required. Why only on 1 rod? Because you may need the second one to pack down other weapon mounts later.
- Glue the magnet 1 on the arm rod and once dry add the second magnet on top. then glue on the dried Milliput.
- Perfect fit
Further on, step 6 is keeping the arm rod (in white dotted circle) to repeat the operation on other weapons. Like that you ensure the polarity is always respected and that all weapons can be swapped.
Step 7 is the final one, consisting in cutting the second arm rod and gluing its magnet, but this time using a weapon mount to bear the magnet. Again a matter of polarity to be respected.
Et Voila!
Easy, not that fast (Milliput has to dry and cutting models is always requiring thinking it twice before acting...), but efficient enough for me.
Next step is painting the knight, which I have starter while the Milliput and the cement were drying. You can see in the background of step 5. that dry brushing is ongoing...
See you with some progress in this entry for CtA26.
-
 2
2
2 Comments
Recommended Comments
Create an account or sign in to comment
You need to be a member in order to leave a comment
Create an account
Sign up for a new account in our community. It's easy!
Register a new accountSign in
Already have an account? Sign in here.
Sign In Now