CtA26 - Second vow (Questoris Mechanicum Knights)
Entry posted by Bouargh in Call to Arms 2026
186 views
Hi Folks,
Although I have almost reached the bottom of my pile of shame, I succumbed (again) to the sirens of the Imperium.
It is no rocket science predicting it: once you buy a bargain Eye of Terror Knight Detachment to be added to your existing Questoris and 3 Moiraxes, you end up with a small force, small enough for some games but not big enough for more. And what would you do with something half established like that? Expand it to a decent size. And this is how you end up building a new army while it was not really on schedule.
So, what will I do with this kit?
The box is the Defender’s one. It has enough options to do more than one configuration of the Questoris. But which one? Answering this question requires planning insights. As I did that leap of faith toward a new army, I have decided myself to go for 2 Questoris in the middle term. The one we are dealing with now and a future one. The latter will be an Errant, with Glove and rocket pod. I am toying with the idea that I will build it from a Chaos Knight kit, just for the look of the legs. I have enough spare armor panels from the unused plastic sprues of the Styrix kit of old to make it very Imperial looking. So, I will save the pod and glove for this future project.
With what is left, I can go Defender, Warden, Crusader or Paladin. Or all these or almost if I magnetize properly the weapons. In fact, with the current bill of bitz and the magnetizing strategy I have used, the defender is, at least temporarily, out of reach if I want to maximize the versatility. And my heart beats for the Crusader. So priority will go to rapid fire battle-cannon, Gatling and hull-mounted dual autocannon. Plus chainsword as an option to shift toward other variants.
As decisions have been made, it is time to dive into the paint scheme decisions. I will stick to the overall color pattern I have used for my Castellan, Styrix and Moiraxes: a dark grey/bone largely inspired from house Korvax. But individualizing the livery requires a little bit of reflection. I like the red stripes seen on this Korvus silhouette:

But I will probably keep it for the Errant. or for the Armigers that came with the Detachment box.
I am also very tempted by the checkboard pattern of HH era knights. But I will not buy the kit just for the purpose of getting the transfer that makes checkers easy. And Ebay does not have much of these or at sky high prices. If I want checkers, I’ll have to do it with paint and brush. And I want some. Or at least it is what I believe...
The method I have used is based on another YouTube video, where masking tape is used for defining free areas to be sprayed. I have no spray and my air brush is still waiting to be commissionned. So I will go the classic brush way.
After some tests for perfect width of the masking tape, I have selected 4mm width. By positioning the stripes of tapes, you can define an incomplete checker pattern. Then you fill in the missing squares by hand. and remove the mask ASAP. Otherwise it is blurrier.
Easy? Well, not that straight forward as the pauldron of a knight is curved. As such the impact is that the checkers look like diamonds, which is not that bad. But it also makes the tape positioning challenging and some of these diamonds’ wannabe-squares may be not that well defined or fail in homogeneous proportion. I should have spent more time and cared more about the tape fitting. But after correction of the missed diamonds (which were btw on the front of the pauldron so very visible) it is anyway satisfying enough. if you look from 2 or 3 feets away. I am happy to have bought a 00 brush for doing that job.
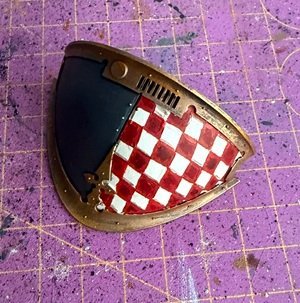
The next step is reproducing the diamond pattern on a knee. same technique but with a smaller tape width. 1 mm. And here is were corrections matters as a paint a little bit too thick ruins the look. But in the end it is rather OK. At least it looks like it is OK on pics shots at 6:00 in the morning.

Next steps, the rest of the model, that will stay in Eshin grey and Bone, just like the previous ones. I do not want an otT paint scheme. Final details will be made out from decals.
That's it for the momment. Balance of the week: 3 magnetized weapons, one pauldron and one knee pad painted. 15 days left. I have to hurry a little bit.
See you.
-
 3
3
1 Comment
Recommended Comments
Create an account or sign in to comment
You need to be a member in order to leave a comment
Create an account
Sign up for a new account in our community. It's easy!
Register a new accountSign in
Already have an account? Sign in here.
Sign In Now