Search the Community
Showing results for tags 'Blood Angels battle report'.
-
Preamble So I felt that I would do a blog on Bolter and Chainsword. My reason for doing this is not only to act as motivation for myself, but also to gather advise and information on how to play (and hopefully win) with my Blood Angels as sadly I don't have the best record with them. So I will be posting painting updates, links to my army lists and I also aim to add some battle reports on the off chance I get to have a game, with C&C being welcome on all. Feel free to post or ignore, but to start this blog off here's my favourite picture from a past Apocalypse game: =][= IMAGE REDACTED =][=
- 1409 replies
-
- 1
-

-
- Blood Angels battle report
- Blood Angels WIP
- (and 6 more)
-
 Hey guys, I want to just do a very quick batrep... not really a full batrep because I've been experimenting a lot of different units lately and I also have some time restraints on me and as well I sold my Deathwatch (painted) army. So that being said I won't take many pics as I am re-painting the army from scratch and I hate unpainted batreps. That being said I wanted to do a quick reference for this game. We played an 1850 Maelstrom and for ONCE I got to play against Space Marines (very rare here). I mean at my local store there are a lot of marine players but they kind of hide out amongst themselves. But for tournie play not as much as you'd like to see. (Bloody xenos edition!) Back to the game... it will be a brief overview. In this experiment I took my normal CAD + BSSF, and I changed the list so many times I accidentally left out my Stalker Bolter squad, so I had to play 1850 without them. The true experiment was I wanted to play more games with the Culexus (I haven't used him in this army specifically and not played him in any army for quite a while, probably Ultra's last.) +++++++++++++++++++++++++++++++++++++++++ So from memory the Blood Angels were using Traitor's hate formation. It actually looked okay on paper, as he had a "CAD" getting him some ObSec with Scouts parked in a bush, and a good sized squad of Grav Bikes, Multi Melta Attack Bikes, a bout 3 Pods of Troops with a Libby and .... the BEEF of the army was Dante and his magical ballet of pretty men in angel outfits which can Deep Strike and then Assault! Scary stuff. +++++++++++++++++++++++++++++++++++++++++ I did get first turn, he failed to grab it. The game was VERY much back and forth. I had two big key moments, and one scary moment: 1. I had a key alpha strike. I unleashed solo Missile Termies, Dread, and (believe it or not) a Rhino with an Infernus Heavy Bolter in it at his Multi Melta bikes. The main alpha though was the Pod with Captain, and Frag Cannon unleashing on the Grav Bikers: - This opening salvo may have saved me. - all but one biker dies, all but one Multi Melta Attack Bike dies. (it did take all the forces I had on the board to do it.) Ironically the last surviving members of each squad would live up until the last turn! (those boys know how to Jink!) 2. I FAIL to get KEY reserves in on T2. Reminding me for the Millionth time you cannot take this army without some form of reserve manipulation ( a bad design element of the BSSF). This is scary because in his T2, his Dante, pods, and 2 large squads of Sanguinary Guard come in and can assault. They get good reserve rolls, re rolls and only 1D6 Deviation! The Sanguinary Guard can and do assault the turn they come in. I got one squad shot up pretty good, and the Sanquinary Guard came in and just annihilated me. 3. My failure for reserves set up a bizzarre situation..... When I failed both rolls for my Pod + Aquila, I knew it was game over since I just watched two of his Sanquinary guard wipe some of my stuff... .so in an act of pure desperation I took my Infernus Hvy Bolter Kill Team, and "Angelis Beacon'd" them across into the heart of the kill zone without deviation. The funny thing is I was wishing so badly at this point that I had not taken that Infernus because I desperately needed a Frag Cannon. The Infernus template hit 7 of his Tacticals, and I rolled four 6's !! These would have been rends, and with the Frag cannon I would have had 14 hits. He failed enough saves, that the rest of the Infernus squad weapons mopped up the Tacticals giving me some breathing space, but what about the Sanguinary Guard? This is where the second big desperate act comes in..... ^This guy made Assassinorium Great Again! 4. The Culexus did 'okay' here but ripping buffs away was one thing, he just did okay enough to assist in turn 1 with killing his libby and assisting in the kill of the squad ,but the big moment is next turn... In the next turn the Culexus would wander up (north of this picture) and get 6 shoots from my psychic pool at his Sanquinary guard which were about to gank my Deathwatch Captain after smoking one of my squads. The Culexus was pro. He leveled his pistol and wacked 5 guard!!! This left only Dante in the squad. The other Sanguinary squad was in CC I believe at this point. 5. The Captain had a brave Deathwatch with a Stormshield who took two blows from Sanquinary Axes before falling. I made a key decision to try to hold on for one more turn..... I decide the Captain is the only one who can handle his turn's worth of attacks, and I take them all on the captain, he tanks all the 3+ power weapons and of all the axe attacks the Halo saved all but 1!!! Close call. 6. The rest of my squads come in (finally). But the Infernus squad is basically one shotted by Dante... no joke, that guy came in, wound up his axe and murdered the whole kill team.... BUT that left him standing in the open. (when your Deathwatch, you gotta know when to die.) In retaliation my Captain's remnant squad, and everything around him including the Culexus let it rip at Dante. He saved so much stuff... ridiculous. It was a simple special ammo poison round that saw Dante fail his 2+ save and die for Warlord kill. This gave me the lead for the first time in the game.... 7. The game was winding down. I had a few scattered units, and a few solo Termies rolling around, but had managed to kill off the rest of his army except for the Pods, and the scouts in the corner (which had no shot/effect all game). With that he conceded and what started as a very back and forth game got very hairy for a while and then concluded with the death of his Warlord. Conclusions: - Infernus: Still not sold. I thought it was doing okay in a Rhino, but because Deathwatch like to inherently get close and use every shot possible, this felt like a bad play. - Culexus. One of the stars of the game. Not that the Blood Angels really relied on anything Psychic wise, the Culexus was key in crippling one of his 2+ save Sanguinary guard.
-
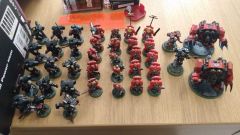
It's that time of year again! Charlo and I will be participating in an Apocalypse game that my group hosts annually. These tend to be pretty epic and this year it should be no exception! With this thread we intend to update it as the battle goes along. It's a full weekend of playing (schedule to follow) so stay tuned! The particulars: 14 x 6 board 2300 PL per side Mission: Night March (CA, page 16) Team 1: Blood Angels (Jolemai); Blood Angels, Ad Mech, Adeptus Custodes (Charlo); Chaos Space Marines; Daemons Team 2: Raven Guard; Imperial Knights (GawFang); Imperial Knights (One_happy_hippy); Astra Millitarum,Titan Legions, Imperial Navy House Rules: Open Play rules however: Armies have to be battleforged. This means individual Command Points pools and Stratagems are in play The Warmaster has a team pool of 12 CP to spend however he wishes (within the rules). This pool will be lost once the Warmaster dies... Special Characters are limited to one per battle Armies to be strict WYSIWYG and painted (three base colours and based minimum) Player can't buff each other's armies *** *** *** As you can see, we struggled to get an ideal balance. We've elected to go for a player and PL match at the expense of the fluff. We've also got a David Vs Goliath game on our hands but this should be fun all the same. My army clocks in at 642 PL (just over 11K points) and is the third largest in attendance. It looks a little something like this: More to come...
-
Simple thread folks, just post below how well you did with the Index using the following format: P:x W:x D:x L:xNow, obviously this isn't for bragging rights. We can use it to assist our fellow Frater be it sharing tips or improving their game(s) going forward! For example, if you've won loads, what has worked for you and why? If you've lost a pile of games, where do you feel you have gone wrong? What were you up against? And so on. There's always something we've missed and somewhere we can improve, so get sharing ideas as we enter a new era!
- 28 replies
-
- 2
-
-
- Blood Angels Chapter
- Blood Angels Successors
- (and 2 more)
-
Well I had a game against a rather large Infantry heavy Iron Warriors army yesterday. I'll break down the game and armies here for y'all. We used the objective cards to randomly generate the game, that was really cool. We drew the mission as Burn something, I can't remember the exact name, the one where you place 3 objectives each and you have to destroy the enemy's objective and had to generate two twists for that we got Acid Rain and Restoratives. The armies were as thus: Chaos Brigade Detachment Chaos Lord: Terminator Armor, Combi-melta, Chainfist Warpsmith: Flamer, Meltagun, Poweraxe 10 Man Chaos Squad: Bolters, Autocannon, Plasmagun 10 Man Chaos Squad: Bolt Pistol, Chain Sword, Meltagun, Champion with Powerfist 16 Chaos Cultists Autogun, Heavy Stubber, Flamer 5 man Terminator: Reaper Autocannon, Combi-melta, x3 Combi-bolter, Powerfist x2, Power Axe, Power Maul, Chain Fist Hellbrute: Multimelta Hellbrute: Missile Launcher, Reaper Autocannon 5 Chaos Bikers: Meltagun, Power Fist Forgefiend: 2x Hades Autocannon, Demon Jaws 5 Havocs: x4 Aurocannon 3 Obliterators Heldrake: Hades Autocannon, Heldrake Claws Blood Angel Spearhead Deatchment Captain in Gravis Armor: Boltstorm Gauntlet, Master Crafted Power Sword x2 Lieutenants: Mastercrafted Auto Bolt Rifle, Power Sword Primaris Ancient: Bolt Rifle 5 Hellblaster: Plasma Incenerator Baal Predator: Twin Assault Cannon Baal Predator: Twin Assault Cannon Predator: Predator Autocannon, x2 Lascannon Blood Angel Vanguard Detachment Lemartes 5 Death Company: Bolt Pistol, Chainsword 5 Assault Terminators: x4 Lightning Claws, Thunder Hammer, Storm Shield Furioso Dreadnought: Blood Talons, Meltagun, Heavy Flamer Stormraven: Twin Assault Cannon, Twin Multimelta, x2 Stormstrike Missile, x2 Hurricane Bolter Deployed DC in reserve and Termmies and Dread in Stormraven, the rest was deployed around two objectives clustered on one side of my deployment zone, he was spread across the table width with our flyers in opposite corners. I had first turn so I screamed the Stormraven right in the butt of his Heldrake and moved one Baal up about 6" to make sure I was in range of his bikers, Captain moved to position himself so as many heavies were inside his bubble same with on of the Lieutenants the other as in between a Baal and the Pred, hellbasters moved to get within range to rapid fire. DC hasn't landed yet. Firing was Baal blasting 3 bikers to death, Hellblasters took the forgefiend down 6 wounds, and the Stormraven took the Heldrake down 5 wounds. First he rolled for regens, the Forgefiend sitting next to his Warpsmith got 1 for normal regen 2 more from the Smith and 3 from the twist card, the Heldrake got 1 from regen and 2 more from twist card, bikers got 2 wounds back from twist card so 1 biker came back. He moved his Bikers closer the offending Baal and the Forgefiend moved closer to the Stormraven. His shooting was mostly concentrated on the Stormraven, but with the Acid Rain he was at a -2 to hit it normally and the Drake, because it moved was -3, so the Drake did 2 damage and the Havocs did 1, and the Bikers took off 6 from that Baal, dang Melta at half range, the Fiend shot at the Pred and took 3 wounds off, then he charged, only the Drake, he forgot about the bikers. Drake wiffed all hits. He then rolled for the Rain, it remained in effect, in fact it remained the entire game Turn 2. I rolled regens from twist card, Baal got back 1 wound, Pred got 2 back and Raven got 2. I repositioned the Hellbasters to fire at the fiend, the Raven dropped off the termies and Dread then moved around behind the Drake. Firing Baal shot up the bikers again, killing just one, Pred, other Baal and Hellblasters shot up the Fiend taking a paltry 4 wounds off it, Raven opened up again on the drake taking it down to 2 wounds remaining. Dread shot flamer and melta at the Warpsmith, taking one wound off him. Termies charged close combat marines and dread charged Warpsmith. Dread turned the traitor into a red smear and the termies killed all but 2 of the marines, they in turn killed one termie then failed leadership by 2 so they went bye bye. His rolls to regain health was 2 for the fiend and 2 for the Drake and he got his dead biker back. He moved the Brutes up towards my lonely objective within 12" of it, so it's gonna be gone next turn. and his bikers moved within 2" of Baal and the Fiend moved closer to the Pred, Drake again moved closer to the Raven. Shooting was a little better for him time around, the Bikers took the Baal down to 1 wound, the Havocs, Drake and Marines took the Raven down to 5 wounds, Acid Rain rally helping me out with that guy. His Fiend shot even more at the Pred taking 2 wounds off him, the Reaper/Missle Brute missing the second Baal entirely. He charged his bikers into the Baal the Fiend into the Pred and the Drake into Raven, Overwatch worked out pretty well this time, killed a biker, killed the Drake flat out and took 2 more wounds off the Fiend, he's now down to 4 I think. The bikers destroy the Baal the Fiend puts 3 wounds on the Pred. Turn 3. My termmies move to destroy one of his objectives, the raven flies over to put an end to the havocs, the Dread moves closer to Objective 2 the Hellblasters move to shoot up the remaining bikers and the Captain, Lieutenant and Ancient move to deal with the Fiend. The Pred backs up out of combat. Lemartes shows up with DC buddies 10" away from the cultists guarding Objective 2, was the closest I could get to them with the terrain. Shooting was Raven killing all but 2 of the Havocs, Baal wiffing against the Fiend, Hellblasters wiping out the acursed bikers, the rest of the HQ dudes shooting at the Fiend taking it down to 2 wounds. Dread and DC shoot at the cultists killing 3. CHARGE! Dread charged Cultists the DC and Lemartes both rolled 12 for charges so into the cultists they go. Lieutenant and Captain charge into Fiend. Fiend wiffs overwatch, and FNP saves one DC dude. Fighting goes very badly for him. Fiend is killed by the Captain and the cultists... well they didn't make it. Termmies and DC destroy both Objectives. His turn, he moves the Brutes closer his termies move to now be able to shoot at stuff and he regains 1 Havoc back. His shooting didn't cause any wounds to anything, he charged with Marines into the my Dread. He failed to wound it and the Dread in turn killed 3, he passed his leadership. End of turn. He calls the game citing he doesn't have enough left to get to my last Objectives as I've pretty much got my entire army left on the board and he's down to 2 and a half squads and a Lord. All in all, it was a pretty tough game and really could have gone either way, the Dice Gods just seemed to favor me more yesterday.
-
From the album: Battle Report Pics
-
- 1
-

-
- Blood Angels battle report
- Jolemai battle report
- (and 2 more)
-

From the album: Battle Report Pics
-

From the album: Battle Report Pics
-

From the album: Battle Report Pics
-

From the album: Battle Report Pics
-

From the album: Battle Report Pics
-

From the album: Battle Report Pics
-

From the album: Battle Report Pics
-

From the album: Battle Report Pics
^^ -

From the album: Battle Report Pics
^^ -

From the album: Battle Report Pics
DW & IK -

From the album: Battle Report Pics
-
- 1
-
-
- Blood Angels battle report
- Jolemai battle report
- (and 2 more)
-
From the album: Battle Report Pics
-

From the album: Battle Report Pics
-

From the album: Battle Report Pics
-

From the album: Battle Report Pics
-

From the album: Battle Report Pics
Map & Deployment -

From the album: Battle Report Pics
turn one -

From the album: Battle Report Pics
turn three -

From the album: Battle Report Pics
T4