GAR Posted February 3, 2007 Share Posted February 3, 2007 Okey Dokey. My thoughts. The retinue. I don't think the shading on the white is dark enough. I think from a table top perspective they will not stand out enough. I would recommend a mix of codex grey and a touch of ultramarine blue. Should be more grey than blue, but the hint of blue should be obvious. Small thin lines with this. not as heavy as you have on the white shading right now. I am not a fan of grey on black. I prefer dark blue, but I know you are happy with the grey so that is fine. I think the weapons need more highlighting, it still seems rather unfinished. I think a dark color of grey would help as well. Love the OSL on the eyes. Nice!! The writing on the armor looks good too. I might want to add another line or two here and there, particularly on the legs, but I think they would be fine the way they are. Kinda subjective and I won't know for sure until I actually see it. It may be just right as is. DA MAN!! ( aka Golden Demon Kensai Dude with the uber blade of DOOM!!) ;) Ok, I like the hair much better now. Two thumbs up. I think I like the blade guard better before, but the picture is darker also so it may be fine as is. Hard to see the touch up on the crux, may have to see it in person. SO far so good. Keep it up. You are getting to a point where I am having fewer and fewer criticisms/critques and more complements. hmmm.... GAR Link to comment https://bolterandchainsword.com/topic/100590-apocalypse-lords/page/4/#findComment-1178448 Share on other sites More sharing options...
varthrok_revived Posted February 10, 2007 Share Posted February 10, 2007 I like your army so far, the black and white particularly. Though may I suggest making the guns metallic? as someone said earlier, "to end the black"? You have quite a nice looking army there, but in all honesty, I don't think the gold on your librarian matches the level of painting on the black and white. I mean no offense, I just think that you can do better. NOt sure exactly whats wrong, it just doesn't look as good as the black and white. Anyway, think over that, and keep up the black and white work! Link to comment https://bolterandchainsword.com/topic/100590-apocalypse-lords/page/4/#findComment-1182342 Share on other sites More sharing options...
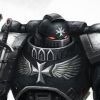
Honda Posted February 10, 2007 Author Share Posted February 10, 2007 Ok, here is this weeks' installment... The focus this week was to: 1. Deepen the shadows in the recesses. This was accomplished by mixing 987 + Codex Grey + Scorched Brown + dab of black ink. I like how this made the recesses more pronounced, but not too severe. It doesn't seem to be that apparent in the pic (I should probably stop making excuses and read one of the photo tutorials), but the two differernt colors for the recesses has an interesting and pleasant effect. Not perfect, but it's not a bad thing. 2. Shoulder pads: I finally got around to crafting a "template" that will allow me to trace the Omega symbol on the shoulder pads with some consistency. As you can see, they are a little better than just winging it, but I need to practice this (which I have about 25 more tries to get it right ;) ). The Omega on the first assault cannon was the last one attempted and it seems to have turned out the best. Oddly, if I start on the straight bits on the bottom first, the round part comes out better. No idea why that is. The red was done with VMC Flat Red. 3. Guns...what to do with the guns. I put a red casing on the SB's and I like how that looks. That will carry over to all the rest of the troopers, but not the assault cannons. I like them black. Also, I put a little Shadow Grey on the end of the barrels to give a "smoke" effect and it looks Ok at distance, but is pretty harsh up close, so I will soften that shortly. The red was done with a base of Bestial Brown, then Red Gore (thinned, 2 coats), then a thin coat of Red Gore + Blood Red to give the Red a little life. After looking at them again, I feel adding metal to them is inevitable, even though I really didn't want to go there. Still, art is what it is. 4. Fix up the bases. Nothing world shattering here, just the final touches on the big objects. Wrapping them up: There are a few little touch ups, maybe scratches, that need to go here and there, plus I need to add their names or slogans to the chest banners. I've already applied the sand to the bases to fix gaps and bring everything together. Once that is done, I'll borrow a tip from Hash and put some of those "armor" pigments on the base and feet to give it a slightly dusty look. So the next time you see these guys, they'll be with the Librarian in the Hall of Honor. Pics http://i35.photobucket.com/albums/d187/hkowabunga/Apocalypse%20Lords/Omegawing/Omegawing-WIP9001.jpg http://i35.photobucket.com/albums/d187/hkowabunga/Apocalypse%20Lords/Omegawing/Omegawing-WIP9002.jpg http://i35.photobucket.com/albums/d187/hkowabunga/Apocalypse%20Lords/Omegawing/Omegawing-WIP9003.jpg http://i35.photobucket.com/albums/d187/hkowabunga/Apocalypse%20Lords/Omegawing/Omegawing-WIP9004.jpg http://i35.photobucket.com/albums/d187/hkowabunga/Apocalypse%20Lords/Omegawing/Omegawing-WIP9005.jpg http://i35.photobucket.com/albums/d187/hkowabunga/Apocalypse%20Lords/Omegawing/Omegawing-WIP9006.jpg http://i35.photobucket.com/albums/d187/hkowabunga/Apocalypse%20Lords/Omegawing/Omegawing-WIP9007.jpg http://i35.photobucket.com/albums/d187/hkowabunga/Apocalypse%20Lords/Omegawing/Omegawing-WIP9008.jpg http://i35.photobucket.com/albums/d187/hkowabunga/Apocalypse%20Lords/Omegawing/Omegawing-WIP9009.jpg http://i35.photobucket.com/albums/d187/hkowabunga/Apocalypse%20Lords/Omegawing/Omegawing-WIP9010.jpg http://i35.photobucket.com/albums/d187/hkowabunga/Apocalypse%20Lords/Omegawing/Omegawing-WIP9011.jpg http://i35.photobucket.com/albums/d187/hkowabunga/Apocalypse%20Lords/Omegawing/Omegawing-WIP9012.jpg http://i35.photobucket.com/albums/d187/hkowabunga/Apocalypse%20Lords/Omegawing/Omegawing-WIP9013.jpg And now, the next squad I will start working on. I like how some of these poses turned out. The Vet Sgt will have brass shoulder guards. http://i35.photobucket.com/albums/d187/hkowabunga/Apocalypse%20Lords/Omegawing/Omegawing-WIP9014.jpg http://i35.photobucket.com/albums/d187/hkowabunga/Apocalypse%20Lords/Omegawing/Omegawing-WIP9015.jpg http://i35.photobucket.com/albums/d187/hkowabunga/Apocalypse%20Lords/Omegawing/Omegawing-WIP9016.jpg http://i35.photobucket.com/albums/d187/hkowabunga/Apocalypse%20Lords/Omegawing/Omegawing-WIP9017.jpg http://i35.photobucket.com/albums/d187/hkowabunga/Apocalypse%20Lords/Omegawing/Omegawing-WIP9018.jpg Thanx for the C&C so far, it's been very helpful... Link to comment https://bolterandchainsword.com/topic/100590-apocalypse-lords/page/4/#findComment-1182555 Share on other sites More sharing options...
The Angelus Sanctus Posted February 10, 2007 Share Posted February 10, 2007 Fantastic work Honda!! :) The SB cases in red REALLY help to give that black side of the Termie that final "here is the end of the black zone" look. However, despite that, i still feel that the black feels like it needs some extra work to break the black up (the white side looks great, seriously dont touch that side dude). Perhaps some more litanies spaced out on the armor to break up the black will help out in that area. Nonetheless, its great to see the progression of these Terminators and you've leaped over each hurdle with heaps of space to spare. Well done :) Link to comment https://bolterandchainsword.com/topic/100590-apocalypse-lords/page/4/#findComment-1182639 Share on other sites More sharing options...
Honda Posted February 10, 2007 Author Share Posted February 10, 2007 @AS, Thanx for the compliments and I agree with you on the black side. I'm going to start with adding "metal" to the gun itself, then very likely some chips and scrapes from rough usage. This will have to happen on both sides obviously ("TROOPER, CAN YOU EXPLAIN WHY YOU ONLY FALL ON YOUR RIGHT SIDE!"). :) So, we're getting there and the last little bit that makes the jump to HoH should get them where they need to be visually. Cheers, Link to comment https://bolterandchainsword.com/topic/100590-apocalypse-lords/page/4/#findComment-1182653 Share on other sites More sharing options...
The Angelus Sanctus Posted February 11, 2007 Share Posted February 11, 2007 Clearly troopers are significantly weighted to the right side :blink: Storm bolters this day and age i tell ye! ;) Link to comment https://bolterandchainsword.com/topic/100590-apocalypse-lords/page/4/#findComment-1182852 Share on other sites More sharing options...
GAR Posted February 15, 2007 Share Posted February 15, 2007 Ok so. Honda, you are going to want to kill me.... The white is totally not doing it for me. I know you are wanting to go warm, but the white just keeps coming off as cool. The correction for this is.... instead of grey as a base for the white, use a 50-50 mix of Snakebite leather and Vomit Yellow. Makes a warm tan color. Then highlight strongly, or glaze the whole thing with Bleached bone and highlight with white. Think Deathwing termi colors only more emphasis on the bone and less on the white. less is more. This is incidentally the main problem with almost every Deathwing Army I have ever seen. Not enough depth. The look like snowmen, ok well angry snowmen, but still snowmen. Once you use white as the main color, your stuck. One should always strive to use as little black or white as possible so the depth of color can come through. That is why blues and browns and beiges are so important. They make the white whiter and the black blacker. Wow, just had a Yoda moment there. I actually sounded like I knew what I was talking about.... :blink: The black, well, I prefer blue for highlights, but the grey you have is acceptable, even if just barely :ph34r: I like the red on the bolters. Just the right touch, but it does need a bit off highlighting. Touch the corners and sharp edges with a mix of blood red and bad moon yellow. The GW oranges really don't mix well with the reds for some reason unless you have the older older range and can get your hands on the classic Blood Angel red. The omega symbol, boom baby. THAT is sweet! touch a teeny tiny bit near the top of the curve of the omega with blood red or blood red mixed with yellow. I thin little line is all it needs. Very small. Just enough to convey the highlight without actually having enough to see it. If you can see it clearly at 3 inches from your face but it blends in at arms length, that is the right amount. The gold, needs a light glaze of chestnut ink. I can't tell if there is any silver highlighting on it, but that will add more glitter to the gold. I don't like the black of the assault cannon housing. Have you considered using white instead of black? Don't change the barrels of the AC. Those are perfect. Strom bolter barrels. hmmm... I don't think NMM will be your friend on this one. Go with metallics. On the edges of the barrels, use a black ink wash to gradually darken the tips of the barrels to get the smoke effect. Aonther interesting twist will be to include a bit of tin bitz or gold to give a slightly oxidized look. Just a little, the majority should appear a boltgun metal, but the gold/tin bitz randomly applied to the tops and high sides of the barrel will help "glam" it up a bit. GAR Link to comment https://bolterandchainsword.com/topic/100590-apocalypse-lords/page/4/#findComment-1186035 Share on other sites More sharing options...
Honda Posted February 17, 2007 Author Share Posted February 17, 2007 Hooah! http://i35.photobucket.com/albums/d187/hkowabunga/Apocalypse%20Lords/Omegawing/Omegawing-WIP10147.jpg For all intents and purposes, these guys are done. A little more of them can be seen at Hall of Heroes. Squad Two is in the batting circle, see you next week! Same Bat-time, same Bat-channel... @Gar, I think what we are experiencing is a philosophical or palette preference difference. I also don't think I see in the pictures what you see in the pictures. However, I also have the advantage of looking at the real mini's, which because of my photographic skills (or lack thereof), only approximate what the real thing is like. For instance, I haven't used white as a base. I used a brownish grey and applied lightened coats from there. I understand and greatly respect your opinions and your ability. You are the most awesome painter I know personally. I would be very interested in letting you see them up close in "real" light and maybe that might provide a better impression. <shrugs> No worries, mate! Link to comment https://bolterandchainsword.com/topic/100590-apocalypse-lords/page/4/#findComment-1187214 Share on other sites More sharing options...
Honda Posted February 17, 2007 Author Share Posted February 17, 2007 Here are some detail shots... Now I know that I said that I was done, but I'm not sure about the chips on the armor. I first did them in GW Terracotta, then back over them with Boltgun metal. It looked good on my test model, but I'm not sure now as it seems too close to the color of the script (which I didn't have on my test model). So I may end up going back and darkening the chips to set them apart. http://i35.photobucket.com/albums/d187/hkowabunga/Apocalypse%20Lords/Omegawing/Omegawing-WIP10154.jpg http://i35.photobucket.com/albums/d187/hkowabunga/Apocalypse%20Lords/Omegawing/Omegawing-WIP10155.jpg http://i35.photobucket.com/albums/d187/hkowabunga/Apocalypse%20Lords/Omegawing/Omegawing-WIP10156.jpg http://i35.photobucket.com/albums/d187/hkowabunga/Apocalypse%20Lords/Omegawing/Omegawing-WIP10157.jpg http://i35.photobucket.com/albums/d187/hkowabunga/Apocalypse%20Lords/Omegawing/Omegawing-WIP10158.jpg http://i35.photobucket.com/albums/d187/hkowabunga/Apocalypse%20Lords/Omegawing/Omegawing-WIP10159.jpg http://i35.photobucket.com/albums/d187/hkowabunga/Apocalypse%20Lords/Omegawing/Omegawing-WIP10160.jpg http://i35.photobucket.com/albums/d187/hkowabunga/Apocalypse%20Lords/Omegawing/Omegawing-WIP10161.jpg http://i35.photobucket.com/albums/d187/hkowabunga/Apocalypse%20Lords/Omegawing/Omegawing-WIP10162.jpg http://i35.photobucket.com/albums/d187/hkowabunga/Apocalypse%20Lords/Omegawing/Omegawing-WIP10163.jpg http://i35.photobucket.com/albums/d187/hkowabunga/Apocalypse%20Lords/Omegawing/Omegawing-WIP10164.jpg http://i35.photobucket.com/albums/d187/hkowabunga/Apocalypse%20Lords/Omegawing/Omegawing-WIP10170.jpg Link to comment https://bolterandchainsword.com/topic/100590-apocalypse-lords/page/4/#findComment-1187228 Share on other sites More sharing options...
GAR Posted February 17, 2007 Share Posted February 17, 2007 Ah, well yes. I have not seen them in person since they were fresh assembled. We seriously need to amend that. A difference in pallete opinion, say it isn't so. I always go with the flow. :ph34r: What I am saying is I like the end result, but it does not appear warm to me. Just trying to keep you focused. ( did I mention I have been working on Deathwing...and Italians...and trolls....and... oh nevermind....)But if your happy, I'm happy. I like the battledamage you have done on the termies. Still don't like the black AC, I'll have to dock you on points for that, LOL. I do however like the ammo in the AC and SBs, that looks spot on perfect. I am flattered you think so superhighly of my skills. The more I paint, the more I become aware of just far I personally have come, but moreso of how far I have to go. I am not quite ready to call myself awesome yet. I think I will need a few demons more before I am comfortable with that. One thing that is kinda bugging about the minis as a whole is the base. I think the greyish base blend in a little too well with the black and white. The fix maybe to add a little sand and paint it brown, bestial brown would be about right. It may be what is needed to make the termies really pop out from the base. I think if you take a couple of days of not looking at the squad, but come back later and then look critically at them again, you see what I mean. It's a small thing and easy to do. The only other that would be a fix is grass, but that really does not fit into yout theme so I leave that off the table as an option. Keep it up! This latest round of picutres is much better than the last one so it really helps me to see what you have in the correct light. GAR Link to comment https://bolterandchainsword.com/topic/100590-apocalypse-lords/page/4/#findComment-1187255 Share on other sites More sharing options...
Honda Posted February 24, 2007 Author Share Posted February 24, 2007 Ok, here we go... In an attempt to "raise the bar" (or is that bite off more than I can chew :) ), I have decided to do 10 terminators in the next round. The reasoning behind this is that although I don't believe that one can paint 10 in the same amount of time as 5 and maintain the equivalent level of quality (which I will be), I do think that now that I have painted 5, I don't have to wonder what various parts are going to look like and I am able to gain some economies of scale. One immediate benefit is that I don't waste any mixed paint. The other major reason for doing this is that it doesn't take a lot of terminators to get to 1000 pts, so I think with two squads + the Librarian and retinue, in drop pods, I'll be pretty close. The other thing that I am seriously considering is taking a brief side trip to build two tactical squads of 10, so that I can get to my 20/20 drop pod list (i.e. twenty terminators, twenty tacticals). So, as you will be able to see, I have put on the second layer of foundation color on the next 10 (15 actually), the first layer of white on 4 of them, painted the foundation color for the gun cases (Bestial Brown), and suddenly it looks like this thing could come together in my lifetime. Of the first 5, I am waiting to get some wheat or straw colored static grass, that I will add to the bases to give that overgrown weed look that you often times see in urban areas. So, the overall progress is looking up and I'd like to think that I'll have then next 10-15 termies done in the next month. Also, I'm still thinking about what sort of doodads to stick on the outside of the drop pods. I'm considering putting some plastic card to represent doors on the body aligned with where the "petals" are. Also, I will most likely try cutting out omega symbols out of paper and then gluing them on the side of the drop pod. If that doesn't work out, then I'll paint them on. Anyway, here are the pictures, primarily to demonstrate that progress is being made, not necessarily to impress anyone with my painting techniques. See you next week. Cheers, http://i35.photobucket.com/albums/d187/hkowabunga/Apocalypse%20Lords/Omegawing/Omegawing-WIP11012.jpg http://i35.photobucket.com/albums/d187/hkowabunga/Apocalypse%20Lords/Omegawing/Omegawing-WIP11013.jpg http://i35.photobucket.com/albums/d187/hkowabunga/Apocalypse%20Lords/Omegawing/Omegawing-WIP11014.jpg http://i35.photobucket.com/albums/d187/hkowabunga/Apocalypse%20Lords/Omegawing/Omegawing-WIP11015.jpg http://i35.photobucket.com/albums/d187/hkowabunga/Apocalypse%20Lords/Omegawing/Omegawing-WIP11016.jpg http://i35.photobucket.com/albums/d187/hkowabunga/Apocalypse%20Lords/Omegawing/Omegawing-WIP11017.jpg Link to comment https://bolterandchainsword.com/topic/100590-apocalypse-lords/page/4/#findComment-1192350 Share on other sites More sharing options...
The Angelus Sanctus Posted February 24, 2007 Share Posted February 24, 2007 Nice progress there Honda :huh: I forsee you finishing these by the end of the year with plenty of time to spare :) Just a quick paint pointer. After having done my SoB in a light grey color and working up from a black undercoat, i still feel that the white side could use that intermediate between hitting the white and the black undercoat. Since you already use codex grey (or an equivalent from another paint range) it isnt too difficult to do that grey step on the white side and by the time you hit the white stage 1. You'll have a solid color to work up from (its easier to do white on grey than white on black) and secondly it gives you that chance to do some dark lining with the grey when you do the white. Of course this assumes you havent already gone off and done the white section on the remaining 25 odd minis. Up to you if you wish to try it out, i think it would work well (and i know ive said this point a few times in the past). However, if you do wish to try to push the boundaries, i think this would be an excellent way to state :) Link to comment https://bolterandchainsword.com/topic/100590-apocalypse-lords/page/4/#findComment-1192385 Share on other sites More sharing options...
Honda Posted February 24, 2007 Author Share Posted February 24, 2007 Just a quick paint pointer. After having done my SoB in a light grey color and working up from a black undercoat, i still feel that the white side could use that intermediate between hitting the white and the black undercoat. Since you already use codex grey (or an equivalent from another paint range) it isnt too difficult to do that grey step on the white side and by the time you hit the white stage 1. :huh: I'm not sure I follow you. I am not painting white over black. I am painting a foundation color (VMC 987) on the black first, then a blend of White + VMC 987 (7:2), to get the "white" side. I'm sorry if I haven't explained that very well. I do agree that attempting to paint white on black is the surest way to severe frustration. Does that help? Link to comment https://bolterandchainsword.com/topic/100590-apocalypse-lords/page/4/#findComment-1192403 Share on other sites More sharing options...
The Angelus Sanctus Posted February 24, 2007 Share Posted February 24, 2007 I think i'm following your steps (although im not familiar with the VMC range, just the VGC). If thats the case, you can still take some of my points with the painting and on the white side (be glad it isnt the whole model) and try to take some more time working up to the white with your intermediate steps. The way it looks, it looks like you are just applying the paint as if it was an undercoat with very little regard to try and pick out the edges of armor plates and armor segments. Hopefully you'll see what im getting at :huh: Link to comment https://bolterandchainsword.com/topic/100590-apocalypse-lords/page/4/#findComment-1192415 Share on other sites More sharing options...
Honda Posted February 24, 2007 Author Share Posted February 24, 2007 The way it looks, it looks like you are just applying the paint as if it was an undercoat with very little regard to try and pick out the edges of armor plates and armor segments. Hopefully you'll see what im getting at Aah..Ok, got it. To date, I had taken the approach of working the whole "white" area up to the lightest color, then going back to hit the recesses with multiple shades as that turned out quicker. You are correct that I can go back and do some highlights on the edges and I will revist them all before I am done. Thanx! Link to comment https://bolterandchainsword.com/topic/100590-apocalypse-lords/page/4/#findComment-1192470 Share on other sites More sharing options...
The Angelus Sanctus Posted February 24, 2007 Share Posted February 24, 2007 Ive done both techniques before (building up shading while building up to the main color) and doing recesses post completed base color and personally, i found the former the easier of the two. When building up, although it does require you to be fairly tidy, you still have some degree of flexibility while building up the color, whilst inversely, you try the other method, you literally have to spend 30 seconds doing a single recess just do you dont accidently botch up the primary coat. However, different strokes for different blokes :blush: Link to comment https://bolterandchainsword.com/topic/100590-apocalypse-lords/page/4/#findComment-1192488 Share on other sites More sharing options...
Honda Posted February 25, 2007 Author Share Posted February 25, 2007 Ive done both techniques before (building up shading while building up to the main color) and doing recesses post completed base color and personally, i found the former the easier of the two. When building up, although it does require you to be fairly tidy, you still have some degree of flexibility while building up the color, whilst inversely, you try the other method, you literally have to spend 30 seconds doing a single recess just do you dont accidently botch up the primary coat. I would agree that there is potentially a higher risk associated with building up, then hitting the recesses, but I find the risk acceptable as long as my brush keeps it's point. The other technique seemed to fiddly to me. It is how I started out as I was attempting to emulate Stuart Spenglers painting style. In the end, going back and doing the recesses just seems easier to me. Thankfully, there's more than one way to paint a marine. :wink: Cheers, Link to comment https://bolterandchainsword.com/topic/100590-apocalypse-lords/page/4/#findComment-1192764 Share on other sites More sharing options...
GAR Posted February 25, 2007 Share Posted February 25, 2007 OK so my thoughts. They look really black and white. I think you accomplished what you wanted in that regard, LOL. Seriously though, looking good so far. I also think the bases will certainly help push what you want with the termies. Those are some well done bases and I am endlessly impressed everytime I see them. They really do make the terminators stand out. Also, I have quite bit of brown/dead looking static grass you can have if you want. I have more than enough to spare all you will need for your army. I also highly approve of the bestial brown as a base for the storm bolters. I think that will give them a lot of "bling" when they are all done. A glaze of red ink also really helps bring out the red color if you are having trouble getting it to pop. I use it quite a bit on my Khorne Chaos warriors and it makes all the difference in the world. It adds a lot of vibrancy that GW reds tend to lack at times. Link to comment https://bolterandchainsword.com/topic/100590-apocalypse-lords/page/4/#findComment-1192805 Share on other sites More sharing options...
The Angelus Sanctus Posted February 25, 2007 Share Posted February 25, 2007 I find Terracotta works alot better than bestial brown :devil: Link to comment https://bolterandchainsword.com/topic/100590-apocalypse-lords/page/4/#findComment-1192889 Share on other sites More sharing options...
Honda Posted February 26, 2007 Author Share Posted February 26, 2007 Interesting. Terracotta didn't impress me that much. If you remember my "Angry Red Men" thread, I did around 500 pts of Khorne in a subdueded red. The mid range of layers was done using Beastial Brown and I was very happy with the overall color on those. Ever since I've stuck with BB as my foundation layer because of coverage, but also because it keeps the red "warm" without making it glow. Terracotta looks like it has some blue in it to me. It just comes off cooler than a warm brown. Anyway, different strokes... Link to comment https://bolterandchainsword.com/topic/100590-apocalypse-lords/page/4/#findComment-1194056 Share on other sites More sharing options...
Honda Posted March 3, 2007 Author Share Posted March 3, 2007 "Welcome back my friends, to the show that never ends, we're so glad you could attend, come inside, come inside" Ok, this week the second layer of foundation white went on. Not that exciting and after all, how excited do we really get over WIP painting shots? http://i35.photobucket.com/albums/d187/hkowabunga/Apocalypse%20Lords/Omegawing/Omegawing-WIP12001.jpg <yep, there's paint on those puppies> So, just a group shot to show that progress is being made. The first five have the double coat and I'll get to the next five this week, plus start the detail work. We've got Spring Break coming up so I'll have a few mornings strung together so that I can make some serious progress. I'd like to have these guys on the table in 1000 pt games by the end of March. I've been fiddling with my list some and this effort will adjust to bring in three dreadnoughts in drop pods as well as some scouts. Primarily, I am interested in getting to the table in my lifetime and for now, I'm going to put off doing all 30 termies in one shot as I'm not convinced on the new Deathwing list yet. So I will work to get the first 20 done, then the other units will be tackled. I will be using "Wisdom of the Ancients" to put three dreads in the heavy slots, a couple of scout squads for my tac choices, and the rest of the force will be termies in drop pods. Again, not a tournament viable list, but it will be something I can have fun with until I get a couple of tactical squads built. Now, just to reward those who tune in each week and are getting a little tired of the white/black stuff (Nope, not me, I LOVE white and black :lol: ), I'm sharing my Alpha Legion commander, Hydraxis. My first ever army was Alpha Legion and I still prefer them over all the other Chaos options as they just play differently. The reason Hydraxis is here, is that the Apocalypse Lords specialize in hunting down the Alpha Legion and Word Bearers, those who sow the seeds of Heresy. So this guy is among the very first PA stuff I ever painted. His body is made out of sculpey. The "scale" indents were made with the edge of an Xacto knife and yes there are tons of them. I actually did an entire Chosen unit of six of these for my army. The fluff behind them is that they (Guilliman's Bane) specialize in genetic research and in particular, inserting reptilian DNA into their troopers to help them become better infiltrators. He's a pretty big dude as I wanted him to tower over the newer plastic termies that were just being whispered about, so at some point, I'll get a comparison shot of him posted. Also, most will note that he isn't perfect, but he was fun to put together and I like how he turned out. Anyway, here is Lord Hydraxis... http://i35.photobucket.com/albums/d187/hkowabunga/Alpha%20Legion/Omegawing-WIP12004.jpg http://i35.photobucket.com/albums/d187/hkowabunga/Alpha%20Legion/Omegawing-WIP12005.jpg http://i35.photobucket.com/albums/d187/hkowabunga/Alpha%20Legion/Omegawing-WIP12006.jpg http://i35.photobucket.com/albums/d187/hkowabunga/Alpha%20Legion/Omegawing-WIP12007.jpg And finally, something a little different so that we all stay focused on the right things...i.e. having fun. http://i35.photobucket.com/albums/d187/hkowabunga/Apocalypse%20Lords/Omegawing/ComicWIP12003.jpg Link to comment https://bolterandchainsword.com/topic/100590-apocalypse-lords/page/4/#findComment-1197741 Share on other sites More sharing options...
The Angelus Sanctus Posted March 3, 2007 Share Posted March 3, 2007 Nice work as always Honda :D I also like the work on Lord Hydraxis (must be a relief to do something DIFFERENT as well). Mini came out looking REALLY nice and the color scheme looks great! Now, with your lil break aside, back to those 30 odd terminators for you now -_- :devil: Link to comment https://bolterandchainsword.com/topic/100590-apocalypse-lords/page/4/#findComment-1197815 Share on other sites More sharing options...
Honda Posted March 3, 2007 Author Share Posted March 3, 2007 I also like the work on Lord Hydraxis (must be a relief to do something DIFFERENT as well). Mini came out looking REALLY nice and the color scheme looks great! Now, with your lil break aside, back to those 30 odd terminators for you now I guess I wasn't very clear on that, he and his troupe were painted several years ago...well, at least three years, possibly four. So, no breaks from painting the 30. More of a picture break. Link to comment https://bolterandchainsword.com/topic/100590-apocalypse-lords/page/4/#findComment-1197833 Share on other sites More sharing options...
The Angelus Sanctus Posted March 3, 2007 Share Posted March 3, 2007 Ooops :ph34r: Nonetheless, thats some very nice work, i can see you have a thing for working with Terminator armor though, since it looks like you used parts from Abaddon to create Lord Hydraxis :D Nice work on the picture break though, its definitely different seeing something that isnt in black and white. Any chance of seeing the other models done on your next picture break? Link to comment https://bolterandchainsword.com/topic/100590-apocalypse-lords/page/4/#findComment-1197878 Share on other sites More sharing options...
Honda Posted March 5, 2007 Author Share Posted March 5, 2007 Nice work on the picture break though, its definitely different seeing something that isnt in black and white. Any chance of seeing the other models done on your next picture break? Yes, that should be doable. I'll get them ready for Saturday's post. Thanx for the C&C... :wink: Link to comment https://bolterandchainsword.com/topic/100590-apocalypse-lords/page/4/#findComment-1198759 Share on other sites More sharing options...
Recommended Posts
Archived
This topic is now archived and is closed to further replies.