jeremy1391 Posted July 7, 2013 Share Posted July 7, 2013 Wow your weathering and mixture of armor marks is amazing! Truly inspirational and a thing of beauty! Link to comment https://bolterandchainsword.com/topic/207053-imperial-fists-and-tablescapesterrain-updated-61217/page/4/#findComment-3408046 Share on other sites More sharing options...
Cpt. Tiberious Posted July 11, 2013 Share Posted July 11, 2013 Dorn himself would be proud of your work brother. Very nicely done. Link to comment https://bolterandchainsword.com/topic/207053-imperial-fists-and-tablescapesterrain-updated-61217/page/4/#findComment-3410618 Share on other sites More sharing options...
augustmanifesto Posted July 13, 2015 Author Share Posted July 13, 2015 (edited) ++++++++++DATE: Terra, 5 years laterMOOD: Depressed it's taken this long, offset by a sense of self-satisfaction in progress madeSTATUS: Final posting before final picts are captured and displayedCOMMENT: Why am I writing a post in this form? ...INCOMING TRANSMISSION FROM II SQUAD, I COMPANY...http://i304.photobucket.com/albums/nn177/Emperor_Bill/IF1_zps715jgm14.jpg Edited July 15, 2015 by augustmanifesto GastosRhor, Kurgan the Lurker, Pearson73 and 2 others 5 Back to top Link to comment https://bolterandchainsword.com/topic/207053-imperial-fists-and-tablescapesterrain-updated-61217/page/4/#findComment-4122419 Share on other sites More sharing options...
Optimat_prime Posted July 13, 2015 Share Posted July 13, 2015 I really love how there guys all look like they've been through years and years and war - which of course is not a new compliment in this thread. I bet they look fantastic all together Especially the white there on that last guy the helmet grime is perfectly tone matched to the rest of the model. Link to comment https://bolterandchainsword.com/topic/207053-imperial-fists-and-tablescapesterrain-updated-61217/page/4/#findComment-4122583 Share on other sites More sharing options...
augustmanifesto Posted July 13, 2015 Author Share Posted July 13, 2015 I really love how there guys all look like they've been through years and years and war - which of course is not a new compliment in this thread. I bet they look fantastic all together Especially the white there on that last guy the helmet grime is perfectly tone matched to the rest of the model. Thanks! Which is fitting given it's been years and years of painting (and stripping, and starting over, and painting...)! Link to comment https://bolterandchainsword.com/topic/207053-imperial-fists-and-tablescapesterrain-updated-61217/page/4/#findComment-4122646 Share on other sites More sharing options...
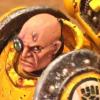
augustmanifesto Posted July 17, 2015 Author Share Posted July 17, 2015 Experimenting with Secret Weapon Miniature Tablescapes paint schemeshttp://i304.photobucket.com/albums/nn177/Emperor_Bill/Mobile%20Uploads/image1_zps9f68ac21.jpg Dosjetka 1 Back to top Link to comment https://bolterandchainsword.com/topic/207053-imperial-fists-and-tablescapesterrain-updated-61217/page/4/#findComment-4124536 Share on other sites More sharing options...
Bernard The slayer Posted July 17, 2015 Share Posted July 17, 2015 Looking great! I would love to see how you apply this technique to tanks… Link to comment https://bolterandchainsword.com/topic/207053-imperial-fists-and-tablescapesterrain-updated-61217/page/4/#findComment-4124558 Share on other sites More sharing options...
Rhetoricus Posted July 17, 2015 Share Posted July 17, 2015 Lovely looking Fists mate. Have you moved on to the new paint range now? I'm absolutely dreading running out of Darksun, and I'm down to my last pot of Golden Yellow too! Anyway as others have said some of the best weathering around. If you find the time a step by step pic tutorial soul be immensely appreciated. More please. Link to comment https://bolterandchainsword.com/topic/207053-imperial-fists-and-tablescapesterrain-updated-61217/page/4/#findComment-4124635 Share on other sites More sharing options...
augustmanifesto Posted July 17, 2015 Author Share Posted July 17, 2015 Here is one more sternguard without basing (notice the scrimshaw as described in Ian Watson's novel Space Marine). http://i304.photobucket.com/albums/nn177/Emperor_Bill/Mobile%20Uploads/image2_zps537058ab.jpg And here is a pre-assembly piece of the sternguard sergeant. A few pieces are not done. Hope to finish tonight. http://i304.photobucket.com/albums/nn177/Emperor_Bill/Mobile%20Uploads/image1_zps967ff1e3.jpg Dosjetka and Vulkan454 2 Back to top Link to comment https://bolterandchainsword.com/topic/207053-imperial-fists-and-tablescapesterrain-updated-61217/page/4/#findComment-4124762 Share on other sites More sharing options...
augustmanifesto Posted July 18, 2015 Author Share Posted July 18, 2015 (edited) Almost finished sternguard sergeant, good enough for now. sorry the quickly snapped pics are kind of blurry upon zooming in.http://i304.photobucket.com/albums/nn177/Emperor_Bill/3758BBC2-148E-47F9-A61A-E748705979C6_zpskutewc2g.jpg Edited July 18, 2015 by augustmanifesto DimDim, Xavier Targhost, Mithrilforge and 2 others 5 Back to top Link to comment https://bolterandchainsword.com/topic/207053-imperial-fists-and-tablescapesterrain-updated-61217/page/4/#findComment-4125368 Share on other sites More sharing options...
augustmanifesto Posted July 23, 2015 Author Share Posted July 23, 2015 Sorry for the step down in coolness, but have some devastators aboot http://i304.photobucket.com/albums/nn177/Emperor_Bill/3F29F8D2-FC35-4488-85A1-A8089AD83486_zpstsifhtgo.jpg Dosjetka 1 Back to top Link to comment https://bolterandchainsword.com/topic/207053-imperial-fists-and-tablescapesterrain-updated-61217/page/4/#findComment-4125716 Share on other sites More sharing options...
One-eye Posted July 23, 2015 Share Posted July 23, 2015 Awesome Sternguards ! Your yellow and your weathering are top notch. IH elements are very well integrated. GastosRhor 1 Back to top Link to comment https://bolterandchainsword.com/topic/207053-imperial-fists-and-tablescapesterrain-updated-61217/page/4/#findComment-4125911 Share on other sites More sharing options...
augustmanifesto Posted July 23, 2015 Author Share Posted July 23, 2015 http://i304.photobucket.com/albums/nn177/Emperor_Bill/0855187D-4610-4B8B-A9E5-8AE06187F4A7_zpsjjngar91.jpg Dosjetka and Kurgan the Lurker 2 Back to top Link to comment https://bolterandchainsword.com/topic/207053-imperial-fists-and-tablescapesterrain-updated-61217/page/4/#findComment-4126623 Share on other sites More sharing options...
augustmanifesto Posted July 24, 2015 Author Share Posted July 24, 2015 http://i304.photobucket.com/albums/nn177/Emperor_Bill/6E828917-0333-4890-B104-588995DE9D0E_zpsx8meqtiz.jpg Link to comment https://bolterandchainsword.com/topic/207053-imperial-fists-and-tablescapesterrain-updated-61217/page/4/#findComment-4126938 Share on other sites More sharing options...
Dosjetka Posted July 24, 2015 Share Posted July 24, 2015 How do you manage to get such an amazing yellow by starting with a black undercoat? Link to comment https://bolterandchainsword.com/topic/207053-imperial-fists-and-tablescapesterrain-updated-61217/page/4/#findComment-4126987 Share on other sites More sharing options...
augustmanifesto Posted July 24, 2015 Author Share Posted July 24, 2015 How do you manage to get such an amazing yellow by starting with a black undercoat? I don't. I start with white. airbrush does the rest! Then I go back over areas that will end up metallics with black and shade in the recesses with scorched brown. helterskelter and GastosRhor 2 Back to top Link to comment https://bolterandchainsword.com/topic/207053-imperial-fists-and-tablescapesterrain-updated-61217/page/4/#findComment-4127045 Share on other sites More sharing options...
GastosRhor Posted July 26, 2015 Share Posted July 26, 2015 Oh man... they look sooo goood. I think must hide under the carpet now. Awesome stuff and inspiration for my IF gang :) Link to comment https://bolterandchainsword.com/topic/207053-imperial-fists-and-tablescapesterrain-updated-61217/page/4/#findComment-4128964 Share on other sites More sharing options...
augustmanifesto Posted July 29, 2015 Author Share Posted July 29, 2015 These centurions are taking forever. But in the meantime: http://i304.photobucket.com/albums/nn177/Emperor_Bill/IF2_zps3ky4oks6.jpg Dosjetka, Dantioch and Widowmaker 3 Back to top Link to comment https://bolterandchainsword.com/topic/207053-imperial-fists-and-tablescapesterrain-updated-61217/page/4/#findComment-4131509 Share on other sites More sharing options...
augustmanifesto Posted September 8, 2015 Author Share Posted September 8, 2015 (edited) Getting some work done on terrain. I've started working on the Secret Weapon Miniatures Tablscapes:-) urban street tiles. I basically followed a simplified version of tutorial posted on the SWS blog by James Wappel, which is: Step 1: apply Minitaire Rock to the streetStep 2: apply Minitaire Concrete Slab to the sidewalk Step 3: apply street markings and paint metal details (Lead Belcher, wash Nuln Oil, drbrush Runefang Steel) Step 4: apply gloss varnish followed by oil washes of Burnt Umber and Davvy's Grey Step 5: seal with matte finish Step 6: apply rust effects to metal areas using pigments Steps 1-2 and application of street markings used Tamiya painting tape for masking. This stuff was impressive. I managed to use the same masking for all of the street markings. I was a bit apprehensive about this project because I had no experience airbrushing large flat areas before (and little experience with an airbrush in general) but to my surprise, it's really easy and is turning out really well. After priming the tiles black I got to painting. Here's a stage-by-stage of my test tile. Step 1: When applying the layer, the trick is the get uneven coverage leaving a natural patchy look, concentrating on cracks (here, there aren't many). http://i304.photobucket.com/albums/nn177/Emperor_Bill/Mobile%20Uploads/B7A5FDB6-E0CC-4ED8-9978-0F4E110A44FD_zpskasuvwue.jpgStep 2: Same as above, shoot for an uneven, patchy look concentrating on any cracks. I found out it's important to go for 100 percent, opaque coat over the boundaries between each tile, which helps to distinguish them and work sort of as a highlight (especially once oil is added later). http://i304.photobucket.com/albums/nn177/Emperor_Bill/Mobile%20Uploads/A1D9175E-F0F0-43A3-A10F-CA0DFB0BD26A_zpsndqedflv.jpgStepe 3-4: I neglected to take a shot of step three (the metals and street markings), so here it is after the oils were applied and still wet: http://i304.photobucket.com/albums/nn177/Emperor_Bill/Mobile%20Uploads/3532FF2B-1FDD-44A4-A788-C43E67F9A9D8_zpse7lzwze6.jpgA quick note on applying the oils. Working with oils on a glossy service is very forgiving. You can wipe away anything you don't like.I found what worked best was applying the Burnt Umber on the sidewalk area and gutter, with a lighter application an inch or two towards the center of the street. I applied the oil a bit liberally and then used a paper towel to dab up the excess (the dabbing technique is important because of the pattern it leaves the remaining oil, which then diffuses out and dries into neatly blended patches).I concentrated the oil in the cracks of the concrete and did a second oil application into the cracks after the first application dried (this is really easy because the oil pant flows right into the cracks via capillary action). How much oil you want remaining on the top of the sidewalk is up to you, I decided it looked best with a light, uneven layer remaining that was patchy as to leave some spots apparently clean at first (as the oil diffuses outward, these spots typically receive a very light covering). After that dried, I applied a heavy layer of Davvy's Grey wash to the street, dabbing the extra up with a big wad of paper towel (I later discovered I left a bit too much on this test tile compared to my other tiles, but it's a street! who cares!) Step 5 and 6: Here is the finished tester tile after being sealed and applying some rusty-looking pigment to the metal areas. I later decided I applied way too much pigment and wiped off a good deal of it with Q-tips soaked in turpenoid. http://i304.photobucket.com/albums/nn177/Emperor_Bill/Mobile%20Uploads/7A0922A4-6BC6-48B1-8A93-0E7756706BE7_zpsrf3ctwxq.jpgNot too bad for a first attempt, I think. Bonus Action Shot!http://i304.photobucket.com/albums/nn177/Emperor_Bill/Mobile%20Uploads/7985B8B4-8AB2-4846-AABC-C52F99D39D04_zpslfjci3ml.jpgGoing into Full-Rate Production The tester tile took me an evening of work. Resolved to apply my knew found feel for the process, I decided to complete the rest of a road tiles. It took about 7-8 hours spread out over a two days. For me, that is actually really, really fast considering it takes me many, many hours to finish a single space marine. Steps 1-3 Batch: http://i304.photobucket.com/albums/nn177/Emperor_Bill/Mobile%20Uploads/77736EFB-5813-41B3-AE2E-C3667D1B38F8_zpssnphzhwa.jpgI improvised a few details here, like painting hazard stripes on the ground machine in the middle of the road. It helps break up the concrete look and add interest. You'll also notice some blast marks in the craters built-into the tiles. For that, I sprayed in Minitaire Coal, faning outward. Steps 4-6 Batch: http://i304.photobucket.com/albums/nn177/Emperor_Bill/Mobile%20Uploads/773D3DCA-5DD9-46A9-B336-698398CE85D6_zpsgbgokvio.jpg(Half-) Concluding Thoughts I am really enjoying this project. It was just what I needed to take a break from painting these Emperor-forsaken Centurions while still staying productive. It was a good change of pace and working with oils and weathering powders. I'm looking forward to competing the remaining tiles where buildings will be placed. Those are much more uniform and I should go much faster, especially because I won't have to worry about masking. I think the colors work really well together. Unlike some other urban street tiles I've seen, sticking to the grey-scale makes the elements blend together while remaining distinct enough (this effect is helped by concentrating different oil paints on each respective section with some bleed-over with the Burnt Umber to smooth the transition).There are a few things I could have spent more time on, but the returns would have been relatively small in exchange for considerably more time invested. One thing that may have been worth it, though, was to dry-brush some of the rubble in the street a lighter grey. I may go back and do that eventually (and then re-seal those areas) but for now I'm satisfied with the results. Regarding the Secret Weapon tiles, I have two thoughts so far: First, Bravo, Mr. Justin. These are an outstanding product. I was an early backer on the kickstarter and the tiles were well worth the wait. They are well designed. Easy to Paint. Functional. I'm really looking forward to gaming on them. I personally favor their more utilitarian, minimalist aesthetic over the GW street tiles. The SWS tiles are also superior to the GW tiles in the respect that they are 1ft x 1 ft (which allows more gaming options). When combining the damaged and undamaged Urban Street Tiles, I think they make for a more interesting game board as well. While the GW versions have more details, there are only two tiles which limits layout and does not feature the kind of interesting cracking and damaged features as the SWS tiles. Second, I do have one complaint. Some of the street tiles have a textured surface (only on the street, not the sidewalk). Others don't. This makes for a different final appearance, especially once washes are applied. There is no way around this. Fortunately, I discovered the difference in appearance is fairly minimal once a matte varnish was sprayed on to seal the tiles. I'm fairly OCD about this kind of thing, and the result is tolerable even to me. But, nonetheless, this is still a flaw in the tiles (and the only one). Edited September 12, 2015 by augustmanifesto Argent aquila, Kurgan the Lurker, Dosjetka and 1 other 4 Back to top Link to comment https://bolterandchainsword.com/topic/207053-imperial-fists-and-tablescapesterrain-updated-61217/page/4/#findComment-4166912 Share on other sites More sharing options...
Argent aquila Posted September 9, 2015 Share Posted September 9, 2015 Stunning work, my friend! will be following closely, keep up the good work. Link to comment https://bolterandchainsword.com/topic/207053-imperial-fists-and-tablescapesterrain-updated-61217/page/4/#findComment-4167124 Share on other sites More sharing options...
lionofjudah Posted September 9, 2015 Share Posted September 9, 2015 Getting ready to get back to my fosts and happy to see your work man... Welcome back home Link to comment https://bolterandchainsword.com/topic/207053-imperial-fists-and-tablescapesterrain-updated-61217/page/4/#findComment-4167162 Share on other sites More sharing options...
Dosjetka Posted September 9, 2015 Share Posted September 9, 2015 Excellent work on both the Devastators and the tiles! :) Link to comment https://bolterandchainsword.com/topic/207053-imperial-fists-and-tablescapesterrain-updated-61217/page/4/#findComment-4167252 Share on other sites More sharing options...
augustmanifesto Posted September 12, 2015 Author Share Posted September 12, 2015 (edited) Finished the other half of the Tablescapes Urban Street Project yesterday. The process was the same as what was previously described for the sidewalk sections. The only difference being the tiles with deep damage and one tile I decided to make an industrial foundation. For the damaged Tiles, I applied some browns with the airbrush first to simulate dirt that will show through the cleaved concrete: http://i304.photobucket.com/albums/nn177/Emperor_Bill/Mobile%20Uploads/13F06896-7847-4039-A771-705267F3ED7C_zpsgoqkilsm.jpgThen, the Concrete Slab was sprayed on. I think I ended up covering too much of the brown, but oh well:http://i304.photobucket.com/albums/nn177/Emperor_Bill/Mobile%20Uploads/882593E1-5267-4340-9D81-7041D2445018_zpsxsw5pjeq.jpgThe second difference was some extra work to create an industrial-ish foundation tile. I thought this would be a simple way to add some interest to the overall game board and play off the industrial-ish theme already in the road tiles (recall one tile has some check-point thing with big metallic elements and another has some sort of machine built into it that I showcased with black and yellow hazard stripes). Wanting to match the hazard stripes going on elsewhere -- and what isn't an obvious industrial reference if not hazard stripes -- I decided to replicate that effect in this tile. I used the good old hairspray technique to get some chipping going on: http://i304.photobucket.com/albums/nn177/Emperor_Bill/Mobile%20Uploads/764AC43D-DFCE-42A1-B4C6-159E56BFA5A0_zpspvuepir3.jpgThen the oil wash went on, followed by some matte seal. Group photo: http://i304.photobucket.com/albums/nn177/Emperor_Bill/Mobile%20Uploads/FFCBAF06-07E3-4BF8-A1B7-5F8D349EF746_zpsbthpoo9k.jpgNext, I see how everything looks together. Edited September 12, 2015 by augustmanifesto Link to comment https://bolterandchainsword.com/topic/207053-imperial-fists-and-tablescapesterrain-updated-61217/page/4/#findComment-4170218 Share on other sites More sharing options...
Zeller Posted September 12, 2015 Share Posted September 12, 2015 Your terrain looks freaking sweet. Those Fists... Link to comment https://bolterandchainsword.com/topic/207053-imperial-fists-and-tablescapesterrain-updated-61217/page/4/#findComment-4170227 Share on other sites More sharing options...
GhostMalone Posted September 12, 2015 Share Posted September 12, 2015 And I'll be stealing your scheme for my table scape tiles love your work man Link to comment https://bolterandchainsword.com/topic/207053-imperial-fists-and-tablescapesterrain-updated-61217/page/4/#findComment-4170229 Share on other sites More sharing options...
Recommended Posts
Create an account or sign in to comment
You need to be a member in order to leave a comment
Create an account
Sign up for a new account in our community. It's easy!
Register a new accountSign in
Already have an account? Sign in here.
Sign In Now