NoPityNoRemorseNoFear Posted January 11, 2016 Author Share Posted January 11, 2016 Hey everyone, Here's my mornings work so far: http://i1377.photobucket.com/albums/ah78/Btemp93/temporary_zps1fkswvp6.jpgI was also thinking about doing a painting tutorial with one of my initiates, would you be interested in that at all?RegardsNPNRNF Link to comment https://bolterandchainsword.com/topic/301060-the-sanctus-crusade-sigismund/page/4/#findComment-4273384 Share on other sites More sharing options...
Brother Captain Ed Posted January 11, 2016 Share Posted January 11, 2016 Your dreadnoughts are hot to death. NoPityNoRemorseNoFear 1 Back to top Link to comment https://bolterandchainsword.com/topic/301060-the-sanctus-crusade-sigismund/page/4/#findComment-4273506 Share on other sites More sharing options...
NoPityNoRemorseNoFear Posted January 11, 2016 Author Share Posted January 11, 2016 Your dreadnoughts are hot to death. Thanks! I still have to paint the venerable aswell, I don't think I will ever be finished. Link to comment https://bolterandchainsword.com/topic/301060-the-sanctus-crusade-sigismund/page/4/#findComment-4273589 Share on other sites More sharing options...
Brother Captain Ed Posted January 11, 2016 Share Posted January 11, 2016 Your dreadnoughts are hot to death. Thanks! I still have to paint the venerable aswell, I don't think I will ever be finished. Well, I hope you keep posting pictures of them (and any brothers they acquire over the years). Seriously some of the best dreads of any chapter that I have seen thus far. Link to comment https://bolterandchainsword.com/topic/301060-the-sanctus-crusade-sigismund/page/4/#findComment-4273590 Share on other sites More sharing options...
NoPityNoRemorseNoFear Posted January 12, 2016 Author Share Posted January 12, 2016 (edited) Your dreadnoughts are hot to death. Thanks! I still have to paint the venerable aswell, I don't think I will ever be finished. Well, I hope you keep posting pictures of them (and any brothers they acquire over the years). Seriously some of the best dreads of any chapter that I have seen thus far. Wow That's a massive compliment thank you, however I really don't think my stuff compares to some of the great sculpting and paintwork that some other people are capable of. I will keep going whenever I am at home! In other news I have managed to get quite far through my personal vow today, I still have edge highlighting, basing and transfers to go but I am pretty happy with it so far! http://i1377.photobucket.com/albums/ah78/Btemp93/temporary_zpsngipqsdb.jpg http://i1377.photobucket.com/albums/ah78/Btemp93/temporary_zpsbsnofaid.jpg http://i1377.photobucket.com/albums/ah78/Btemp93/temporary_zps1bgivzf8.jpg http://i1377.photobucket.com/albums/ah78/Btemp93/temporary_zpstor8t3d4.jpg I have taken a few photos of one of the initiates along the way so I'll give a step by step instructions for one of them if people are interested! I also still haven't touched my centurions, mainly because I'm half way through a 3500 point battle in which they are still alive and taking up space in my room: http://i1377.photobucket.com/albums/ah78/Btemp93/temporary_zpsof0imsko.jpg Edited January 12, 2016 by NoPityNoRemorseNoFear Marshal Mattias 1 Back to top Link to comment https://bolterandchainsword.com/topic/301060-the-sanctus-crusade-sigismund/page/4/#findComment-4273840 Share on other sites More sharing options...
Brother Christopher Posted January 12, 2016 Share Posted January 12, 2016 I am truly impressed by the pace and quality of your progress - your painting is efficient and effective. I especially like the way you handled ornaments on the breastplates. Link to comment https://bolterandchainsword.com/topic/301060-the-sanctus-crusade-sigismund/page/4/#findComment-4274490 Share on other sites More sharing options...
NoPityNoRemorseNoFear Posted January 13, 2016 Author Share Posted January 13, 2016 I am truly impressed by the pace and quality of your progress - your painting is efficient and effective. I especially like the way you handled ornaments on the breastplates. Cheers, It was basically a solid day of painting on a laptray whilst moving around the house and drinking tea. I haven't managed anything today though sadly, been practising my power axe arm on some witches in disguise (logs). Yeah washes are really good at giving you incredible detailing like that, I've decided I'll put a painting tutorial up so you'll see how it is done there! Link to comment https://bolterandchainsword.com/topic/301060-the-sanctus-crusade-sigismund/page/4/#findComment-4274659 Share on other sites More sharing options...
NoPityNoRemorseNoFear Posted January 14, 2016 Author Share Posted January 14, 2016 (edited) Painting finally finished! Just a few Transfers to do whenever I have time. http://i1377.photobucket.com/albums/ah78/Btemp93/temporary_zps0phexzvt.jpg http://i1377.photobucket.com/albums/ah78/Btemp93/temporary_zpsalkmjsp7.jpg http://i1377.photobucket.com/albums/ah78/Btemp93/temporary_zps2ivubcbj.jpg http://i1377.photobucket.com/albums/ah78/Btemp93/temporary_zpsdqgvbdfr.jpg http://i1377.photobucket.com/albums/ah78/Btemp93/temporary_zpsgn76sc6c.jpg The battle has been tidied up too, sadly cut short as I am leaving on Saturday.This just leaves the centurions for me to focus on for today. Also a Painting Guide will be coming shortly! Edited January 14, 2016 by NoPityNoRemorseNoFear Psykic_scribe 1 Back to top Link to comment https://bolterandchainsword.com/topic/301060-the-sanctus-crusade-sigismund/page/4/#findComment-4275435 Share on other sites More sharing options...
NoPityNoRemorseNoFear Posted January 14, 2016 Author Share Posted January 14, 2016 My Colour Scheme for the Black Templars:Fistly I sprayed the model black and drybrushed all of the areas which will remain black with Citadel Adeptus mechanicus gray:http://i1377.photobucket.com/albums/ah78/Btemp93/Painting%20Guide/temporary_zpsnmgzzpjv.jpg Then I applied Several layers of Citadel Ceramite White to the shoulder pads to make sure they are as white as possible. http://i1377.photobucket.com/albums/ah78/Btemp93/Painting%20Guide/temporary_zpsrkvyibvt.jpg I then paint over the armour with Vallejo Black Primer to give a deeper colour and applied Citadel Rakarth Flesh to Crusader Seals.http://i1377.photobucket.com/albums/ah78/Btemp93/Painting%20Guide/temporary_zpslykhmfqi.jpg I then trialed using Vallejo grey wash with a thin brush in the corners of the shoulder pad, I changed this later and used Citadel Nuln Oil because I have decided I prefer a deeper colour in the crevices of the white shoulder pad. http://i1377.photobucket.com/albums/ah78/Btemp93/Painting%20Guide/temporary_zps1hk2wytv.jpg After This Step I didn't have my camera so I didn't show a few steps so here they all are: Citadel Leadbelcher was used on the chainsword teeth and other metal areas Citadel Ghenna's Gold was used on the Aquila and other insignia Citadel Warplock Bronze was used on the Chainsword Exhaust thingmy Citadel Rakarth flesh was used on the skull iconography Citadel Khorne Red was applied to the eye lenses and crusader Seals Citadel Nuln Oil wash was applied to the metal areas of the Model Citadel Agathrax Earthshade wash was applied to the Aquila and the crusader seals http://i1377.photobucket.com/albums/ah78/Btemp93/Painting%20Guide/temporary_zpsdjy1zsw4.jpg http://i1377.photobucket.com/albums/ah78/Btemp93/Painting%20Guide/temporary_zpsmnzra7ji.jpg After This Highlights were appied:Citadel Dawnstone highlighted the black armour Vallejo Game Colour Bloody Red highlighted the eye lenses Citadel Ironbreaker was used to highlight the metals and very lightly on the aquilaAnd Citadel Texture Astrogranite was used to base the model (More can be done here I know)http://i1377.photobucket.com/albums/ah78/Btemp93/Painting%20Guide/temporary_zpsruy8rwxy.jpg I hope you find this interesting, It was quite fun to make! Metic 1 Back to top Link to comment https://bolterandchainsword.com/topic/301060-the-sanctus-crusade-sigismund/page/4/#findComment-4275453 Share on other sites More sharing options...
Metic Posted January 14, 2016 Share Posted January 14, 2016 looks good, but remember to clean up your mold lines. That bolter barrel is a sin against the emperor. NoPityNoRemorseNoFear 1 Back to top Link to comment https://bolterandchainsword.com/topic/301060-the-sanctus-crusade-sigismund/page/4/#findComment-4275664 Share on other sites More sharing options...
NoPityNoRemorseNoFear Posted January 14, 2016 Author Share Posted January 14, 2016 looks good, but remember to clean up your mold lines. That bolter barrel is a sin against the emperor. I am quite ashamedly incredibly lazy on occasions, I'll get on it Metic! Link to comment https://bolterandchainsword.com/topic/301060-the-sanctus-crusade-sigismund/page/4/#findComment-4275689 Share on other sites More sharing options...
NoPityNoRemorseNoFear Posted January 15, 2016 Author Share Posted January 15, 2016 Hi everyone,I have given the Centurion some greenstuff but I haven't done much more than that.Bear in mind it is quite rough right now but I'll end up sanding it after it has cured and I will go about templarifying it after that!Any ideas/ comments/ criticisms on how to improve it are welcome!http://i1377.photobucket.com/albums/ah78/Btemp93/temporary_zpssabckalz.jpg?1452864589447&1452864591355&1452864612064&1452864654847 http://i1377.photobucket.com/albums/ah78/Btemp93/temporary_zps4tgxoear.jpg?1452864589447&1452864591355&1452864612064&1452864654847Sadly I think this is the end of my hobbying spree as I am off to Uni again on Saturday.It's been a good christmas period though and thanks for being so helpful with your input! Marshal Mattias, Honda and Psykic_scribe 3 Back to top Link to comment https://bolterandchainsword.com/topic/301060-the-sanctus-crusade-sigismund/page/4/#findComment-4276357 Share on other sites More sharing options...
Marshal Mattias Posted January 15, 2016 Share Posted January 15, 2016 The chest details are great, but I agree with your own assessment that there is a little work to get the robe elements to be same standard. I like the pose and helmet choice too, he feels like a mini dreadnought basically ;) Link to comment https://bolterandchainsword.com/topic/301060-the-sanctus-crusade-sigismund/page/4/#findComment-4276366 Share on other sites More sharing options...
NoPityNoRemorseNoFear Posted January 16, 2016 Author Share Posted January 16, 2016 The chest details are great, but I agree with your own assessment that there is a little work to get the robe elements to be same standard. I like the pose and helmet choice too, he feels like a mini dreadnought basically Thanks, That's what I was going for! Also duly noted I have lots to do on the robes, This is why I need to get better with Greenstuff! Link to comment https://bolterandchainsword.com/topic/301060-the-sanctus-crusade-sigismund/page/4/#findComment-4276777 Share on other sites More sharing options...
AndrewChristlieb Posted January 16, 2016 Share Posted January 16, 2016 He's looking good so far! Try looking at the upgrade sprue's tabards for inspiration on how the folds lay. I'm terrible with greenstuff too, but that's helped me get a little better results. I really need to get a set of tools, the old hobby knife doesn't cut it... :D Link to comment https://bolterandchainsword.com/topic/301060-the-sanctus-crusade-sigismund/page/4/#findComment-4276806 Share on other sites More sharing options...
Honda Posted January 16, 2016 Share Posted January 16, 2016 I really like how he's shaping up. I hope he doesn't have to wait too long before you get back to him. Observations: 1. I know he still has a bit of clean up to undergo, but I think you nailed the chest part of the robes. I think the chest piece is an especially nice touch. 2. That being said, the volume of fabric above his waist does not seem to correspond to the volume of fabric below his waist. So I think you need to broaden the tabard and make sure that it lines up with the top. 3. I'm not sure if this is the final position of his belt/chain, but he's definitely "low ridin'." So since Templars don't do "gangsta", it seems like that needs to be tightened up a tad. To summarize, I think you have the pose down and as stated by MM, the helmet is a real win. He will look awesome when you are finished with him. Cheers, NoPityNoRemorseNoFear 1 Back to top Link to comment https://bolterandchainsword.com/topic/301060-the-sanctus-crusade-sigismund/page/4/#findComment-4276953 Share on other sites More sharing options...
NoPityNoRemorseNoFear Posted January 16, 2016 Author Share Posted January 16, 2016 He's looking good so far! Try looking at the upgrade sprue's tabards for inspiration on how the folds lay. I'm terrible with greenstuff too, but that's helped me get a little better results. I really need to get a set of tools, the old hobby knife doesn't cut it... Thansk, Yeah I will have a look, this is my first attempt at a tabard and I probably should have taken more time making him. Yeah I would love a mini rolling pin to flatten the GS a bit more, I ended up pushing down on a ruler to get it flat enough! I really like how he's shaping up. I hope he doesn't have to wait too long before you get back to him. Observations: 1. I know he still has a bit of clean up to undergo, but I think you nailed the chest part of the robes. I think the chest piece is an especially nice touch. 2. That being said, the volume of fabric above his waist does not seem to correspond to the volume of fabric below his waist. So I think you need to broaden the tabard and make sure that it lines up with the top. 3. I'm not sure if this is the final position of his belt/chain, but he's definitely "low ridin'." So since Templars don't do "gangsta", it seems like that needs to be tightened up a tad. To summarize, I think you have the pose down and as stated by MM, the helmet is a real win. He will look awesome when you are finished with him. Cheers, Sadly I suspect it'll be around 4 months until I am back to working on them. Yeah I probable should do more to the bottom half of the robes, I was just very conscious of not messing the top part up that I left the bottom without doing too much with it. I'm going to have to lift the chain on the right hand side, I didn't think of that thanks! Yeah I cannot wait to get them all finished, as they will look really good once done. Before I left I decided to try and display my entire completed army on a shelf, I quickly realised that wouldn't be possible so here are all of my infantry + Dreadnoughts with a Storm Raven thrown in! http://i1377.photobucket.com/albums/ah78/Btemp93/05820464-5c74-46fa-9483-f9c0bde06036_zpsljsklslz.jpg I thought this would be a fittingly Zealous farewell until next time! Keep Crusading! AndrewChristlieb, Psykic_scribe, Honda and 1 other 4 Back to top Link to comment https://bolterandchainsword.com/topic/301060-the-sanctus-crusade-sigismund/page/4/#findComment-4277071 Share on other sites More sharing options...
Psykic_scribe Posted January 16, 2016 Share Posted January 16, 2016 That's a ZEALOUS looking band of brothers ! On the subject of mini rolling pins, I collected mine from my wife who received a present from my mother-in-law. Enough said. But part of a broom handle for working GS would do fine too. NoPityNoRemorseNoFear 1 Back to top Link to comment https://bolterandchainsword.com/topic/301060-the-sanctus-crusade-sigismund/page/4/#findComment-4277135 Share on other sites More sharing options...
AndrewChristlieb Posted January 16, 2016 Share Posted January 16, 2016 I lube up the hobby knife's blade and use that to roll it out. I guess I really do everything with that stupid knife... :D NoPityNoRemorseNoFear 1 Back to top Link to comment https://bolterandchainsword.com/topic/301060-the-sanctus-crusade-sigismund/page/4/#findComment-4277176 Share on other sites More sharing options...
NoPityNoRemorseNoFear Posted April 2, 2016 Author Share Posted April 2, 2016 Hi everyone, I've gone home for a few days in the middle of my final thesis which may have been a mistake as I have new begun procrasti-crafting a few unfinished projects.I won't be here for long and I have more important things to do but we'll see what I can get done! To start with:http://i1377.photobucket.com/albums/ah78/Btemp93/Black%20Templars/temporary_zpswstdxd4q.jpg?t=1459519105 http://i1377.photobucket.com/albums/ah78/Btemp93/Black%20Templars/temporary_zps4nhi8jwl.jpg http://i1377.photobucket.com/albums/ah78/Btemp93/Black%20Templars/temporary_zps29ga0g9o.jpg http://i1377.photobucket.com/albums/ah78/Btemp93/Black%20Templars/temporary_zpskbwc47g8.jpg here's the First Centurion, I doubt I will have time to make another but I might do some painting after this. C+C welcome as always, Is there anything more I should do to the model, templarify it a little more perhaps? Brother Christopher and Psykic_scribe 2 Back to top Link to comment https://bolterandchainsword.com/topic/301060-the-sanctus-crusade-sigismund/page/4/#findComment-4352710 Share on other sites More sharing options...
NoPityNoRemorseNoFear Posted April 4, 2016 Author Share Posted April 4, 2016 (edited) Hi everyone again,Apologies for the spam but I don't get long with my crusade and I have been practising with green stuff again for my surcoats. This time I have used petroleum jelly instead of water to keep GS from sticking and used a sculpting tool as a makeshift rolling pin.I found this far easier when sculpting however I was working in poor light so so I have missed a few odd details. I am still happy with this attempt and as everyone says, the more you practise the better it gets!Enough talk, bring on the models!http://i1377.photobucket.com/albums/ah78/Btemp93/Black%20Templars/temporary_zpsee4yyffc.jpg http://i1377.photobucket.com/albums/ah78/Btemp93/Black%20Templars/temporary_zpswnpsvpz5.jpg http://i1377.photobucket.com/albums/ah78/Btemp93/Black%20Templars/temporary_zpsevdhuczr.jpg http://i1377.photobucket.com/albums/ah78/Btemp93/Black%20Templars/temporary_zpslbjtkzqs.jpg http://i1377.photobucket.com/albums/ah78/Btemp93/Black%20Templars/temporary_zpsxfvxsxds.jpg C+C as always are welcome!Edit: More greenstuff etc. Plus a new Venerable dreadnought although it is still a WIP http://i1377.photobucket.com/albums/ah78/Btemp93/Black%20Templars/temporary_zpskvx0raj9.jpg?t=1460125218 http://i1377.photobucket.com/albums/ah78/Btemp93/Black%20Templars/temporary_zpswr9mdaa4.jpg?t=1460125339 http://i1377.photobucket.com/albums/ah78/Btemp93/Black%20Templars/temporary_zpsrtnwqi8y.jpg?t=1460125442 http://i1377.photobucket.com/albums/ah78/Btemp93/Black%20Templars/temporary_zpst5iuaug3.jpg?t=1460125534 http://i1377.photobucket.com/albums/ah78/Btemp93/Black%20Templars/temporary_zpshrzop3qi.jpg http://i1377.photobucket.com/albums/ah78/Btemp93/Black%20Templars/temporary_zps8ijtoeun.jpg Edited April 9, 2016 by NoPityNoRemorseNoFear AndrewChristlieb, Brother Christopher and Honda 3 Back to top Link to comment https://bolterandchainsword.com/topic/301060-the-sanctus-crusade-sigismund/page/4/#findComment-4354705 Share on other sites More sharing options...
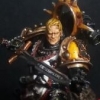
NoPityNoRemorseNoFear Posted May 30, 2016 Author Share Posted May 30, 2016 Hello everyone! After what felt like an age I have finally finished my studies and what better timing than the start of the ETL V!!So here is my initial vow: http://i1377.photobucket.com/albums/ah78/Btemp93/temporary_zpstnylnrq3.jpg 10 Honour guard with 2 relic blades and a thunder hammer = 295 1 Storm Talon with typhoon missile launcher = 130 1 Ironclad Dreadnought = 135 1 Captain with Relic blade, shield eternal and artificer armour = 185 Total = 745 points So far I have managed to mostly complete my Venerable Dread and the Captain. http://i1377.photobucket.com/albums/ah78/Btemp93/WP_20160530_20_41_51_Pro_zpsi0grgfmh.jpg http://i1377.photobucket.com/albums/ah78/Btemp93/WP_20160530_20_44_28_Pro_zpsqcotlj9z.jpg http://i1377.photobucket.com/albums/ah78/Btemp93/WP_20160530_20_45_08_Pro_zpspgh3sw9o.jpg Unfortunately the dred's banner snapped off and was lost up north but hopefully it can be recovered. Still got lots of honour guard to complete but plenty of time to get them done! Glad to be back, I am looking forward to getting a lot more completed soon! Brother Christopher, Brother Chaplain Ryld and Marshal Mattias 3 Back to top Link to comment https://bolterandchainsword.com/topic/301060-the-sanctus-crusade-sigismund/page/4/#findComment-4408428 Share on other sites More sharing options...
Brother Christopher Posted May 30, 2016 Share Posted May 30, 2016 Congratulations on you progress, brother. In the grim darkness of the future, there is no notion of a too big of a sword. And, I implore, share the secrets of how you the green stuff plate with the small Maltese crosses on the venerable dread from your previous post! That is just staggeringly cool and I'd love to 'borrow' your idea! Link to comment https://bolterandchainsword.com/topic/301060-the-sanctus-crusade-sigismund/page/4/#findComment-4408447 Share on other sites More sharing options...
NoPityNoRemorseNoFear Posted May 30, 2016 Author Share Posted May 30, 2016 (edited) Congratulations on you progress, brother. In the grim darkness of the future, there is no notion of a too big of a sword. And, I implore, share the secrets of how you the green stuff plate with the small Maltese crosses on the venerable dread from your previous post! That is just staggeringly cool and I'd love to 'borrow' your idea! I am glad you like it! I picked up some a standard press moulding kit on ebay in which you can just boil the mould and then push it onto the original of what you want to replicate. In that case I used the inside of the BT sprue rhino doors, vehicle upgrade parts in general have really good mould-able parts (see the ven's left leg/ the centurions chest piece as examples!). If you want I could make a quick tutorial of the entire process so you know what's involved? Edited May 30, 2016 by NoPityNoRemorseNoFear Link to comment https://bolterandchainsword.com/topic/301060-the-sanctus-crusade-sigismund/page/4/#findComment-4408457 Share on other sites More sharing options...
Bjorn Firewalker Posted May 30, 2016 Share Posted May 30, 2016 (edited) http://i1377.photobucket.com/albums/ah78/Btemp93/WP_20160530_20_41_51_Pro_zpsi0grgfmh.jpg http://i1377.photobucket.com/albums/ah78/Btemp93/WP_20160530_20_45_08_Pro_zpspgh3sw9o.jpg Unfortunately the dred's banner snapped off and was lost up north but hopefully it can be recovered. Impressive work on the Venerable Dreadnought. I like the lightning effects on the sword. Edited June 1, 2016 by Bjorn Firewalker NoPityNoRemorseNoFear 1 Back to top Link to comment https://bolterandchainsword.com/topic/301060-the-sanctus-crusade-sigismund/page/4/#findComment-4408482 Share on other sites More sharing options...
Recommended Posts
Create an account or sign in to comment
You need to be a member in order to leave a comment
Create an account
Sign up for a new account in our community. It's easy!
Register a new accountSign in
Already have an account? Sign in here.
Sign In Now