W.A.Rorie Posted August 8, 2018 Share Posted August 8, 2018 the other guy is on the ground already.....the gunner is the LSS gunner Link to comment https://bolterandchainsword.com/topic/344554-task-force-umbra-a-raven-guard-5th-company-wip/page/8/#findComment-5140987 Share on other sites More sharing options...
thewarriorhunter Posted August 8, 2018 Share Posted August 8, 2018 Now I want to model a guy hanging on to the rear wing for dear life, shooting his bolt gun John Woo style. Link to comment https://bolterandchainsword.com/topic/344554-task-force-umbra-a-raven-guard-5th-company-wip/page/8/#findComment-5141048 Share on other sites More sharing options...
Race Bannon Posted August 8, 2018 Share Posted August 8, 2018 Now I want to model a guy hanging on to the rear wing for dear life, shooting his bolt gun John Woo style. So it is said, so it must be done Link to comment https://bolterandchainsword.com/topic/344554-task-force-umbra-a-raven-guard-5th-company-wip/page/8/#findComment-5141061 Share on other sites More sharing options...
duz_ Posted August 8, 2018 Share Posted August 8, 2018 If it may help, this is my plan for the Storm: http://www.bolterandchainsword.com/topic/289887-magnetized-my-land-speeder-storm/?hl=%2Bstorm&do=findComment&comment=3692194 It's going to be a labor of love and maybe the last model I ever build before I die So it is said, so it must be done Just saying... Link to comment https://bolterandchainsword.com/topic/344554-task-force-umbra-a-raven-guard-5th-company-wip/page/8/#findComment-5141066 Share on other sites More sharing options...
Brother Quixote Posted August 8, 2018 Share Posted August 8, 2018 Looking forward to seeing how this turns out. I have a LSS in my sprue piles somewhere and I was half thinking of magnets. Link to comment https://bolterandchainsword.com/topic/344554-task-force-umbra-a-raven-guard-5th-company-wip/page/8/#findComment-5141092 Share on other sites More sharing options...
golfdeltafoxtrot Posted August 9, 2018 Author Share Posted August 9, 2018 Well my normal Thursday evening gaming has been cancelled and my Kill Team scenery was completed last night. That means that tonight will be the beginning of LSS assembly. The main chassis won't require much in the way of adjustment and I can start making plans for where and how I want to position my Scouts. Link to comment https://bolterandchainsword.com/topic/344554-task-force-umbra-a-raven-guard-5th-company-wip/page/8/#findComment-5141424 Share on other sites More sharing options...
golfdeltafoxtrot Posted August 11, 2018 Author Share Posted August 11, 2018 It has begun. Slightly delayed as my wife decided that my spare Thursday evening was better spent gardening than modelling, but I got the work done last night instead. Surprisingly easy to put together after the last debacle I had with a Land Speeder. You may notice that I’ve relocated the heavy bolter. I took it off the passenger side rail (the holes for which I will fill with green stuff) and mounted it on the side. A converted gun camera and a mounting peg made from spare sprue and now the pilot can fire it from his control console, leaving the passenger free to disembark with the rest of the squad. I also started work on the pilot. He won’t be up-armoured like the rest of the squad, but he does get the standard Scout helmet with comms gear and optics. Link to comment https://bolterandchainsword.com/topic/344554-task-force-umbra-a-raven-guard-5th-company-wip/page/8/#findComment-5142684 Share on other sites More sharing options...
Race Bannon Posted August 11, 2018 Share Posted August 11, 2018 Aw snap, I may have to steal this idea too :facepalm: Link to comment https://bolterandchainsword.com/topic/344554-task-force-umbra-a-raven-guard-5th-company-wip/page/8/#findComment-5142890 Share on other sites More sharing options...
thewarriorhunter Posted August 11, 2018 Share Posted August 11, 2018 Dude that is a great idea that I may steal also... Since I have seniority in post count I demand more photos of that HB and how it's mounted. Link to comment https://bolterandchainsword.com/topic/344554-task-force-umbra-a-raven-guard-5th-company-wip/page/8/#findComment-5142945 Share on other sites More sharing options...
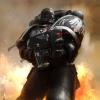
golfdeltafoxtrot Posted August 12, 2018 Author Share Posted August 12, 2018 Demand and you shall receive Brother! I built the standard HB from the LSS kit then removed the mounting hook thing from the bottom and the front sight from the top. The gun camera is a pair of binoculars from the Cadian Command box shaved down to look less like binoculars then glued where the front sight was. The mounting peg is a piece of sprue cut to size, filed to fit the shape of the front panel and then stuck to the underside of the HB. I tried to make it as unobtrusive as possible as sprue always looks like sprue and it can be really obvious if you’re not careful with it. Last night saw the first of the Scouts worked on. I haven’t got any magnets yet, still trying to hunt down a supplier and measure up what I need, but a bit of blue tack serves to illustrate the plan. Scout 1 sits on the left of the LSS watching the rear with his Corvidae-pattern CQB bolter - reflex sight, box magazine and stock to optimise for close-quarters firefights. He dismounts with the rest of his squad mates to seize a crucial objective. He obviously doesn’t leave his legs behind. Took about an hour to get all the measuring, dry-fitting, positioning, and gluing done. The LSS legs aren’t cut down very accurately but the issue is with the back so it won’t really get seen. Had to shave down some of the torso to get the arms to fit but the mangled bits are hidden by the arm so that doesn’t matter either. I’m pretty pleased so far, it’s time consuming but I want to get it right. Link to comment https://bolterandchainsword.com/topic/344554-task-force-umbra-a-raven-guard-5th-company-wip/page/8/#findComment-5143194 Share on other sites More sharing options...
thewarriorhunter Posted August 12, 2018 Share Posted August 12, 2018 That HB work looks good. I don't think the sprue will be much of an issue since it's on the bottom. Link to comment https://bolterandchainsword.com/topic/344554-task-force-umbra-a-raven-guard-5th-company-wip/page/8/#findComment-5143217 Share on other sites More sharing options...
golfdeltafoxtrot Posted August 12, 2018 Author Share Posted August 12, 2018 That HB work looks good. I don't think the sprue will be much of an issue since it's on the bottom. Thanks dude. I was originally planning something more elaborate with a CROWS-style turret but I didn’t want to spend ages on it hen I could be working on the Scouts instead. I think it works quite nicely, should look OK once I get round to painting. Link to comment https://bolterandchainsword.com/topic/344554-task-force-umbra-a-raven-guard-5th-company-wip/page/8/#findComment-5143325 Share on other sites More sharing options...
W.A.Rorie Posted August 13, 2018 Share Posted August 13, 2018 Very cool so far Link to comment https://bolterandchainsword.com/topic/344554-task-force-umbra-a-raven-guard-5th-company-wip/page/8/#findComment-5143993 Share on other sites More sharing options...
golfdeltafoxtrot Posted August 14, 2018 Author Share Posted August 14, 2018 Work continues apace. Well, sort of apace. Some of the LSS torso-leg assemblies proved more challenging to modify, but a bit of planning and careful sawing and it came out alright in the end. Similarly some of the arms are positioned slightly off because that’s the only way I could get everything lined up, but I suspect it’s just my overly critical eye that spots that sort of thing. Also, the structure of the LLS itself will require slight modification. The Scout that’s standing up on the left side bench doesn’t really fit in if I add the H-shaped top component of the transport compartment. As such I’ll likely cut it down to scavenge the lights off it and add a bar of 2mm square styrene rod across the top instead. One Scout remains to be built - the guy hanging off the right side - then I’ll have to start thinking about magnets. Comments and criticism welcomed. Link to comment https://bolterandchainsword.com/topic/344554-task-force-umbra-a-raven-guard-5th-company-wip/page/8/#findComment-5144630 Share on other sites More sharing options...
duz_ Posted August 14, 2018 Share Posted August 14, 2018 Looks great if I send you mine can you do it for me too :D ^_^ :sweat: Link to comment https://bolterandchainsword.com/topic/344554-task-force-umbra-a-raven-guard-5th-company-wip/page/8/#findComment-5144750 Share on other sites More sharing options...
Shadow Captain Vyper Posted August 14, 2018 Share Posted August 14, 2018 Looks great if I send you mine can you do it for me too +1 Link to comment https://bolterandchainsword.com/topic/344554-task-force-umbra-a-raven-guard-5th-company-wip/page/8/#findComment-5144800 Share on other sites More sharing options...
W.A.Rorie Posted August 14, 2018 Share Posted August 14, 2018 Very Nice. I really Digg the poses with you went with Link to comment https://bolterandchainsword.com/topic/344554-task-force-umbra-a-raven-guard-5th-company-wip/page/8/#findComment-5144831 Share on other sites More sharing options...
thewarriorhunter Posted August 14, 2018 Share Posted August 14, 2018 Are those Anvil bits? It's looking great so far. Link to comment https://bolterandchainsword.com/topic/344554-task-force-umbra-a-raven-guard-5th-company-wip/page/8/#findComment-5144977 Share on other sites More sharing options...
W.A.Rorie Posted August 14, 2018 Share Posted August 14, 2018 Looks like arms heads, mags, and sights too me Link to comment https://bolterandchainsword.com/topic/344554-task-force-umbra-a-raven-guard-5th-company-wip/page/8/#findComment-5145002 Share on other sites More sharing options...
golfdeltafoxtrot Posted August 14, 2018 Author Share Posted August 14, 2018 Are those Anvil bits? It's looking great so far. war009 has it right. Black Ops heads, Black Ops Vanguard arms, Exo-Lords box mags, and Exo-Lords reflex sights. A bit of flash on the heads but otherwise excellent quality bits. Link to comment https://bolterandchainsword.com/topic/344554-task-force-umbra-a-raven-guard-5th-company-wip/page/8/#findComment-5145060 Share on other sites More sharing options...
thewarriorhunter Posted August 14, 2018 Share Posted August 14, 2018 I love their stuff. Link to comment https://bolterandchainsword.com/topic/344554-task-force-umbra-a-raven-guard-5th-company-wip/page/8/#findComment-5145147 Share on other sites More sharing options...
golfdeltafoxtrot Posted August 15, 2018 Author Share Posted August 15, 2018 So bar the magnets, the top section of the transport space, and the gap filling, that’s the LSS pretty much done. The last Scout proved to be a pain in my backside. The original pose requires that he be glued onto a little peg on the lip of the transport compartment and be holding onto a handle with his left hand. With his left hand occupied and the extra bulk of the arms and weapons, he doesn’t really fit there anymore. Instead, he’s going to have to sit on the running board. Here’s how it looks with everyone on board. And here’s the squad dismounted (though as you can see one guy is propped up on some blue tack until I can get a base built for him). I’m pretty pleased so far, and I’m hoping that the magnets won’t be too much of a stretch. Comments and criticism welcome. Link to comment https://bolterandchainsword.com/topic/344554-task-force-umbra-a-raven-guard-5th-company-wip/page/8/#findComment-5145341 Share on other sites More sharing options...
Dracos Posted August 15, 2018 Share Posted August 15, 2018 Sick. Just freaking sick. Love how the third party bits just work it. Sweet job on the Speeder team. Link to comment https://bolterandchainsword.com/topic/344554-task-force-umbra-a-raven-guard-5th-company-wip/page/8/#findComment-5145394 Share on other sites More sharing options...
Race Bannon Posted August 15, 2018 Share Posted August 15, 2018 Dude, this may be the best Storm conversion in the galaxy :tu: Link to comment https://bolterandchainsword.com/topic/344554-task-force-umbra-a-raven-guard-5th-company-wip/page/8/#findComment-5145408 Share on other sites More sharing options...
W.A.Rorie Posted August 15, 2018 Share Posted August 15, 2018 Hot damn those are Sexy...... Link to comment https://bolterandchainsword.com/topic/344554-task-force-umbra-a-raven-guard-5th-company-wip/page/8/#findComment-5145476 Share on other sites More sharing options...
Recommended Posts
Archived
This topic is now archived and is closed to further replies.