NiftyVT Posted June 7, 2019 Author Share Posted June 7, 2019 (edited) Next up is a couple Armigers! On my first I decided to experiment a little and marble the top carapace. In general I try to experiment or do some thing a little different/new on just about every model I do. Whether its a conversion technique, decal technique, or painting technique to name a few possibilities. In this case it was a painting technique with my airbrush. I saw a random facebook post that mentioned something about a 'dryer sheet' method of painting marble. And that was basically the only information provided. . .so I decided to give it a try! So this is for sure a new weapon in my painting arsenal. After this I did a bunch of Adeptus Titanicus panels too! Other than that I painted the rest of the model like the Knight for the most part. Just changed up some chassis colors. I did the enamel wash over the marble too. And the final result. For my 2nd Armiger I decided to try something new. Over on the Heresy30k forum a member posted their technique/process on how they acheived a beaten copper look on the armor panels of their 28mm Warlord. I think I got the overall look down but it seems to just look better on the larger Warlord armor panels because you have more room to play. So that was a fun little experiment. And the next time I do a set of martian bases I will do a little tutorial. The next thing I want to experiment with is adding pigments to the bases! I have a bunch of colors of pigment from Secret Weapon ready and waiting. I also painted up a random objective, and as you can see the Armigers are magnetized. Plan is to eventually get some alternate weapon options. A little sneak peak at what I am currently working on. Now. . .what could this little guy be doing? Edited June 7, 2019 by NiftyVT Lord Blackwood, Charlo, Focslain and 1 other 4 Back to top Link to comment https://bolterandchainsword.com/topic/356176-niftyvts-xana-ii-mechanicum/page/2/#findComment-5327644 Share on other sites More sharing options...
jeremy1391 Posted June 7, 2019 Share Posted June 7, 2019 The marble carapace looks awesome! Link to comment https://bolterandchainsword.com/topic/356176-niftyvts-xana-ii-mechanicum/page/2/#findComment-5327775 Share on other sites More sharing options...
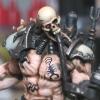
NiftyVT Posted June 11, 2019 Author Share Posted June 11, 2019 Thanks and its super easy to do too! So I have pretty much exhausted my finished collection, except for my Knight Acheron, so now it's time for true WIP minis. First up are 2 Dragoons. These also emerged from the forge a bit. . . different. The awesome Triaros that has been at this stage for 2 years. Top shield bit is separate to aid painting. And a super cool Vultarax. This pic is a few weeks old and I have actually made good progress on it. Its almost ready for the oil wash step. Next up is some Rust stalkers that I saved from a player at my FLGS. I had to come up with some missing arms but I like the result. Also included are some more of my GW Skulls program metal tech priests/arch magos. I know the Acheron is a rather large omission but I just don't have any good pictures of it at the moment. There are a few other things on the work bench but I will post them later. If you look at the background of some of my pictures you might spy some yet un mentioned things. Lord Blackwood and brother_b 2 Back to top Link to comment https://bolterandchainsword.com/topic/356176-niftyvts-xana-ii-mechanicum/page/2/#findComment-5329824 Share on other sites More sharing options...
NiftyVT Posted June 12, 2019 Author Share Posted June 12, 2019 Alright, up next is a few WIP shots of my now complete Acheron. I started off with a fantastic base from Dragon Forge Design (where most of my bases come from actually). Standard paint job as previously shown. But first I match drilled some pin holes to secure the knight to the base. Close up of base + pin holes. I did standard FW prep work and multi assembly for painting. Lots of tiny bubble filling and a little green stuff work to fix some minor mold slips. I have it standing on that foam core because I already have the pins in its feet. If you ware wondering whats in the Jar: Its where I poor the mineral spirits when cleaning my airbrush and regular brushes after using the enamel wash. Then I take it to the local trash collection where they have a special disposal tank. I followed the same painting process as the plastic knight except this time I actually knew what I was doing! When I did the plastic knight I did lots of liquid mask and painters tape mask in order to airbrush the armor panel trim. On the Acheron I found that I really didnt need to go through all of the effort and did most of the trim by hand and got the same result. However, the larger trim on the main carapace, after trying by hand, did need to be airbrushed in order to achieve a nice smooth finish but instead of the time consuming liquid mask + painters tape I used good old silly putty! Nothing else really special about the build or painting that hasn't been shown. I did fully paint the interior but the one and only time I took off the carapace to show it off I scratched the exhaust ports pretty bad. After fixing the paint I havent removed the carapace since. I am not even going to bother with the interior on my Castigator. I do try to attempt something new with each mini so maybe on my next knight that has an interior I will try magnetizing and putting a hinge on the cockpit door. . . maybe a LED to light the inside or something. I should have time on Friday to take some pictures of the finished Acheron. Stray, Magos Takatus, Prot and 1 other 4 Back to top Link to comment https://bolterandchainsword.com/topic/356176-niftyvts-xana-ii-mechanicum/page/2/#findComment-5330069 Share on other sites More sharing options...
NiftyVT Posted June 14, 2019 Author Share Posted June 14, 2019 (edited) And here are some completed pictures of the Acheron. Enjoy. Those decals that go across panel lines are such a pain but well worth the effort to get right. Edited June 14, 2019 by NiftyVT RolandTHTG, Lord Blackwood, jeremy1391 and 5 others 8 Back to top Link to comment https://bolterandchainsword.com/topic/356176-niftyvts-xana-ii-mechanicum/page/2/#findComment-5331544 Share on other sites More sharing options...
Bjorn Firewalker Posted June 14, 2019 Share Posted June 14, 2019 Excellent work on the Knight Acheron. Are the red scorpions on its armor mere decorations, or do they indicate he's a freeblade ally of the Red Scorpions Chapter? Link to comment https://bolterandchainsword.com/topic/356176-niftyvts-xana-ii-mechanicum/page/2/#findComment-5331562 Share on other sites More sharing options...
NiftyVT Posted June 15, 2019 Author Share Posted June 15, 2019 (edited) Excellent work on the Knight Acheron. Are the red scorpions on its armor mere decorations, or do they indicate he's a freeblade ally of the Red Scorpions Chapter? Xana II Deamonforge House Malinax icons. I got 4 of the transfer sheets from FW before they were discontinued. Edited June 15, 2019 by NiftyVT jeremy1391 and Ghostinnashell 2 Back to top Link to comment https://bolterandchainsword.com/topic/356176-niftyvts-xana-ii-mechanicum/page/2/#findComment-5331583 Share on other sites More sharing options...
NiftyVT Posted June 24, 2019 Author Share Posted June 24, 2019 Disappointed that there are no Apoc rules for all my fun FW stuff. . .the wait and freeze on buying anything new continues. Link to comment https://bolterandchainsword.com/topic/356176-niftyvts-xana-ii-mechanicum/page/2/#findComment-5336729 Share on other sites More sharing options...
Charlo Posted June 25, 2019 Share Posted June 25, 2019 Disappointed that there are no Apoc rules for all my fun FW stuff. . .the wait and freeze on buying anything new continues. Which stuff? There's an entire FW section of rules including knights/ Titans etc Link to comment https://bolterandchainsword.com/topic/356176-niftyvts-xana-ii-mechanicum/page/2/#findComment-5337239 Share on other sites More sharing options...
NiftyVT Posted June 26, 2019 Author Share Posted June 26, 2019 Disappointed that there are no Apoc rules for all my fun FW stuff. . .the wait and freeze on buying anything new continues.Which stuff? There's an entire FW section of rules including knights/ Titans etc Thanatar, Triaros, Castellax etc. Link to comment https://bolterandchainsword.com/topic/356176-niftyvts-xana-ii-mechanicum/page/2/#findComment-5337911 Share on other sites More sharing options...
NiftyVT Posted June 30, 2019 Author Share Posted June 30, 2019 I actually got in some hobby time this weekend in between lots of adulting. I present Mr Vultarax. This little guy has been out and about hunting for a while now hence his disheveled appearance. The mini is made all the more awesome by the wonderful flying stand from Dragon Forge design. Make sure you have him drill the base for you because the hole comes perfectly square. The fallen column on the base is Dragon Forge Design too. Lord Blackwood, Azekai, Ghostinnashell and 2 others 5 Back to top Link to comment https://bolterandchainsword.com/topic/356176-niftyvts-xana-ii-mechanicum/page/2/#findComment-5339802 Share on other sites More sharing options...
Bjorn Firewalker Posted July 1, 2019 Share Posted July 1, 2019 Excellent work on Mr. Vultarax. Link to comment https://bolterandchainsword.com/topic/356176-niftyvts-xana-ii-mechanicum/page/2/#findComment-5339897 Share on other sites More sharing options...
NiftyVT Posted July 1, 2019 Author Share Posted July 1, 2019 Excellent work on Mr. Vultarax. Thanks! I did tried a couple new things with this mini. The rust was straight from the basic GW painting video, Typhus Corrosion and a dry brush. Which is something I have never done. I also sponged on quite a bit of brown around the armor panel joints and then I did some scratches by quickly slicing a sharp corner that I cut into a sponge over the armor panels. And I went heavier on the enamel wash. But I did have one problem. The heavier wash followed by me getting distracted and letting it dry way to long made it a huge pain to rub the wash off. I actually had to dampen a cotton swab with mineral spirits and wipe it over a small area, let it sit of a few seconds so it loosened up the enamel paint and then wipe. Rinse and repeat for about 100+ cotton swabs! Thankfully Vallejo gloss varnish is some tough stuff! It was a slow and delicate process because if I used to much mineral spirit then I would have removed all of the wash and it would no longer be tinting the base coats. Link to comment https://bolterandchainsword.com/topic/356176-niftyvts-xana-ii-mechanicum/page/2/#findComment-5340026 Share on other sites More sharing options...
NiftyVT Posted July 8, 2019 Author Share Posted July 8, 2019 I have decided that I really need to power through some infantry. I set them out so they are ready for assembly line work whenever I get some hobby time! Magos Takatus, Stray and brother_b 3 Back to top Link to comment https://bolterandchainsword.com/topic/356176-niftyvts-xana-ii-mechanicum/page/2/#findComment-5344007 Share on other sites More sharing options...
brother_b Posted July 8, 2019 Share Posted July 8, 2019 I love them thralls. Nice stuff. Link to comment https://bolterandchainsword.com/topic/356176-niftyvts-xana-ii-mechanicum/page/2/#findComment-5344026 Share on other sites More sharing options...
NiftyVT Posted July 8, 2019 Author Share Posted July 8, 2019 I love them thralls. Nice stuff. I love the thralls but man they took a while to assemble! I assembled the arms to the guns and then I had to heat each set of arms up and then quickly flex, fit and glue at the shoulders all at the same time. Total pain but worth it. brother_b and Stray 2 Back to top Link to comment https://bolterandchainsword.com/topic/356176-niftyvts-xana-ii-mechanicum/page/2/#findComment-5344096 Share on other sites More sharing options...
Mushkilla Posted July 9, 2019 Share Posted July 9, 2019 The spider legged kataphrons remind me of the spider legged cyborgs from Tiberium Sun Firestorm. Visionary stuff! The talos dragoon fusions are also fantastic. Why must deviation from the sacred STC patterns be so rewarding? Thanks for sharing. :) Link to comment https://bolterandchainsword.com/topic/356176-niftyvts-xana-ii-mechanicum/page/2/#findComment-5344328 Share on other sites More sharing options...
NiftyVT Posted July 9, 2019 Author Share Posted July 9, 2019 (edited) The spider legged kataphrons remind me of the spider legged cyborgs from Tiberium Sun Firestorm. Visionary stuff! The talos dragoon fusions are also fantastic. Why must deviation from the sacred STC patterns be so rewarding? Thanks for sharing. :) The plan is to eventually build a couple more talos-dragoon conversions so the one actual skitarii rider can 'herd' them around. =) Just grabbing the legs off ebay and then a full talos kit will help me save some funds. Edited July 9, 2019 by NiftyVT Link to comment https://bolterandchainsword.com/topic/356176-niftyvts-xana-ii-mechanicum/page/2/#findComment-5344431 Share on other sites More sharing options...
Lightbox Posted July 10, 2019 Share Posted July 10, 2019 Some really cool conversions here! Almost makes me want to start mechanicum for the kitbashing potential ;) Do you have a tutorial on how you achieved that marbling on your armiger? Link to comment https://bolterandchainsword.com/topic/356176-niftyvts-xana-ii-mechanicum/page/2/#findComment-5344872 Share on other sites More sharing options...
NiftyVT Posted July 10, 2019 Author Share Posted July 10, 2019 (edited) Some really cool conversions here! Almost makes me want to start mechanicum for the kitbashing potential Do you have a tutorial on how you achieved that marbling on your armiger? The tutorial is basically just that first picture. You just need to try out different drier sheets until you find the brand that gives you the look you want. Some hints and tips: 1. Shake out the drier sheet because most of them are really dusty. 2. Personally I used ones that have been through the drier. 3. Carefully pull apart the drier sheet to open up the pattern. This takes some trial and error. 4. Practice on junk bits. I did several practice runs on an old dozer blade I had in the bits box. 5. You can use the same spot on a single sheet multiple times. I rotated the sheet and re positioned it a little on each piece. This is how I did a ton of Titanicus armor panels very quickly. 6. Experiment with how long you let the paint dry before removing the sheet. I found that I could spray, wait a few seconds and then remove the sheet. 7. Use tweezers to remove stray drier sheet bits as soon as possible. 8. Dont spray to heavy or you will get some texture on the surface. Thats all I got off the top of my head. Edited July 22, 2019 by NiftyVT Stray 1 Back to top Link to comment https://bolterandchainsword.com/topic/356176-niftyvts-xana-ii-mechanicum/page/2/#findComment-5344900 Share on other sites More sharing options...
NiftyVT Posted July 14, 2019 Author Share Posted July 14, 2019 (edited) Making some decent progress on a bunch of infantry. I am doing my best to take some step by step pictures so I can show the whole process. I just need to remember to keep taking pictures lol. Edited July 14, 2019 by NiftyVT Link to comment https://bolterandchainsword.com/topic/356176-niftyvts-xana-ii-mechanicum/page/2/#findComment-5346707 Share on other sites More sharing options...
NiftyVT Posted July 21, 2019 Author Share Posted July 21, 2019 (edited) Here is a step by step run down of the painting process for my infantry. My process is pretty quick and gives a great table top+ finish. First step is to prime and then airbrush everything thats going to be off white. Primer: Vallejo or Stynlrez Black. Vallejo Model Air Aged White. Then I picked out everything that is going to be black. In this case mostly just the tubes, pants and gloved hands. Army Painter Matt Black Then I painted all of the armour. Vallejo Metal Color Airbrush Colors Magnesium. Then I picked out all of the metal body parts. Vallejo Metal Color Airbrush Colors Steel. Next up is a base coat on the weapons. Vallejo Metal Color Airbrush Colors Exhaust Manifold. Then I did a little dry brushing on the tubes and highlighted the black bits. GW Mechanicus Standard Grey Notice that I missed this guys hands which I had to go back and paint black and highlight after I took the pic. Next its time to pick out the details. I used copper to pick out the odd little details here and there. Vallejo Metal Color Airbrush Colors Copper. Then I grabbed the silver which I used to highlight everything and paint the intricate scrolling on the weapons. Vallejo Metal Color Airbrush Colors Silver. And I used a series of tans for the scrolls and black for the writing on the scrolls. Coat d'arms 522 Pale Sand and 221 Horse Tone Dun. Army Painter Matt Black At this point all of the painting is basically done. All that is left is a gloss coat, oil wash and the base. And probably some transfers. One thing to note with my process is that I can ignore most little mistakes because when I do the oil wash step I can easily cover them up by strategic oil removal or by keeping more oil on. Yes they are really shiny right now which is difficult to photograph but the oil wash and the matte coat at the very end makes them nice and grimy and gives that wonderful tint to the off white. Now I just need to finish these guys up and then its time to get those 20 Thralls done! Edited July 21, 2019 by NiftyVT Focslain, Lord Blackwood and brother_b 3 Back to top Link to comment https://bolterandchainsword.com/topic/356176-niftyvts-xana-ii-mechanicum/page/2/#findComment-5350554 Share on other sites More sharing options...
Son of Sacrifice Posted July 23, 2019 Share Posted July 23, 2019 It's a really nice scheme, painted well. Are you playing 30k or 40k? Link to comment https://bolterandchainsword.com/topic/356176-niftyvts-xana-ii-mechanicum/page/2/#findComment-5351332 Share on other sites More sharing options...
NiftyVT Posted July 23, 2019 Author Share Posted July 23, 2019 It's a really nice scheme, painted well. Are you playing 30k or 40k? This started as a 30k force but I play mostly 40k in reality due to the local crowd. Also, the Mechanicum rules are spread over hundreds of dollars (USD) of books. Some books only contain rules for 1 or 2 models! I have the Big Book for the knights and the Mechanicum red book but the red book is missing a bunch of rules that came out in follow on black books and I am not buying an expensive rule book for just 1-2 models worth of rules. I asked FW if the red book was ever going to be updated and they gave me the generic answer 'we dont know but watch the Warhammer Community site for information.' I guess I can always just rely on battle scribe but I like to actually have the rules in hand. Link to comment https://bolterandchainsword.com/topic/356176-niftyvts-xana-ii-mechanicum/page/2/#findComment-5351628 Share on other sites More sharing options...
NiftyVT Posted July 29, 2019 Author Share Posted July 29, 2019 (edited) More infantry added to the endless hordes of Xana II. To continue the tutorial: Once a gloss coat has dried completely its time for the oil wash. 50/50 mix of AK Interactive Streaking Grime and Brown Blue enamels. I sprayed this on through my airbrush and it looks like this once its dry. A fume rated mask and a vented booth are a must for this step! Only let it dry for 15-30 minutes or it may become extremely difficult to get off! Next is the wipe step. I used an old cotton T-Shirt to take off as much as I could reach. Then out came the cotton swabs. . .lots and lots of them! I also used an old nylon paintbrush to get to any hard to reach areas. I keept a small bowl with a little odorless mineral spirits in it near by. If I needed to use the brush I dampened it with mineral spirits and used it to pull/push the enamel somewhere where I could get to it with a cotton swab. If any of the enamel wash is stubborn I used a damp cotton swab or the nylon brush to barely wet the area with mineral spirit and then a new swab to gently work the wash off. There should be barely any mineral spirit on the swap, dip the cotton swab in the mineral spirit and then soak most of it out on a paper towel. Be gentle when using mineral spirits because If you rub to hard then you could pull up the gloss coat along with the enamel. Once all of the wiping is complete I let the enamel dry over night and then hit it with another gloss coat to seal it down. This picture is after the wipe off step, gloss and right after I started spreading Martian Ironcrust onto the base. Once the Ironcrust was dry I followed the GW Texture paint basing guide to finish them up. I did a heavy dry brush of GW Ryza Rust followed by a light drybrush of GW Eldar Flesh. Then I painted the base rim black and did the final Matte coat via airbrush. Vallejo Matte Varnish, Army Painter Matt Black. And yes I do lots of varnishing on these guys. When it comes down to it they are gaming pieces so the more protection the better! And thats a bunch more infantry into the completed pile! Total miniatures painted this year thus far is 94. And if you are keeping track the 2nd old school Skullz program Tech priest showed up in this batch. I have all of the rest airbrush off white and waiting. Edited July 29, 2019 by NiftyVT Dosjetka, brother_b and Lord Blackwood 3 Back to top Link to comment https://bolterandchainsword.com/topic/356176-niftyvts-xana-ii-mechanicum/page/2/#findComment-5354608 Share on other sites More sharing options...
Recommended Posts
Create an account or sign in to comment
You need to be a member in order to leave a comment
Create an account
Sign up for a new account in our community. It's easy!
Register a new accountSign in
Already have an account? Sign in here.
Sign In Now