NiftyVT Posted October 29, 2021 Author Share Posted October 29, 2021 Great work. I feel a bit off attempting to offer any criticism as your work is way beyond my ability. Here goes any way. There is a detail that struck me about your original questoris . It has strikingly red feet. On a all off-white model, it is a stand out. When I saw it I was wondering if there was a Story behind it. I was hoping to see it repeated in the other units. My hope was not paid off. This to me is a opportunity lost. I was thinking it was homage to sacred Mars. It was not even repeated on the other knights though so it looks like it was just a one off. I suppose that One knight ( who has different weapons from Time to Time) once Walked sacred Mars... Sorry if the Fluff nazi in me is out of line here. edit The New tank dose have red dirt on the treads. This is the look I was feeling. I use pigments on the tank tracks and I really wish they would stay all dusty looking when sealed down but I think they still look good. The main reason that my first knight has those brick brown feet is because I got lazy. I didnt notice that I didnt spray the toes the aged white until way into the painting process so I started blocking it in by hand using the same vallejo brown primer that I used to prime the armor panels with. But, I gave up before I started on hand painting the many, many layers of the aged white it would have taken to get good coverage and just left them as is. No secret story here. In other news, I picked up my next Chaos Knight from my FLGS yesterday. All my Taro Modelmaker parts are all clean and ready to go. Let the forge burn bright! Link to comment https://bolterandchainsword.com/topic/356176-niftyvts-xana-ii-mechanicum/page/8/#findComment-5758918 Share on other sites More sharing options...
NiftyVT Posted November 17, 2021 Author Share Posted November 17, 2021 Just mucking about in the forge. Untitled by nifty, on Flickr Untitled by nifty, on Flickr Smoke Frog and Focslain 2 Back to top Link to comment https://bolterandchainsword.com/topic/356176-niftyvts-xana-ii-mechanicum/page/8/#findComment-5765082 Share on other sites More sharing options...
NiftyVT Posted November 30, 2021 Author Share Posted November 30, 2021 (edited) Basic build complete. I just need to add spikes and such. Armor panels and other bits are balancing carefully for the photo so they can be painted separate. Untitled by nifty, on Flickr Untitled by nifty, on Flickr Edited November 30, 2021 by NiftyVT Smoke Frog, Magos Valkamar, RolandTHTG and 2 others 5 Back to top Link to comment https://bolterandchainsword.com/topic/356176-niftyvts-xana-ii-mechanicum/page/8/#findComment-5768588 Share on other sites More sharing options...
Pearson73 Posted December 17, 2021 Share Posted December 17, 2021 That Arlatax conversion is inspired! What a characterful army this is, with so mny cool builds and a solid level of painting. Link to comment https://bolterandchainsword.com/topic/356176-niftyvts-xana-ii-mechanicum/page/8/#findComment-5773523 Share on other sites More sharing options...
NiftyVT Posted January 15, 2022 Author Share Posted January 15, 2022 (edited) So my Bday is coming up and I am looking to get something a bit…bigger. Warhound or Knight Asterius? Edit: My hobby area is still out of commission due to the pipe that broke under my basement slab. Having to fight with the insurance company on every little thing. Pro tip, if you have Travelers insurance drop them ASAP. Edited January 16, 2022 by NiftyVT Link to comment https://bolterandchainsword.com/topic/356176-niftyvts-xana-ii-mechanicum/page/8/#findComment-5784691 Share on other sites More sharing options...
NiftyVT Posted October 1, 2022 Author Share Posted October 1, 2022 Back up and running. Only real hobby time is early in the morning on the weekends (my mini me just turned 1). So, I have been working on some of these guys! Once the basing dries I am all ready to do the oil wash. I have also finished blocking in the colors on the running knight. I need to do some chipping on the off white and little micro scratches on the metal. Then the shield knight is front and center. Oh, and about my bday present to myself . . . it was a Chaos Warhound. Its hanging out in its box waiting for me to finish the shield knight. RolandTHTG, Khornestar, tinpact and 3 others 6 Back to top Link to comment https://bolterandchainsword.com/topic/356176-niftyvts-xana-ii-mechanicum/page/8/#findComment-5871276 Share on other sites More sharing options...
NiftyVT Posted October 8, 2022 Author Share Posted October 8, 2022 (edited) End of the GW previews today showed what looked like a Dark Mechish Demon Prince! Edit: All 6 Vorax just waiting on a matte coat! Edited October 11, 2022 by NiftyVT Link to comment https://bolterandchainsword.com/topic/356176-niftyvts-xana-ii-mechanicum/page/8/#findComment-5873282 Share on other sites More sharing options...
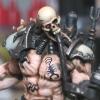
NiftyVT Posted October 22, 2022 Author Share Posted October 22, 2022 Vorax done! Magos Takatus, LameBeard, Captain Caine 24th and 9 others 12 Back to top Link to comment https://bolterandchainsword.com/topic/356176-niftyvts-xana-ii-mechanicum/page/8/#findComment-5878065 Share on other sites More sharing options...
NiftyVT Posted November 7, 2022 Author Share Posted November 7, 2022 Over the weekend I got the gloss coat on the running knight and finished the build (just needed to add spikes) on the ‘lancer.’ Link to comment https://bolterandchainsword.com/topic/356176-niftyvts-xana-ii-mechanicum/page/8/#findComment-5882121 Share on other sites More sharing options...
NiftyVT Posted November 10, 2022 Author Share Posted November 10, 2022 And so it begins! Magos Takatus, Focslain, Aarik and 1 other 4 Back to top Link to comment https://bolterandchainsword.com/topic/356176-niftyvts-xana-ii-mechanicum/page/8/#findComment-5882977 Share on other sites More sharing options...
NiftyVT Posted November 13, 2022 Author Share Posted November 13, 2022 Making good progress on the initial clean up of the parts. I got everything scrubbed down and about 1/2 of the parts trimmed and cleaned. One of the big pluses of the Chaos Warhound is that any air bubbles or any other mold imperfections I come across just get turned into more battle damage. Focslain 1 Back to top Link to comment https://bolterandchainsword.com/topic/356176-niftyvts-xana-ii-mechanicum/page/8/#findComment-5883500 Share on other sites More sharing options...
NiftyVT Posted November 20, 2022 Author Share Posted November 20, 2022 That Vasgtorr mini is going to get the same treatment that my Mephiston did. and on the Warhound front: I ordered a base from TaroModelMaker. And I started dry fitting the main hull. I have some heat bending that I need to do and then it’s off to layout the pins! Link to comment https://bolterandchainsword.com/topic/356176-niftyvts-xana-ii-mechanicum/page/8/#findComment-5885408 Share on other sites More sharing options...
Magos Takatus Posted November 20, 2022 Share Posted November 20, 2022 Nice! TaroModelMaker has some nice conversion parts if I remember correctly. I think I ordered parts for my Mechanicus Knights from them. Link to comment https://bolterandchainsword.com/topic/356176-niftyvts-xana-ii-mechanicum/page/8/#findComment-5885449 Share on other sites More sharing options...
NiftyVT Posted November 20, 2022 Author Share Posted November 20, 2022 (edited) 10 hours ago, Magos Takatus said: Nice! TaroModelMaker has some nice conversion parts if I remember correctly. I think I ordered parts for my Mechanicus Knights from them. I have a bunch of Taros stuff. Armiger bits and my Lancer is all Taro. And it looks like I got his last 2 Acastus bases. Edited November 20, 2022 by NiftyVT Link to comment https://bolterandchainsword.com/topic/356176-niftyvts-xana-ii-mechanicum/page/8/#findComment-5885577 Share on other sites More sharing options...
NiftyVT Posted November 23, 2022 Author Share Posted November 23, 2022 All the clamps! Link to comment https://bolterandchainsword.com/topic/356176-niftyvts-xana-ii-mechanicum/page/8/#findComment-5886455 Share on other sites More sharing options...
Focslain Posted November 23, 2022 Share Posted November 23, 2022 That thing is not going anywhere. Link to comment https://bolterandchainsword.com/topic/356176-niftyvts-xana-ii-mechanicum/page/8/#findComment-5886465 Share on other sites More sharing options...
NiftyVT Posted November 23, 2022 Author Share Posted November 23, 2022 Got everything out thats currently painted. Hope to get at least 1 other Knight done by the end of the year. Taking some time off around XMas. Papewaio, brother_b, Nagashsnee and 7 others 10 Back to top Link to comment https://bolterandchainsword.com/topic/356176-niftyvts-xana-ii-mechanicum/page/8/#findComment-5886520 Share on other sites More sharing options...
Magos Takatus Posted November 23, 2022 Share Posted November 23, 2022 Absolutely beautiful. I'm a bit biased but I love the Cerastus Castigator and the Triaros. You have a great collection and they are clearly painted to a fantastic standard. Link to comment https://bolterandchainsword.com/topic/356176-niftyvts-xana-ii-mechanicum/page/8/#findComment-5886573 Share on other sites More sharing options...
NiftyVT Posted December 7, 2022 Author Share Posted December 7, 2022 The main hull glue up went fantastic! Now its time to build from the bottom up. . . how its going One big pin to go from the base up into the foot and then probably a 2nd pin further towards the tip of the toe. Oh, and the big white surface I am working on is the Warhound Base from TaroModelMaker! Hard part is where do I secure the foot on the base and have the torso as close to centered on the base as possible. I see lots of blue tac and pretending to have 8 arms in my future. And probably a couple holes in the base to hold the foot down as I trial and error this thing. Magos Takatus 1 Back to top Link to comment https://bolterandchainsword.com/topic/356176-niftyvts-xana-ii-mechanicum/page/8/#findComment-5890447 Share on other sites More sharing options...
NiftyVT Posted December 10, 2022 Author Share Posted December 10, 2022 It stands! Well . . .one toe does. So the pin coming out of the foot was at a weird angle so I used some good old blue tac to get the angle close and over drilled the hole by one bit size. Then with a little blue tac plus 8 arming the leg to get a little visual I figured this was close. . .ish. . .maybe to the right angle . I couldnt hold the leg and take a pic so just the toe and foot pad for you. I also stuck the other toes on via blue tac to make sure they would not look janky. They were fine. The pin is quite tight so with just tac on the base and at the foot pad it stands nicely. So now how do I epoxy this thing?! Why with a paint pot, tooth pick container, glue bottle plus my smallest clamp that could get JUST enough purchase on the rivet on the tip of the toe to hold it. Hang in there little guy you got this! I think this is the first really big step (haha, step. . .). Next up is the rest of the toes on this foot and the other leg. . .that will not be touching the base. . . you know. . .because I hate myself. But at the same time, somehow, I need to get the main support leg up and the torso on so I can make sure the other leg is posed right. This will be interesting. Its a classic chicken before the egg problem. . .or I just wing it which is where I am leaning this morning. Aarik 1 Back to top Link to comment https://bolterandchainsword.com/topic/356176-niftyvts-xana-ii-mechanicum/page/8/#findComment-5891358 Share on other sites More sharing options...
NiftyVT Posted December 27, 2022 Author Share Posted December 27, 2022 No turning back now! Foot is epoxied, torso mount has been filled and cuts have been made! Link to comment https://bolterandchainsword.com/topic/356176-niftyvts-xana-ii-mechanicum/page/8/#findComment-5895313 Share on other sites More sharing options...
Pearson73 Posted December 28, 2022 Share Posted December 28, 2022 Fantastic group shot, looking forward to seeing the titan progress. NiftyVT 1 Back to top Link to comment https://bolterandchainsword.com/topic/356176-niftyvts-xana-ii-mechanicum/page/8/#findComment-5895403 Share on other sites More sharing options...
NiftyVT Posted December 30, 2022 Author Share Posted December 30, 2022 (edited) On 12/28/2022 at 12:03 AM, Pearson73 said: Fantastic group shot, looking forward to seeing the titan progress. Thanks! More progress. Almost ready to get it standing proper! Went to the store today and got some pipe for the torso pin and arm extensions. I am going to try and magnetize the torso using the big pin so I can break it down if needed. And my old trusty copper pipe cutter cuts the plastic pipe really well too! Main standing leg is all pinned up and epoxied together. Ready for final main posing. Also did a ton of gap filling work on the main hull. I am still brain storming what do do with the spot where I cut the arm mounts off. Maybe another 1 or 2 little sensor pods like the ones looking forward? Or maybe some more Chaos'y wires and other gubbins to cover the area? Leaning towards more sensor bits. Smooth it out, add marching rivets around teh panel, maybe a sensor thats twice the width of the one facing forward? Area circled in red, rivets in black, sensor red. Edited December 30, 2022 by NiftyVT Magos Takatus and Focslain 2 Back to top Link to comment https://bolterandchainsword.com/topic/356176-niftyvts-xana-ii-mechanicum/page/8/#findComment-5896087 Share on other sites More sharing options...
Magos Takatus Posted December 31, 2022 Share Posted December 31, 2022 It looks like things are coming along nicely. Well done. Link to comment https://bolterandchainsword.com/topic/356176-niftyvts-xana-ii-mechanicum/page/8/#findComment-5896123 Share on other sites More sharing options...
NiftyVT Posted January 14, 2023 Author Share Posted January 14, 2023 When your son wakes up early and the epoxy isnt quite cured, you think fast! Worked great! Blue tac plus paint jar = extra hands. tinpact, Focslain and Magos Takatus 3 Back to top Link to comment https://bolterandchainsword.com/topic/356176-niftyvts-xana-ii-mechanicum/page/8/#findComment-5899978 Share on other sites More sharing options...
Recommended Posts
Create an account or sign in to comment
You need to be a member in order to leave a comment
Create an account
Sign up for a new account in our community. It's easy!
Register a new accountSign in
Already have an account? Sign in here.
Sign In Now