Lamenter Posted July 30, 2010 Author Share Posted July 30, 2010 It's certainly unusual for me to finish a project so quickly but the first Scout Squad is complete. All the legs were cast in greenstuff (surprisingly easier than resin). Otherwise these are pretty straightforward, I'll show how I made the torso when I finish the Scout Biker "Lion Rider" squad, it's simple but effective all the same. The plethora of scout accessories makes it simple to hide any gaps where the torso meets the legs, but the fit is pretty good anyway. Click the image for a larger version in a new window. http://www.masteroftheforge.com/files/images/mkvarmy/scouts/scoutsquadsmall.jpg They generally stand (34mm tall) head and shoulders above the regular metal and plastic scout models but are still shorter than the rest of my Actual Scale Space Marines (average 39mm tall). Link to comment https://bolterandchainsword.com/topic/172997-lamenters-actual-scale-space-marines/page/10/#findComment-2476238 Share on other sites More sharing options...
Lamenter Posted August 16, 2010 Author Share Posted August 16, 2010 It's been a while since I last posted anything, but I've kind of been preoccupied with other work and problems of late. Anyhow, here's my latest finished work, a squad of Scout Lion Riders (count as bikes). http://www.masteroftheforge.com/files/images/mkvarmy/scouts/lionriderssmall.jpg The scouts were made to fit on the lions back by modifying the greenstuff casts I made of the legs I previously sculpted. The approach to making these is essentially the same as the last actual scale Scout conversions I made. I may do a guide to making enlarged legs at a later date, though it's not exactly simple. Here's an image of how I made the enlarged scout torsos. The back is the back half of the original torso which the breather tubes have also been removed from. The front is obviously a power armour chest piece and is attached to the back with a blob of GS. http://www.masteroftheforge.com/files/images/mkvarmy/scouts/scouttorso.jpg _____________________________________________________________ Here's a quick update on progress with the Master of the Forge model I've been working on for a long time. As often happens with my conversions I couldn't help myself from trying to improve it. It was bothering me that when I took a photo of the model the best angle to picture it from resulted in the scanner hand positioned oddly in the way. So I stripped it off and built a new arm and a thunder hammer for him. I made a couple of attempts at the hammer as I wanted it to look more like a tool than weapon, figuring he'd be using it to bash armour plates back into shape. I think what I settled on works rather nicely. http://www.masteroftheforge.com/files/images/techmarine/motfwhite.jpg Here's pics of the model before undercoating: http://www.masteroftheforge.com/files/imag.../motffinal1.jpg http://www.masteroftheforge.com/files/imag.../motffinal2.jpg http://www.masteroftheforge.com/files/imag.../motffinal3.jpg Link to comment https://bolterandchainsword.com/topic/172997-lamenters-actual-scale-space-marines/page/10/#findComment-2489712 Share on other sites More sharing options...
Noctus Cornix Posted August 16, 2010 Share Posted August 16, 2010 *looks at the master of the forge* :eek :) :) :drool: :jaw: :jaw: :jaw: :jaw: Link to comment https://bolterandchainsword.com/topic/172997-lamenters-actual-scale-space-marines/page/10/#findComment-2489723 Share on other sites More sharing options...
High Marshal Sigfeird Posted August 16, 2010 Share Posted August 16, 2010 nice i see you used my Lion idea ;) great minds ah Lamenter ;) Link to comment https://bolterandchainsword.com/topic/172997-lamenters-actual-scale-space-marines/page/10/#findComment-2489734 Share on other sites More sharing options...
Lamenter Posted August 26, 2010 Author Share Posted August 26, 2010 I’ve put in a fair few hours trying to get this fella painted up. Normally I paint a lot of my models in parts and assemble the finished thing at the end, though this was just one solid piece and proved extremely fiddly at times. Although it’s technically finished (at I'd be happy to game with it) I think I can make some improvements and I’ll most likely add a lot of painted battle damage, as that always looks cool on yellow armour, and is one of the reasons I want to collect a Lamenters force. http://www.masteroftheforge.com/files/images/techmarine/masteroftheforge2.jpg I forgot to take size comparison photo today but will try to remember when I finish adding battle damage. I’ve always intended to use this conversion in the header of my website as well as a new avatar for forum and blog use. He’ll also feature as one of the HQs in my Lamenters army (it'll probably be the 41st millenium before it's finished). Someone on my website pointed out how it reminded him of Iron Man which never registered with me as I painted him (despite having an Iron Man poster above my painting desk). This makes me even more pleased with the final scheme I settled on. Link to comment https://bolterandchainsword.com/topic/172997-lamenters-actual-scale-space-marines/page/10/#findComment-2497511 Share on other sites More sharing options...
Terminatorinhell Posted August 26, 2010 Share Posted August 26, 2010 That yellow looks so good on the techmarine! Good thing you didnt go for the standard red. Link to comment https://bolterandchainsword.com/topic/172997-lamenters-actual-scale-space-marines/page/10/#findComment-2497540 Share on other sites More sharing options...
Firenze Posted September 6, 2010 Share Posted September 6, 2010 ... I love this thread, especially the Techmarine. I'm starting my own kill team of True Scale, and you and Doghouase really inspired me to do it. However, I didn't have any room to buy new models, so used some unused terminators and sparebitz around the house. Yours can never be bested though. Brilliant work Lamenter. Link to comment https://bolterandchainsword.com/topic/172997-lamenters-actual-scale-space-marines/page/10/#findComment-2505533 Share on other sites More sharing options...
Scriptor Tharxes Posted September 6, 2010 Share Posted September 6, 2010 The Master of the Forge is also the Master of Awesomeness! Sadly there is no Picture without any Color on it. Would like to see youre Conversion Work. Awesome. Link to comment https://bolterandchainsword.com/topic/172997-lamenters-actual-scale-space-marines/page/10/#findComment-2505543 Share on other sites More sharing options...
Lamenter Posted September 6, 2010 Author Share Posted September 6, 2010 ... I love this thread, especially the Techmarine. I'm starting my own kill team of True Scale, and you and Doghouase really inspired me to do it. However, I didn't have any room to buy new models, so used some unused terminators and sparebitz around the house. Yours can never be bested though. Brilliant work Lamenter. Thanks very much. I should probably point that I could have built and painted an entire small army in the time it took me to create this one model :P The Master of the Forge is also the Master of Awesomeness!Sadly there is no Picture without any Color on it. Would like to see youre Conversion Work. Awesome. Cheers. Well I don't often quote myself, but what the hell :D Here's pics of the model before undercoating: http://www.masteroftheforge.com/files/imag.../motffinal1.jpg http://www.masteroftheforge.com/files/imag.../motffinal2.jpg http://www.masteroftheforge.com/files/imag.../motffinal3.jpg Link to comment https://bolterandchainsword.com/topic/172997-lamenters-actual-scale-space-marines/page/10/#findComment-2505570 Share on other sites More sharing options...
Scriptor Tharxes Posted September 6, 2010 Share Posted September 6, 2010 Oh. Didnt recognize. Sorry, was humiliated by your techmarine. :P The Legs are Greenstuff only? Not the techmarine legs? :D Link to comment https://bolterandchainsword.com/topic/172997-lamenters-actual-scale-space-marines/page/10/#findComment-2505581 Share on other sites More sharing options...
Captain Mick Posted September 6, 2010 Share Posted September 6, 2010 Maybe it took a while but it really looks fantastic, well done :D . Link to comment https://bolterandchainsword.com/topic/172997-lamenters-actual-scale-space-marines/page/10/#findComment-2505587 Share on other sites More sharing options...
Lamenter Posted September 6, 2010 Author Share Posted September 6, 2010 Thanks. Here's a link to how I did the legs for anyone who's interested: http://masteroftheforge.com/2010/09/03/tut...layered-armour/ Link to comment https://bolterandchainsword.com/topic/172997-lamenters-actual-scale-space-marines/page/10/#findComment-2505596 Share on other sites More sharing options...
Scriptor Tharxes Posted September 6, 2010 Share Posted September 6, 2010 Thank you very much for the link. Ill try this on my own Techmarine. Never had one. :) Link to comment https://bolterandchainsword.com/topic/172997-lamenters-actual-scale-space-marines/page/10/#findComment-2505601 Share on other sites More sharing options...
aekold Posted September 7, 2010 Share Posted September 7, 2010 Great work, your work is really an inspiratin to raise my greenstuf sikkls to a new level. What did you use to built the weapon that the techmarine is holding in his right hand? I recognise a part of an assault cannon and a servo arm. Keep up the great work. Link to comment https://bolterandchainsword.com/topic/172997-lamenters-actual-scale-space-marines/page/10/#findComment-2506338 Share on other sites More sharing options...
Lamenter Posted September 7, 2010 Author Share Posted September 7, 2010 What did you use to built the weapon that the techmarine is holding in his right hand? I recognise a part of an assault cannon and a servo arm. The main bit is part of a servo arm trimmed down, the rest is a collection of small plastic bits (at least 10 different bits) that I'm not readily able to identify. I have unidentified bits all over my desk and I just test them out and see what fits and usually chop them up even more as I go. There's never a plan as to what bits to use other than major parts, I just test out bits in a random fashion till I find something that works - it takes a while but the results are always better than just proceeding with a preconceived idea. Link to comment https://bolterandchainsword.com/topic/172997-lamenters-actual-scale-space-marines/page/10/#findComment-2506645 Share on other sites More sharing options...
Captain Mick Posted September 8, 2010 Share Posted September 8, 2010 Thanks for the link but i guess i need much more training before i could start with things like that :) . Link to comment https://bolterandchainsword.com/topic/172997-lamenters-actual-scale-space-marines/page/10/#findComment-2507088 Share on other sites More sharing options...
Tutteman Posted September 8, 2010 Share Posted September 8, 2010 Thanks. Here's a link to how I did the legs for anyone who's interested: http://masteroftheforge.com/2010/09/03/tut...layered-armour/ For anyone who is interested...that'll be a lot! Fantastic Model, 100% brilliant. Link to comment https://bolterandchainsword.com/topic/172997-lamenters-actual-scale-space-marines/page/10/#findComment-2507315 Share on other sites More sharing options...
Lamenter Posted September 8, 2010 Author Share Posted September 8, 2010 :D I just finished putting together this second techmarine, loosely based on my Master of the Forge and this awesome illustration. This one was completed far more quickly than the previous one as there was far less planning and forethought going in to it, even so I have to say I'm really pleased with how it turned out. http://masteroftheforge.com/files/images/mkvarmy/mkvtechmarine1.jpg http://masteroftheforge.com/files/images/mkvarmy/mkvtechmarine2.jpg The build itself is pretty self explanatory. The backpack ending up being rebuilt from plastic bits because I'd chopped it up to try something out on the MotF that didn't pan out. I left off the second servo arm from the harness because it just made the model look too crowded and so opted for an exhaust made from a missile launcher bit. Link to comment https://bolterandchainsword.com/topic/172997-lamenters-actual-scale-space-marines/page/10/#findComment-2507321 Share on other sites More sharing options...
Captain Mick Posted September 8, 2010 Share Posted September 8, 2010 And again its fantastic :D waiting on the next fantastic model :lol: . Link to comment https://bolterandchainsword.com/topic/172997-lamenters-actual-scale-space-marines/page/10/#findComment-2507326 Share on other sites More sharing options...
Ompfris Posted September 8, 2010 Share Posted September 8, 2010 wow, ALL of these look amazing! and I couldn't belive it.... they look even better painted! Amazed by your skill. Link to comment https://bolterandchainsword.com/topic/172997-lamenters-actual-scale-space-marines/page/10/#findComment-2507359 Share on other sites More sharing options...
DarKHaZZ13 Posted September 9, 2010 Share Posted September 9, 2010 wow. seriosuly man, I've been out of the hobby just over a year? and where did all this come form!?! I rmemeber when you were 'just messing around' with the truscale idea O_o. Link to comment https://bolterandchainsword.com/topic/172997-lamenters-actual-scale-space-marines/page/10/#findComment-2507680 Share on other sites More sharing options...
cathar the great Posted September 11, 2010 Share Posted September 11, 2010 Wow great work on the second Techmarine. The pose is a bit similar to the other one, but it's still cool. My favourite part is the mega-beefy backpack with the rocketlauncher exhaust. Although the angle where the flamethrower sticks out looks a bit silly. Link to comment https://bolterandchainsword.com/topic/172997-lamenters-actual-scale-space-marines/page/10/#findComment-2509326 Share on other sites More sharing options...
Mithril hound Posted September 12, 2010 Share Posted September 12, 2010 You get better, which is crazy.. Link to comment https://bolterandchainsword.com/topic/172997-lamenters-actual-scale-space-marines/page/10/#findComment-2509761 Share on other sites More sharing options...
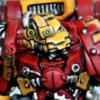
Lamenter Posted September 29, 2010 Author Share Posted September 29, 2010 And again its fantastic :cuss waiting on the next fantastic model ;) . Will this do? I'm back! :devil: I've been putting off completing this particular model for quite sometime now as I couldn't put my finger on exactly how to get it right. The work in progress had bolters attached either side of the front wheel and it just didn't seem brutal enough. I started by stripping these off and adding armour plates (bit off a cyclone missile launcher). I then had to figure an alternative to the bolters. http://www.masteroftheforge.com/files/images/bike/bike1.jpg http://www.masteroftheforge.com/files/images/bike/bike2.jpg I played around with heavy bolters, storm bolters and a plasma cannon, trying to mount them on a mini turret behind the rider, and whilst it looked pretty cool it was just OTT. I found a couple of stormbolters at the bottom of my bitzbox that I think came from dreadnoughts (not sure how I acquired them :-/ ). After a LOT of filing and trimming I managed to get them to fit nicely on either side of the engine block/radiator. http://www.masteroftheforge.com/files/images/bike/bikefront.jpg http://www.masteroftheforge.com/files/images/bike/bikerear.jpg I decided to finish this off as I figured someone would want to buy it, but now that it's finished I find myself wanting to keep hold of it and I've started investigating the possibility of all biker armies (I'm terrible I know). For a rough breakdown of components here you go: Ork Warbiker - front forks, front wheel, radiator, handles Space Marine Bike - main body, control (handlebar center) Ork Trukk - back wheel Baneblade - exhausts ? Ven Dread (metal) - stormbolters, behind seat armour plating Terminator - legs Power Armour marine - torso, arms, backpack, head Terminator Cyclone ML - armour on side of front wheel Sangiunor - power sword Link to comment https://bolterandchainsword.com/topic/172997-lamenters-actual-scale-space-marines/page/10/#findComment-2524373 Share on other sites More sharing options...
Terrible_Trygon Posted September 29, 2010 Share Posted September 29, 2010 The GS cable thingies on new techmarine's backpack look a little crude and really lazy compared to the rest of the work. Also; will you be de-orkifying the wheels on the bike? Link to comment https://bolterandchainsword.com/topic/172997-lamenters-actual-scale-space-marines/page/10/#findComment-2524464 Share on other sites More sharing options...
Recommended Posts
Archived
This topic is now archived and is closed to further replies.