Brother Rathul Posted June 21, 2010 Share Posted June 21, 2010 truly awesome Link to comment https://bolterandchainsword.com/topic/172997-lamenters-actual-scale-space-marines/page/9/#findComment-2441026 Share on other sites More sharing options...
TauranBrother Posted June 21, 2010 Share Posted June 21, 2010 I just can't get over how great they all look. Truely an army of epic win. Keep up the great work. I can't wait to see them painted. Link to comment https://bolterandchainsword.com/topic/172997-lamenters-actual-scale-space-marines/page/9/#findComment-2441030 Share on other sites More sharing options...
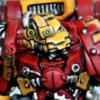
Lamenter Posted June 21, 2010 Author Share Posted June 21, 2010 Before I can really get stuck in to casting anything I have to finish a few squads off that I promised to do a long time ago (I'm a lazy bugger <_<). http://www.masteroftheforge.com/files/images/mkvarmy/mkvassaultsquad/mkvassaultserg.jpg This is the sergeant of a Mark V Assault Squad in progress. I always find lightning claws particularly difficult to pose effectively, but I'm fairly pleased with the way they face in the same direction but with one drawn back. The claws came from the Chaos Lord boxed set with the thumb claws trimmed off and replaced with normal powerfist thumbs to help lose the Chaos styling. Almost the entire squad have had their feet replaced with greenstuffed feet (using a silicone putty one piece mold). This should make running and landing poses far easier to make and provide some variation amongst the squad. I'll also be trying to implement Doghouse's method of converting Power Armour arms for these Actual Scale models. I have a feeling this will be rather difficult, but his turned out very nicely and all the assault weapons I need for the squad are already attached to the arms. Link to comment https://bolterandchainsword.com/topic/172997-lamenters-actual-scale-space-marines/page/9/#findComment-2441760 Share on other sites More sharing options...
Terminatorinhell Posted June 21, 2010 Share Posted June 21, 2010 Wow he is coming along nicely the only thing that's off is his left arm and the way it would have to be bent for that position. Link to comment https://bolterandchainsword.com/topic/172997-lamenters-actual-scale-space-marines/page/9/#findComment-2441763 Share on other sites More sharing options...
Skirax Posted June 21, 2010 Share Posted June 21, 2010 I'm not going to lie.... the claws look silly. But, it's your model, so hey ho. Link to comment https://bolterandchainsword.com/topic/172997-lamenters-actual-scale-space-marines/page/9/#findComment-2441764 Share on other sites More sharing options...
Lamenter Posted June 30, 2010 Author Share Posted June 30, 2010 Wow he is coming along nicely the only thing that's off is his left arm and the way it would have to be bent for that position. Yeah, it's not easy to get right. One of the annoying things with posing arms is the need to fit shoulder pads on top properly. I'm not going to lie.... the claws look silly. But, it's your model, so hey ho. Well, claws do always look silly! __________________________________________________________ Work is progressing on the Mark V Assault Squad (I took some pics but they turned out blurred, so I'll take some more when they're a little further along), but whilst I've been working on them I've given a bit of time to a Master of the Forge conversion. I've been thinking about this particular conversion since I started my website as I had plans to incorporate photos of it into the header for the blog. As I had a few sets of resin legs spare (with air bubbles in them) I figured I'd use a pair as the starting point and sculpt all the lovely Techmarine stylings over the top of it. The top half of the model is from the Thunderfire cannon Techmarine. http://www.masteroftheforge.com/files/images/techmarine/techmarine1.jpg The original concept of the model was to have it equipped with a Conversion Beamer, mounted on his backpack over one of his shoulders, and carrying a Thunder Wrench in both hands, reminiscent of the Rogue Trader era Techmarines. The head is roughly based on the design of the Techmarine featured in Dawn of War 2. http://www.masteroftheforge.com/files/images/techmarine/conversionbeamer.jpg I may change to original concept if I can figure out something better looking. I like to have my models 100% WYSIWYG so I need to decide which codex I'll be using and exactly which Chapter he'll belong to. He'll be either a Blood Angel or Lamenter, so he could end up being a plain Techmarine rather than a MotF and as such could also have a jump pack. Decisions, decisions, decisions. Link to comment https://bolterandchainsword.com/topic/172997-lamenters-actual-scale-space-marines/page/9/#findComment-2450259 Share on other sites More sharing options...
cathar the great Posted June 30, 2010 Share Posted June 30, 2010 Techmarine looks great, very bulky and robot-like. Will you add any detail to the torso, too? Link to comment https://bolterandchainsword.com/topic/172997-lamenters-actual-scale-space-marines/page/9/#findComment-2450331 Share on other sites More sharing options...
Lamenter Posted July 17, 2010 Author Share Posted July 17, 2010 Techmarine looks great, very bulky and robot-like. Will you add any detail to the torso, too? Yes a little bit. I'll post pics of the finished mini tomorrow. ___________________________________________________________ Here I have the finished Assault Squad equipped with Mark V armour that I've been working on for a while. The complete rebuilding of the legs on all these conversions has really paid off and allowed for some decent jump-pack poses. Additionally the bulking up of the arms has worked out as a really nice alternative to using terminator arms and I think I'll be using this approach again in future. http://www.masteroftheforge.com/files/images/mkvarmy/mkvassaultsquad/mkvassaultmarine8.jpg http://www.masteroftheforge.com/files/images/mkvarmy/mkvassaultsquad/mkvassaultmarine7.jpg http://www.masteroftheforge.com/files/images/mkvarmy/mkvassaultsquad/mkvassaultmarine6.jpg http://www.masteroftheforge.com/files/images/mkvarmy/mkvassaultsquad/mkvassaultmarine5.jpg http://www.masteroftheforge.com/files/images/mkvarmy/mkvassaultsquad/mkvassaultmarine4.jpg http://www.masteroftheforge.com/files/images/mkvarmy/mkvassaultsquad/mkvassaultmarine3.jpg http://www.masteroftheforge.com/files/images/mkvarmy/mkvassaultsquad/mkvassaultmarine2.jpg http://www.masteroftheforge.com/files/images/mkvarmy/mkvassaultsquad/mkvassaultmarine1.jpg Link to comment https://bolterandchainsword.com/topic/172997-lamenters-actual-scale-space-marines/page/9/#findComment-2465373 Share on other sites More sharing options...
Terminatorinhell Posted July 18, 2010 Share Posted July 18, 2010 Man, these are still works of art, the assault marines are great but you got me sold on the techmarine! Link to comment https://bolterandchainsword.com/topic/172997-lamenters-actual-scale-space-marines/page/9/#findComment-2465443 Share on other sites More sharing options...
Lamenter Posted July 18, 2010 Author Share Posted July 18, 2010 Man, these are still works of art, the assault marines are great but you got me sold on the techmarine! ;) The Master of the Forge is not quite ready for painting, as there are a few details that still need cleaning up or adding, predominantly to the shoulder pads. Anyhow, I figured the conversion is close enough to finished to show it off. The original concept was to have him in this pose with the shoulder mounted CB and carrying a 2 handed thunder hammer/wrench. As I was building him it seemed a shame to obscure the sculpting on the model with a big weapon held in front of him, this was my main reason for switching to a single handed thunder wrench. I also really like the scanner arm from the (Thunderfire Cannon) Techmarine, for some reason, and it fits the torso nicely. These two images were central to the concept I had in mind. http://www.masteroftheforge.com/files/images/techmarine/cb.jpg http://www.masteroftheforge.com/files/images/techmarine/head.png Anyway here you go. Pretty sure I'll be painting him up as a Lamenters chapter Master of the Forge (he'll be my new avatar, and I'll work his image into the banner of my website too). http://www.masteroftheforge.com/files/images/techmarine/motf2.jpg http://www.masteroftheforge.com/files/images/techmarine/motf1.jpg http://www.masteroftheforge.com/files/images/techmarine/motf3.jpg Link to comment https://bolterandchainsword.com/topic/172997-lamenters-actual-scale-space-marines/page/9/#findComment-2465932 Share on other sites More sharing options...
Skirax Posted July 18, 2010 Share Posted July 18, 2010 Don't get me wrong, I've loved every single conversion you've done, but the positioning of the claws did look a little out of place. No offence. As for the rest of the Assault Marines, they look immense. Link to comment https://bolterandchainsword.com/topic/172997-lamenters-actual-scale-space-marines/page/9/#findComment-2465967 Share on other sites More sharing options...
musliisafish Posted July 19, 2010 Share Posted July 19, 2010 all I can say about the master of the forge: wow... amazing work! Mind if Ido something similar to the legs when i get around to my army? (Painting up a traitor mecahnicus based marine army :P) Link to comment https://bolterandchainsword.com/topic/172997-lamenters-actual-scale-space-marines/page/9/#findComment-2466146 Share on other sites More sharing options...
Terminatorinhell Posted July 19, 2010 Share Posted July 19, 2010 How do you get the leg armor so nicely layered? Is there some sort of technique where you cut out the shape then put it on the leg? Link to comment https://bolterandchainsword.com/topic/172997-lamenters-actual-scale-space-marines/page/9/#findComment-2466149 Share on other sites More sharing options...
Pig Of Sparta Posted July 19, 2010 Share Posted July 19, 2010 Loving the assault marines and master of the forge mini's (in fact I want one of those assault marines :P). They make me want to try an 'artscaling' project again. (Need to scrape together some funds for that though) What I like most is that not only have you made bigger marines but you've put them in a really cool mark of battle plate. Are you painting these as well or are they off to their 'owner' for that? Keep up the good work ^_^ James Link to comment https://bolterandchainsword.com/topic/172997-lamenters-actual-scale-space-marines/page/9/#findComment-2466424 Share on other sites More sharing options...
Lamenter Posted July 22, 2010 Author Share Posted July 22, 2010 Don't get me wrong, I've loved every single conversion you've done, but the positioning of the claws did look a little out of place. No offence. As for the rest of the Assault Marines, they look immense. Yeah, a lot of people have commented on this. I think I'll alter the position of the arm on the left, as the whole ninja pose didn't really work out. Mind if Ido something similar to the legs when i get around to my army? (Painting up a traitor mecahnicus based marine army :D) Go right ahead. Just takes a bit of patience B) How do you get the leg armor so nicely layered? Is there some sort of technique where you cut out the shape then put it on the leg? No specific technique, just do one layer at a time and allow each to fully cure before starting the next layer. Make sure the GS is soft and stick to using soft clay shapers when sculpting. Loving the assault marines and master of the forge mini's (in fact I want one of those assault marines :)). They make me want to try an 'artscaling' project again. (Need to scrape together some funds for that though) What I like most is that not only have you made bigger marines but you've put them in a really cool mark of battle plate. Are you painting these as well or are they off to their 'owner' for that? Keep up the good work :) James Unfortunately I'm not painting these though I believe the client will be starting a painting log on at least one forum so I'll provide links when he does. _________________________________________________ Next up are Actual Scale Scouts and Scouts Bikers (who'll be riding Lions rather than bikes). I thought the Scout conversions would be a simple case of lengthening the legs a little but after a few side by side comparisons it became evident it wasn't enough. As such I've had to do some extensive converting - pics incoming! Link to comment https://bolterandchainsword.com/topic/172997-lamenters-actual-scale-space-marines/page/9/#findComment-2469465 Share on other sites More sharing options...
Nougat Posted July 22, 2010 Share Posted July 22, 2010 Wow. You're an absolute maniac! Very inspiring work, though it's a bit out of reach for someone like me, whose conversion skills hit a wall when I have to use green stuff! How long does it take you to convert a single model like the assault marines or tacticals? Link to comment https://bolterandchainsword.com/topic/172997-lamenters-actual-scale-space-marines/page/9/#findComment-2469662 Share on other sites More sharing options...
Lamenter Posted July 22, 2010 Author Share Posted July 22, 2010 Wow. You're an absolute maniac! Very inspiring work, though it's a bit out of reach for someone like me, whose conversion skills hit a wall when I have to use green stuff! How long does it take you to convert a single model like the assault marines or tacticals? Thanks very much. It's hard to gauge the length of time because I work in so many separate stages and so squads at a time. A standard Mark 7 marine shouldn't take too long once you get used to it, older marks obviously require a lot more work. Link to comment https://bolterandchainsword.com/topic/172997-lamenters-actual-scale-space-marines/page/9/#findComment-2469711 Share on other sites More sharing options...
Terminatorinhell Posted July 22, 2010 Share Posted July 22, 2010 What kind of clay shapers do you use? Link to comment https://bolterandchainsword.com/topic/172997-lamenters-actual-scale-space-marines/page/9/#findComment-2469780 Share on other sites More sharing options...
Lamenter Posted July 23, 2010 Author Share Posted July 23, 2010 What kind of clay shapers do you use? These here. Link to comment https://bolterandchainsword.com/topic/172997-lamenters-actual-scale-space-marines/page/9/#findComment-2469795 Share on other sites More sharing options...
Lamenter Posted July 27, 2010 Author Share Posted July 27, 2010 Moving on to Actual Scale Scouts. At first I just expected Scouts to be a very simple conversion requiring nothing more than slightly lengthened legs. Unfortunately this wasn't the case as they turned out still too short with long feeble looking legs. My approach then is two fold. Increase the height and mass of the torso and make completely new scaled up pairs of legs. The torso is made by chopping the breather tubes from the front of the scout torso component and then completely removing the front of said torso and replacing it with a chest piece from a regular power armoured Space Marine. The breather tubes can then (with a little trimming) fit back on top. I'll give a full breakdown with pics at a later date. The legs were a little trickier. In the end I just sculpted fresh legs in the same style and position as the existing plastic legs but so far without any of the details like pouches, ammo or holster. I spent most of yesterday trying to make casts of these legs (I made 2 variants) and much to my frustration haven't been able to get rid of the air bubbles that are ruining them. I may end up simply making the whole squad's legs from greenstuff as trying to fill in holes left by air bubbles is more time consuming than making them from scratch. http://www.masteroftheforge.com/files/images/mkvarmy/scouts/scoutcomp.jpg I don't think the arms will look too out of place, but I haven't checked yet. Other than the legs, these are pretty straight forward so I'll try and knock together a tutorial at some point. Link to comment https://bolterandchainsword.com/topic/172997-lamenters-actual-scale-space-marines/page/9/#findComment-2473838 Share on other sites More sharing options...
CaptainForge Posted July 28, 2010 Share Posted July 28, 2010 You must have incredible patience. Each True Scale Marine is a work of art. How long does it take you to complete just one marine? Link to comment https://bolterandchainsword.com/topic/172997-lamenters-actual-scale-space-marines/page/9/#findComment-2474606 Share on other sites More sharing options...
Lamenter Posted July 28, 2010 Author Share Posted July 28, 2010 You must have incredible patience. Each True Scale Marine is a work of art. How long does it take you to complete just one marine? Thanks. One could be finished in a few days doing a bit each day, you can't rush it really. Link to comment https://bolterandchainsword.com/topic/172997-lamenters-actual-scale-space-marines/page/9/#findComment-2474674 Share on other sites More sharing options...
S. Bloodhowl Posted July 28, 2010 Share Posted July 28, 2010 I just read this thread from the start (again) and was reminded at how awesome it is! Although it is a shame that in the entire thread only one of your models is shown painted :P Link to comment https://bolterandchainsword.com/topic/172997-lamenters-actual-scale-space-marines/page/9/#findComment-2474694 Share on other sites More sharing options...
Lamenter Posted July 28, 2010 Author Share Posted July 28, 2010 That's something I hope to change in future, but a lot of these so far have been conversion only commissions. Link to comment https://bolterandchainsword.com/topic/172997-lamenters-actual-scale-space-marines/page/9/#findComment-2474732 Share on other sites More sharing options...
Hashshashin Posted July 28, 2010 Share Posted July 28, 2010 Great Job! :( I love your work and its great to see so many pieces collected together. Also I really dig your TS scouts they are starting to shape up to the right size Link to comment https://bolterandchainsword.com/topic/172997-lamenters-actual-scale-space-marines/page/9/#findComment-2475140 Share on other sites More sharing options...
Recommended Posts
Archived
This topic is now archived and is closed to further replies.