Baulder Posted June 12, 2014 Share Posted June 12, 2014 fantastic work, keep it going. Link to comment https://bolterandchainsword.com/topic/276735-skeletoros-great-company-motivational-thread/page/5/#findComment-3716426 Share on other sites More sharing options...
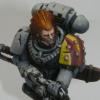
skeletoro Posted June 14, 2014 Author Share Posted June 14, 2014 wahoooo, my first (mostly, i need to touch up bases) finished models in YEARS... http://img.photobucket.com/albums/v333/skeletoro/WP_20140615_08_16_04_Pro_edited.jpg http://img.photobucket.com/albums/v333/skeletoro/WP_20140615_08_12_43_Pro_edited.jpg http://img.photobucket.com/albums/v333/skeletoro/WP_20140615_08_20_25_Pro_edited.jpg http://img.photobucket.com/albums/v333/skeletoro/WP_20140615_08_22_29_Pro_edited.jpg http://img.photobucket.com/albums/v333/skeletoro/WP_20140615_08_19_27_Pro_edited.jpg http://img.photobucket.com/albums/v333/skeletoro/WP_20140615_08_22_58_Pro_edited.jpg http://img.photobucket.com/albums/v333/skeletoro/WP_20140615_08_19_55_Pro_edited.jpg Link to comment https://bolterandchainsword.com/topic/276735-skeletoros-great-company-motivational-thread/page/5/#findComment-3718891 Share on other sites More sharing options...
irwit Posted June 14, 2014 Share Posted June 14, 2014 Awesome!!! Really like that last shot too. Really dynamic. Overall I think these have so much personality and convey a real.sense of what space wolves are Ll about. Great job! Link to comment https://bolterandchainsword.com/topic/276735-skeletoros-great-company-motivational-thread/page/5/#findComment-3718916 Share on other sites More sharing options...
Dantay VI Posted June 15, 2014 Share Posted June 15, 2014 Absolutely stunning, brilliant job on those Wolves!! Link to comment https://bolterandchainsword.com/topic/276735-skeletoros-great-company-motivational-thread/page/5/#findComment-3719114 Share on other sites More sharing options...
skeletoro Posted June 16, 2014 Author Share Posted June 16, 2014 OK, step 1: As demonstrated by my lovely assistant, the first step was to spray the blood claws with primer. I've used the Vallejo polyurethane stuff through the airbrush - two coats. Edit: links stuffed, will fix! Link to comment https://bolterandchainsword.com/topic/276735-skeletoros-great-company-motivational-thread/page/5/#findComment-3719965 Share on other sites More sharing options...
irwit Posted June 16, 2014 Share Posted June 16, 2014 still so jealous of that hobby room. Link to comment https://bolterandchainsword.com/topic/276735-skeletoros-great-company-motivational-thread/page/5/#findComment-3720019 Share on other sites More sharing options...
Rune_Priest_Rhapsody Posted June 16, 2014 Share Posted June 16, 2014 Looking good man!! The cave, the models, the eyes and the assistant (following in dad's shoes, I see!!) !! Loving the mi of bits'n'kits too!! End of Line Link to comment https://bolterandchainsword.com/topic/276735-skeletoros-great-company-motivational-thread/page/5/#findComment-3720436 Share on other sites More sharing options...
skeletoro Posted June 17, 2014 Author Share Posted June 17, 2014 OK so a bit of a disclaimer before I detail the next step... This is more of a chronicle of my adventures than a guide. I'm trying some new things and they could backfire or look awesome. It's anyone's guess. It's my hope that I'll get a good result with these blood claws and that this info can be used as a how to guide, of sorts. Of course, if not, it'll always be useful as a cautionary tale In any event, definitely don't assume I'm doing any of this the right way I've got a few objectives and plans with how these blood claws will be painted relative to the grey hunters. 1. I want to maintain gritty/realistic look but increase contrast. I'd like the golds to pop a lot more, for instance, and the whites to look more distinct from the power armour. 2. I want to improve the look of the steel - I want a darker metal but with more exaggerated lighting (to suggest higher reflectivity, but I am not going nmm per se) 3. I want to dramatically improve my masking (allowing me to base coat all main colours with airbrush, unlike last time where steel, leather and fur were done post hoc) and my oil washes (using more hues, applying all washes during the same stage after airbrushing is finished, and for the most part ditching acrylic shades). 4. Better varnishing. Both the masking and washes suffered last time in part (I think) because I didn't properly varnish or didn't wait long enough for the varnish to dry before masking/ applying oil washes. So by being more thorough/patient with my varnishes, I hope to do better all round. 5. Stylistically, my blood claws will have a lot less gold and more grey metal. Their armour will be plainer, to convey their relative lack of experience and therefore not having accrued many battle honours. Link to comment https://bolterandchainsword.com/topic/276735-skeletoros-great-company-motivational-thread/page/5/#findComment-3721190 Share on other sites More sharing options...
skeletoro Posted June 17, 2014 Author Share Posted June 17, 2014 I did the grey metals today, woot! Sorry, the photos are BAD. Anyway, here's what I did: 1. Base coated entire model with the airbrush, using Vallejo Model Air - VMA - Dark Blue Grey. Or was it Grey Blue? I will check that. Anyway, I like to use less 'metallic' paint, that is, paint with less (in this case no) mica flakes in it for shadows, given that the mica is supposed to convey a 'shine'. As I highlight on top of this coat, I will gradually add metallic paint until I reach the top few highlights, which will be fully metals. http://img.photobucket.com/albums/v333/skeletoro/blood%20claws%20wip/temporary-15.jpg 2. Using the airbrush, I sprayed down at a 45 degree angle for the first zenithal highlight (a 4:1 mix of VMA dark blue grey and VMA Steel) http://img.photobucket.com/albums/v333/skeletoro/blood%20claws%20wip/temporary-17.jpg 3. Again, but 2:1 and 60 degrees. 4. At this point I switched to drybrushing, because I felt the metal areas I was painting were so small that I didn't so much want the nice gradient effect the airbrush provides as I wanted to pick out the raised areas and drench them in luminance. Drybrushing seemed more appropriate. Also, it allowed me to only apply paint to areas that were going to end up metal. If I was painting larger armour plates I would have continued using the airbrush. Anyway, I drybrushed 1:1 steel and VMA base grey (a lighter grey), aiming to focus on areas that catch the light from the sun (but at the same time being fairly liberal' - light bounces around and all that) 4. Next highlight was pure VMA steel http://img.photobucket.com/albums/v333/skeletoro/blood%20claws%20wip/temporary-24.jpg 5. VMA aluminium 6. VMA Metallic Medium (awesome stuff!) as final highlight. I tried to build up this paint in areas that catch the full brunt of the sun, to mimic a 'gleam'. I only applied it in a few places but went over those places quite heavily (3 passes) to try to boost the contrast. http://img.photobucket.com/albums/v333/skeletoro/blood%20claws%20wip/temporary-25.jpg 7. I followed this up with 2 coats of Vallejo gloss varnish over the whole model (watered down) through the airbrush. http://img.photobucket.com/albums/v333/skeletoro/blood%20claws%20wip/temporary-28.jpg After my 24 hour wait, I'll be masking all the stuff that's supposed to be grey metal, leaving everything else for the next colour... red? Yellow? Brown? Gold? White? Link to comment https://bolterandchainsword.com/topic/276735-skeletoros-great-company-motivational-thread/page/5/#findComment-3721225 Share on other sites More sharing options...
pedrogzc Posted June 17, 2014 Share Posted June 17, 2014 Quite interesting method!!! I have been tempted to use a similar approach mixing methallics and non methallics colours, definitely should try it in some models. And nice umpa lumpa you have. How old is he? 5-6 years? Mine is still young but yet eager to paint with dad :) Link to comment https://bolterandchainsword.com/topic/276735-skeletoros-great-company-motivational-thread/page/5/#findComment-3721254 Share on other sites More sharing options...
skeletoro Posted June 17, 2014 Author Share Posted June 17, 2014 Quite interesting method!!! I have been tempted to use a similar approach mixing methallics and non methallics colours, definitely should try it in some models. I'd love to see what kind of result you can get! And nice umpa lumpa you have. How old is he? 5-6 years? Mine is still young but yet eager to paint with dad Just turned 3 today! Hard to tell from a back-of-head shot though! I don't actually let him paint with the airbrush though he does like to make it blow air on his hand I've been indoctrinating him into the ways of the geek from birth but it comes naturally to him. My encouragement is largely unnecessary. His favourite models: The thousand sons corpse from the thunderlord box (he calls it 'my white man') An ultramarine from Space Crusade with a missile launcher ('my blue man') My fire raptor (that's what he calls it too, even though it's MINE!) I had to sacrifice a paint brush so that he could have his own and stop ruining my ones, hah! The other day he runs up to me and says: "daddy, what's in my pocket?" Me (playing along): "I don't know Avery, what???" "DIIIIIIIIIIIIICCCEEEE!!!!!!" and with a cheer, he violently turns his pockets inside out, showering the room with pretty much my whole collection of D&D dice. Link to comment https://bolterandchainsword.com/topic/276735-skeletoros-great-company-motivational-thread/page/5/#findComment-3721275 Share on other sites More sharing options...
pedrogzc Posted June 17, 2014 Share Posted June 17, 2014 aaaaahahahahaha!!!! Mine is also 3! Sometime I "persuade" him to "paint" tau and gants so I can paint at the same time... Otherwise Overseer Mum wouldn't allow to catch a single brush Have you ever post shots of the Fire Raptor?! I have to see it! Back on topic. Are you going to mask nearly the whole mini to airbrush details? For next batch I recommend walkin' the inverse way, first you paint the little details, then mask it with liquid mask and finally paint the whole mini. Although I have to admit never did it before, but I have seen it in pro-painters blog as Volomir. Cheers! Link to comment https://bolterandchainsword.com/topic/276735-skeletoros-great-company-motivational-thread/page/5/#findComment-3721283 Share on other sites More sharing options...
skeletoro Posted June 17, 2014 Author Share Posted June 17, 2014 Haha! I'm doing the silvery shades first, which for the most part are pretty small, finicky areas (e.g. the cables on the Mk vi chest). I'll aim to so other small things next, maybe gold (get Metallics out of the way and give my brush a good clean) followed by bone/leather/parchment, the lenses, faces, hair, shoulder pads, with the actual armour colour last. Don't worry, there's no way I could bring myself to mask the actual armour plates of the model with masking fluid, hehe. I would never manage to extract it out of the crevices like between the backpack and the torso! The reason I have applied paint to the whole model so far is mainly that I know my limits. I am still pretty noob with the airbrush and i'd have a hard time hitting all those little steel details (e.g. the little circles on the sides of their helms, the cabling on their packs, etc etc) with any degree of selectivity - so I figured: save time, paint the whole thing silver, mask it off. I shouldn't have to do that with most other colours. There will be overpay but the other colours are relatively more isolated (e.g there's only one head, only a few pouches, a few spots of gold etc etc). So hopefully I won't end up with so many layers of paint that it starts looking bad. It seems like you can happily do dozens of (thin) coats with an airbrush with no discernible glugginess. Here's hoping it works.. Link to comment https://bolterandchainsword.com/topic/276735-skeletoros-great-company-motivational-thread/page/5/#findComment-3721303 Share on other sites More sharing options...
skeletoro Posted June 17, 2014 Author Share Posted June 17, 2014 OK I'll post some pics of the raptor, though it is only 95% assembled. I've been planning on engraving runes on it and my first attempt is still there, though I plan on redoing it. Actually, this is the first resin vehicle I've assembled. Tomorrow though, it's late and I should go to sleep. Link to comment https://bolterandchainsword.com/topic/276735-skeletoros-great-company-motivational-thread/page/5/#findComment-3721308 Share on other sites More sharing options...
Dantay VI Posted June 17, 2014 Share Posted June 17, 2014 Wow tat is a really interesting technique for painting the armour, I wouldd never have considered painting it with a metallic misx but it works really well. I was indoctrinated in painting first with the humbrol enamels as a kid and later with gw acrylics so it is great to see such varied painting styles, I might have to give it a go with the next batch. Glad to see you getting your son into model miniatures too, my son is 4 and its all cars and stuff... Although I am breaking him in slowly with lego and megablocks And oh yes can't wait to see the raptor, I just acquired one myself, so I will let you bemy guiding light on this wee project.... Watching with interest!! Link to comment https://bolterandchainsword.com/topic/276735-skeletoros-great-company-motivational-thread/page/5/#findComment-3721817 Share on other sites More sharing options...
skeletoro Posted June 17, 2014 Author Share Posted June 17, 2014 Thanks The paint you see on the armour of the blood claws will actually be painted over. In fact, almost all of this stage will be obscured completely by later layers of paint. Let me explain... After the gloss varnish has dried, I am going to take a paint brush with synthetic bristles, and a cup of water with some dishwashing liquid mixed in. I'll use this to wash the brush, as masking fluid will ruin a brush if allowed to dry on the bristles. I'll keep the brush damp (only damp, mind you) with the soapy water at all times to stop this happening. I'll decide what parts of the model I want to remain 'metal coloured' (i.e. greyish metal) and will carefully paint masking fluid over these areas, taking special care not to get masking fluid anywhere else. I'll do a couple of layers of masking fluid though, just to make sure I don't miss any patches (it's quite hard to see when it is on thin, and it is actually easier to move when the layer is thicker because it rolls up into a blob very easily - it tends to adhere to itself better than it adheres to a mini). Once I've done that, I'll be ready to paint the next colour (probably gold I think). Anything not masked will either get painted (on purpose, because I am doing gold's and I want it to be gold) or it will stand a high chance of getting overpay. I won't worry about this too much though - the paint layers are thin (hopefully thin enough for this process, it's definitely one thing that COULD backfire as I am doing many coats) and if it's not masked, it's either a) supposed to be gold or going to get painted over at a later step. With the gold, as with the steel (??) I will start very dark (possibly rhinox hide) and build my way up to lighter hues. I will likely airbrush balthazar, then Gehenna's gold, then switch to a liberal drybrush of auric armour gold and a more targeted highlight of golden griffon. Perhaps then I'll do a final drybrush of metallic medium... I'm undecided on that! Then I'll varnish the gold areas, wait 24 hours and mask them off too (note, I haven't removed the previous mask). As you can see I don't mention using a purple or ogryn flesh wash during this stage. That's because I plan on leaving the washes until I have almost finished painting the model. And then I will be going nuts, using water mixable oils exclusively. SO, during the stage I am doing now, it's more important that I get the general colours and zenithal highlighting (ie gradient of shading from parts of the model facing the sun down to dark areas in the shade). I don't really have to worry quite so much about shading cracks etc, because that will happen at a later stage with the oil wash. So, once I've done gold and masked it off, I will continue painting colours and masking them (filling in most of the details as I go, including pack markings, lense glow, faces/eyes, transfers etc), one by one, until only the actual armour plates remain exposed (the rest of the models will look like blobs of silicon!) The last step will be to paint the armour, do a final varnish, and then after another 24 hours go in and rip off ALL the masking fluid, praying to the Allfather that it is neat and tidy. Any mess will get tidied up, I'll do weathering and paint the base, then do another varnish to be safe. THEN and only then will the fun with oil washes begin After I'm happy with the washes, I'll give them plenty of time to dry (you're actually supposed to give them ONE YEAR before varnishing but I say to hell with that!!) and then varnish - one layer of gloss and a final coat of matte. Some static grass or whatever and I'll be done. Note that I use gloss varnish exclusively until right at the end. Matte varnish is the bane of my life. At least the stuff I'm using REALLY seems to kill the contrast of my models - black becomes a dusty kind of violet. Maybe I'm doing it wrong or I'm just using crappy varnish (the Vallejo stuff through an airbrush). Link to comment https://bolterandchainsword.com/topic/276735-skeletoros-great-company-motivational-thread/page/5/#findComment-3721981 Share on other sites More sharing options...
skeletoro Posted June 17, 2014 Author Share Posted June 17, 2014 Ok here's some vehicles, on the back burner for now though!! http://img.photobucket.com/albums/v333/skeletoro/temporary-16.jpg http://img.photobucket.com/albums/v333/skeletoro/temporary-15.jpg http://img.photobucket.com/albums/v333/skeletoro/temporary-14.jpg http://img.photobucket.com/albums/v333/skeletoro/temporary-13.jpg http://img.photobucket.com/albums/v333/skeletoro/temporary-12.jpg Link to comment https://bolterandchainsword.com/topic/276735-skeletoros-great-company-motivational-thread/page/5/#findComment-3721988 Share on other sites More sharing options...
skeletoro Posted June 18, 2014 Author Share Posted June 18, 2014 The reason the fire raptor has some weird gaps is it isn't fully glued together, by the way I haven't glued the sides on the ball turrets because I need to be able to get in there to do OSL coming from the instruments etc that are on the inside of the turrets. I also pinned the living bejeezus out of the fire raptor. It has maybe 50 pins in it? I reinforced the wings a lot to make it child proof, hahaha Link to comment https://bolterandchainsword.com/topic/276735-skeletoros-great-company-motivational-thread/page/5/#findComment-3722028 Share on other sites More sharing options...
Dantay VI Posted June 18, 2014 Share Posted June 18, 2014 Wow, cool, thanks for explaining how you plan to paint up your claws. I believe I have seen a brown-purple wash used before by a GW store just after doing the armour's base colour and it came out really well. Can't say I have ever tried it though I got a bit freaked out when I saw the putty on te raptor, so thanks for explaining it to me, how was it for warpage? Oh and also... belated happy birthday to the wee nipper! Link to comment https://bolterandchainsword.com/topic/276735-skeletoros-great-company-motivational-thread/page/5/#findComment-3722167 Share on other sites More sharing options...
skeletoro Posted June 30, 2014 Author Share Posted June 30, 2014 I'm just going to start by dumping a bunch of pics of the progress on my blood claws and then I will endeavour to come back and explain them soon Browns OK. Editing in some explanation here. I kind of stuffed up a few things with the browns and have learned a couple of lessons. Firstly, I came to the realization that I had a few different colours that were all starting with the same base coat - rhinox hide (love this dark, dark brown!) so I figured - I'll base coat them all at once, highlight the leather (mournfang zenithal highlight, followed by a khaki drybrush. The leathers were looking awesome. Drybrushing with a high contrast khaki really seems to add to that 'stressed' leather look. Highly recommend. Then I got a little impatient and decided to mask the leathers (and bones, stone runes) without first varnishing them, in order to paint the one wolf tail and the golds (zenithal 45° rhinox/balthazar, 60° Gehenna's, top down auric, drybrush golden griffon and extreme drybrush of metal medium - oops, forgot to take pics of this process!) Not varnishing was a mistake. I got worried after finishing the golds and removed the mask on the leather, as the longer masking fluid is left, the more it adheres to the underlying paint. Although the leather wasn't completely ruined, it did noticeably suffer - most notably the raised areas, with my precious khaki drybrushing, were worn quite a bit and still need some touching up before I will be ready to go nuts with oil washes. What a pain. Oh well, lesson learned: VARNISH PROPERLY BEFORE APPLYING MASKING FLUID, ESPECIALLY OVER DELICATE, DRYBRUSHED HIGHLIGHTS. http://img.photobucket.com/albums/v333/skeletoro/blood%20claws%20wip/temporary-18-1.jpg http://img.photobucket.com/albums/v333/skeletoro/blood%20claws%20wip/temporary-34.jpg http://img.photobucket.com/albums/v333/skeletoro/blood%20claws%20wip/temporary-20-1.jpg Wolf tail Not too happy with this wolf tail, though I think the actual process I have used is OK. I just haven't yet had enough practice to consistently achieve a compelling result. What I've been doing is aiming for a gradient from the base (ferrule? ) of the wolf tail to the tip. In this case, I was trying to go from tan/yellow brown, to dark brown, to dark grey/black. This was then drybrushed over with a complementary highlight - a mix of khaki, sand, and grey. In this case I used the airbrush for the base colours, but it was a tad fiddly. The reason you see masking tape is that I had just varnished the leathers, but it hadn't been long enough to apply masking fluid, so I had (impatiently) improvised by shielding those areas with masking tape. Another lesson: NON-HOBBY MASKING TAPE IS MUCH MORE LIKELY TO DAMAGE THE PAINT IT TOUCHES THAN HOBBY MASKING TAPE IS. THE ADHESIVE IS TOO STRONG - IT'S SAFER TO STICK WITH TAMIYA, AND DON'T GET IMPATIENT FOE THE LOVE OF THE ALLFATHER! http://img.photobucket.com/albums/v333/skeletoro/blood%20claws%20wip/temporary-38.jpg http://img.photobucket.com/albums/v333/skeletoro/blood%20claws%20wip/temporary-38.jpg Flesh I am still trying to achieve a good result with flesh tones. My plan with these blood claws is to start with a zenithal base coat. As they will mostly be red heads, I intend to leave their hair this colour until the oil wash stage, where I will add red/blond/auburn hues until I achieve the desired result. The funny thing is that after deciding to use this method I finished reading Prospero Burns where Kasper Hawser describes Russ' hair as blonde soaked in blood. Coincidence? (I wasn't a big fan of PB to begin with, but it really grew on me by the end and may even be up there with Scars in second-equal place -behind the first heretic- of the HH books I have read thus far. Though the initial trilogy were pretty solid too, IMO. Hmm, and Mechanicum. And Fulgrim. :S OK, side track over!!) Anyway, I intend to make 'ogryn flesh' and purple oil washes and use these to make the skin more ruddy (and add deeper shadows) - at the moment it is decidedly washed out, I recognise my failing and will be sure to correct it. http://img.photobucket.com/albums/v333/skeletoro/blood%20claws%20wip/temporary-32.jpg Grenades (masking tape) Again, still waiting for some varnish to dry, and decided to paint the grenades - dark blue grey with base grey zenithal (both Vallejo air). http://img.photobucket.com/albums/v333/skeletoro/blood%20claws%20wip/temporary-27.jpg Red and grey on pads (tape) I then did reds and whites on the shoulder pads. I ran out of time (my compressor is too noisy to use while my son is asleep) and had not highlighted all the way up to white, so the shoulder pads remained light grey. In my impatience I removed the mask to take a look and some pics. This wasted more time because I just had to re-mask. Anyway, I used colour theory to darken my reds. By mixing some ork hide shade (a complementary colour) into my mechrite red, I obtained a much darker red. I used this as a base coat, then zenithal highlighted up through mechrite, evil suns scarlett, and I think finally wild rider red but I cannae remember! May have been white+ESS for that final highlight (which would make a pinker, perhaps less saturated red overall, but less orange too). Anyway, when using the airbrush I highly recommend using super dark base coats to obtain a gradient from near black to near white. Many of the 'dark' games workshop colours are, imo, not dark enough so you have to look elsewhere to other paint ranges, or else mix in black (this will make a darker but less vivid and more grey shade), or consult a colour wheel and darken the colour by adding a complementary colour (purple for yellow, orange for blue, green for red, and vice versa too. This will make a darker version of your original colour, but shouldn't grey out the paint so much.. in theory). http://img.photobucket.com/albums/v333/skeletoro/blood%20claws%20wip/temporary-26.jpg http://img.photobucket.com/albums/v333/skeletoro/blood%20claws%20wip/temporary-20.jpg Yellow pads I had decided to make the studs steel rather than grey, so they had been masked off. I then needed to mask triangles of red before airbrushing yellow over the top. I have used TAMIYA masking tape for this before but it was quite difficult to get the tape to stick properly with the studs underneath. So I decided to paint the mask on with masking fluid. Yellow was zamesi dessert (man those zamesis have weird appetites) with a touch of purple ink to darken it further. Then yriel, then sunburst, and finally a mix of sunburst and white, all done as zenithal highlights. Sometimes I find that mixing a little glaze medium helps obtain a more seamless gradient, but it means applying a bit more paint, and given the shockingly bad coverage that sunburst yellow has, it is probably not advisable for yellow. Lots of thinner and really thin coats may be a better way to go about it. http://img.photobucket.com/albums/v333/skeletoro/blood%20claws%20wip/temporary-10.jpg http://img.photobucket.com/albums/v333/skeletoro/blood%20claws%20wip/temporary-8.jpg http://img.photobucket.com/albums/v333/skeletoro/blood%20claws%20wip/temporary-2.jpg http://img.photobucket.com/albums/v333/skeletoro/blood%20claws%20wip/temporary-17-1.jpg http://img.photobucket.com/albums/v333/skeletoro/blood%20claws%20wip/temporary-41.jpg Anyway, the yellow looked good, but for whatever reason it flaked off in a few places when I removed the mask. This may have been due to sloppy mask application, or the paint may have been too weak/brittle. I think carefully and gently perforating the top layer of paint with a very sharp blade (around the borders of the masked area), and then dragging the bade gently away from the border, reduces the chance of losing extra paint and helps achieve clean straight lines. But I am interested in finding a more suitable masking product, and may invest in a putty or at least a thicker, more opaque masking fluid in order to better control the masking process. Anyway, I touched up the damaged areas and did some line highlights. In the end I found that a thin, white glaze worked well as a highlight (and it worked for both red and yellow areas). I used a purple glaze to shade the yellow areas, and green for the reds. At least, I think that's what I ended up with. I actually tried a bunch of different things. Ultimately the highlights would have worked better if I had been stricter about where the lines were relative to the light source. For some reason my spatial processing wigged out and I decided in some cases that the back of the pad was 'down' so the shadows aren't quite right, detracting from the effect somewhat, though I am fairy happy overall. Grey armour I used my 5 layer colour scheme again for these guys. As time has gone on I've found that there's a few things that really help with zenithal highlighting (IMO) 1. Make sure your base coat is thorough. Don't miss any areas. Really, you should do two good coats to be sure. 2. Thin your paints well, and clean your airbrush thoroughly to avoid 'speckles' of paint. You need it to mist on. You shouldn't see the individual little dots, and if you do, try cleaning your brush thoroughly (especially the needle and where the tip of the needle emerges from the front of the brush). Invest in airbrush cleaning fluid, but be careful as the fluid can degrade the rubber gromets in cheaper airbrushes like my NZD$50 one (which I wouldn't hesitate to recommend, by the way. You don't need to break the bank on an airbrush - though your compressor will cost more than this). Try adding more thinner to the paint - or switching from water to proper acrylic paint thinner if you haven't already... I noticed a huge difference doing this! Lastly, some paints not designed for airbrushes, or that are a bit old, might work better with a higher PSI or may even need to be filtered through a gauze to get lumps out. 3. Apply light coats in order to avoid 'spiders'. As a rule of thumb, I watch closely for any signs of 'wetness' on the model and if I see any I stop applying paint and let the airbrush blow air on the model to dry the paint before applying more. Lots of thin coats. The thinner your paint, the thinner your coats will need to be to avoid spiders. 4. Glazes (i.e. mixing glaze medium with the paint in order to make it translucent actually seems to work quite nicely for zenithal highlighting. As I buy more paint I am consider trying to achieve the same armour colours in my 5 paint scheme with 3 paints (I'll probably look for Vallejo equivalents and ditch the GW stuff - their paint isn't actually that bad but I prefer model air, especially for the price). By successively glazing colours 2 and 3 over the base coat I should be able to speed up the process a lot. The only thing to be careful of is that you need to reach the same 'high point' on your most highlighted areas for each model. It will look odd if one space wolf is highlighted up to 50% opacity ulthuan grey and the other has 99% opacity ulthuan grey, therefore looking much lighter. 4b. I have been experimenting with a slight 'wiggle' on the airbrush while glazing a zenithal highlight on. My theory is that if I do a 50° highlight with some 'random noise' thrown in, wait for it to dry and do the same thing at, say, 55°, then this should look similar to a stark 45° highlight but with a somewhat smoother transition -areas at the 45° mark will be touched by the highlight shade but at a lower opacity. 5. Start really really dark and highlight up to a really light tint, and cover all the ground in between. My blood claws are mostly ulthuan grey on the top, but if you turn them upside down, it's mostly my mix called 'SW1' (umm, hi man ) - CMA dark blue grey, the fang, and dark reaper. And, to be honest, I'll be looking to start even darker in the future. 6. Be really careful not to 'over-highlight'. It's really easy to accidentally start spraying at 30° rather than 45°, which can almost completely cover the base coat. It's also often tempting to over-highlight because you feel that the model's chest wasn't hit with a given coat, and so you come in from a shallower angle to hit the cheat plate 'just a little'. However, it's probably just the case that the model is leaning forward slightly, so the chest probably should be dark. In that case, all over-highlighting the chest will accomplish is to undo the zenithal effect. Let the chest and half that helmet stay SW1 if that's what it wants to do! You know what? When the model is finished and half the helm is near black and the other half is near white, with a tight gradient between them following the curvature of the helmet, it will look really cool. Mission accomplished. So yeah, stick to the 45, 60, 85 degree angles quite strictly. http://img.photobucket.com/albums/v333/skeletoro/blood%20claws%20wip/temporary-52.jpg http://img.photobucket.com/albums/v333/skeletoro/blood%20claws%20wip/temporary-44.jpg http://img.photobucket.com/albums/v333/skeletoro/blood%20claws%20wip/temporary-50.jpg http://img.photobucket.com/albums/v333/skeletoro/blood%20claws%20wip/temporary-56.jpg http://img.photobucket.com/albums/v333/skeletoro/blood%20claws%20wip/temporary-61.jpg Where I'm at so far.. colour comparison time. Overall I am quite happy with the progress and optimistic. I have made some errors and wasted a lot of time due to masking stuff ups, but that's just an opportunity to improve. http://img.photobucket.com/albums/v333/skeletoro/blood%20claws%20wip/temporary-27-1.jpg http://img.photobucket.com/albums/v333/skeletoro/blood%20claws%20wip/temporary-68.jpg http://img.photobucket.com/albums/v333/skeletoro/blood%20claws%20wip/temporary-70.jpg In these pics you can see one of the blood claws (on the right) beside one of my finished grey hunters, and a really early test mini I did in 2012 soon after buying my first space wolves (my unhappiness with the paint job and the tedium of brush painting is what spurred me on to drastically revise my paint scheme). The guy on the left was done with Sw1-5, but has had an oil wash of W&N Artisan Raw Umber mixed with Ivory Black, diluted with water and cleaned up with cotton buds/swabs/cue tips. The test mini in the middle is the GW scheme: base coat of the fang, then a black wash, a layer of Russ grey and line highlights of fenrisian grey. What do you think of the colours? I actually like the armour colour of the blood claw more than either of the others, to be honest. I think perhaps I was MUCH too heavy handed with the oil wash on the model to the left. But I also do greatly prefer the slightly more turquoise, slightly more grey armour shade to the GW scheme. That said, the armour still lacks shading in crevices (e.g. on armour panels, around rivets, in sharp concavities such as on the backpack) so I definitely do want to use oil washes to do that. BUT, from the comparison above I think I've come to the conclusion that I will apply the oil wash more sparingly... I'll probably paint it into the cracks and clean up with a damp brush or makeup applicator rather than saturating the entire model and cleaning up with cotton buds. Hopefully I'll be able to keep that nice grey I've now grown attached to. Coming up: I'll add some pics of the flamer guy (who seems MIA above) and will cover my helmet lenses (an experimental method of my own devising), chipping (painted on with a brush), and other final touches that need covering before varnishing ready for oil washes. Link to comment https://bolterandchainsword.com/topic/276735-skeletoros-great-company-motivational-thread/page/5/#findComment-3733756 Share on other sites More sharing options...
CatSmasher Posted July 1, 2014 Share Posted July 1, 2014 Looking awesome. Link to comment https://bolterandchainsword.com/topic/276735-skeletoros-great-company-motivational-thread/page/5/#findComment-3733813 Share on other sites More sharing options...
skeletoro Posted July 1, 2014 Author Share Posted July 1, 2014 Thanks update: I've added a wall, nay, a manufactorium of text to the images in my post above to describe the process I went through. Just remember this is a hybrid guide/cautionary tale. Hopefully documenting my mistakes and lessons learned will be even more useful to any readers than merely telling you the right way to do it and leaving it at that. And anyway, I don't know the right way to do it, so can't really help you there Which brings me to this: any criticism or suggestions are welcomed. I'm sure there are many ways I can improve and I would like to find out how!! Thanks for reading. Link to comment https://bolterandchainsword.com/topic/276735-skeletoros-great-company-motivational-thread/page/5/#findComment-3734694 Share on other sites More sharing options...
irwit Posted July 2, 2014 Share Posted July 2, 2014 Hey That's a pretty epic post and I'm probably going to be late for work if I read it all but here a quick tip for masking quick. http://massivevoodoo.blogspot.co.uk/2014/05/tutorial-masking-options.html?m=1 Also it may be worth keeping some pieces separate and glueing afterwards yo save so much masking? Also maybe get a bit more practise in with a paint brush. Personally I just couldn't do with masking everything for golds, silvers, leather etc. Most I've done is base coat and a power sword. Finally these guys are looking great! Amazing conversion skills!!! When I started my at I was pretty obsessed with consistency. How do I make sure every shade and highlight is u I form across the army. However in hinde sight it took away some of the fun and having variation can actually be more positive than negative as the variation itself creates more interest. I admire the dedication to consistency but make sure to remember its more important to enjoy the painting process than to have everything perfectly matching. Just my 2 pence worth :) Link to comment https://bolterandchainsword.com/topic/276735-skeletoros-great-company-motivational-thread/page/5/#findComment-3734844 Share on other sites More sharing options...
Max_Dammit Posted July 2, 2014 Share Posted July 2, 2014 Fire raptorrrrrrrrrrrrr http://ourdollcommunity.com/forum/chat/img/emoticons/drool.gif I wish I had a room like that Link to comment https://bolterandchainsword.com/topic/276735-skeletoros-great-company-motivational-thread/page/5/#findComment-3735105 Share on other sites More sharing options...
skeletoro Posted July 7, 2014 Author Share Posted July 7, 2014 Quick update: oil wash mostly done, waiting for it to dry before sealing it in with varnish. How does it look? And does this link work? Trying to share straight from onedrive as photobucket is a pain. Link to comment https://bolterandchainsword.com/topic/276735-skeletoros-great-company-motivational-thread/page/5/#findComment-3738673 Share on other sites More sharing options...
Recommended Posts
Archived
This topic is now archived and is closed to further replies.