Brother Callius Posted August 25, 2016 Author Share Posted August 25, 2016 (edited) Thanks a lot guys! I am also quite jealous. Any chance of you joining in the Imperial Fists Expansion event with some of that haul? The freehanded script on that Knight is quite nice, as is the rest of it. I look forward to seeing it finished. I plan on getting the things washed and sorted in the weekend. After I get a overview, I will get a first vow in for the expansion.I think I will start small and if I make it I will take a couple more vows.Gotta beat those traitors! Edited August 25, 2016 by Brother Callius Soldier of Dorn 1 Back to top Link to comment Share on other sites More sharing options...
disease Posted August 25, 2016 Share Posted August 25, 2016 First time I've stumbled across this thread and really blown away by how awesome it all is. Congrats man, well deserved - the mkIII are particularly spectacular. Brother Callius 1 Back to top Link to comment Share on other sites More sharing options...
Soldier of Dorn Posted August 25, 2016 Share Posted August 25, 2016 I plan on getting the things washed and sorted in the weekend. After I get a overview, I will get a first vow in for the expansion. I think I will start small and if I make it I will take a couple more vows. Gotta beat those traitors! http://s2.quickmeme.com/img/be/bea685ace6558735f6e2cb2478286fdc96ad4981375834ad29021318aab9462b.jpg I look forward to seeing what you bring. For Dorn! Link to comment Share on other sites More sharing options...
Brother Callius Posted August 27, 2016 Author Share Posted August 27, 2016 Thanks to The Psycho I have now pledged my 10 man terminator squad to the Imperial Fists Expansion. I hope to get a few more vows in before the end but that should not be a problem. Before I could get going, I needed to wash all the resin I've got. I like to do it in big batches so that everything I have is ready to assemble and paint when I get them to my hobby area. Not the most exciting update but my OCD likes the grey resin lined up in neat rows and I thought you guys would appreciate it. Plus everything looks a whole lot bigger laid out on a table rather than in the packing. Brother Pheidias, Luna707, m0nolith and 1 other 4 Back to top Link to comment Share on other sites More sharing options...
Luna707 Posted August 27, 2016 Share Posted August 27, 2016 WOW! Brother Callius 1 Back to top Link to comment Share on other sites More sharing options...
lionofjudah Posted August 27, 2016 Share Posted August 27, 2016 THAT!!! Winning pic of moar yellow dudes to be is beautiful:):):) Brother Callius 1 Back to top Link to comment Share on other sites More sharing options...
Brother Callius Posted August 29, 2016 Author Share Posted August 29, 2016 Thanks guys, now I just need to paint it all I got the knight almost done yesterday and I'm planning on doing the final touches tonight and tomorrow. In any case expect the finished mini tomorrow evening. The only things I have left on him are the shoulders, (almost done) and the base which I have a few ideas for. Then it will be on to the decals and weathering. There really isn't much more to say, so have a little look at the new WIP pics, and check back tomorrow evening for some knightly fun... Link to comment Share on other sites More sharing options...
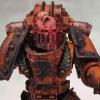
Brother Callius Posted August 30, 2016 Author Share Posted August 30, 2016 Bellum Sacrum Walks! The knight is done, well within my time frame.With this paintscheme I was looking for something different than yellow all the time and I love the red colour for knights, but at the same time I feel as though most knights out there are red. But after seeing the finished result I am glad I chose red instead of blue. The only real gripe I have is that the cream is a bitch to paint. It consists of a grey primer as always but then there are 8 layers ontop of that; two layers of Rakarth flesh and six layers of heavily thinned Screaming skull. It was a nightmare to get even, and paintsrokes are so clearly visible on light colours. I tried to show his allegiance on his shoulder plates with the left one displaying the fist of the VII and an imperial eagle. The right one shows the knights name and the pilot's personal heraldy as well as the secondary emblem of the knight house. All in all I am not sure if my knight house will live one or they will crash and burn after this guy. I don't know what it is but I just don't get the same feeling of pride and pure awesomeness when looking at my knight that I do looking at my Fists. Furthermore I felt the majority of the panels where tedious and I didn't really feel the eagerness to paint that I normally do. I can't put my finger on it but something is just not right, so I will be putting this project on ice for now and continue with my yellow guys. Maybe I'll paint the other knight as a renegade to use in the game they came with, plus they will make fine display pieces once I get a proper cabinet for my minis. But no more of my negativity, it's on to the little guy: I have the detail shots in here so they won't fill the whole page. Hidden Content Biohazard, Luna707, Flint13 and 2 others 5 Back to top Link to comment Share on other sites More sharing options...
Dosjetka Posted August 30, 2016 Share Posted August 30, 2016 Lovely work. The dying Iron Warrior is, naturally, the best part. ;) Brother Callius 1 Back to top Link to comment Share on other sites More sharing options...
Flint13 Posted August 30, 2016 Share Posted August 30, 2016 Amazing work on that Knight, man. His weathering is spot on! Brother Callius 1 Back to top Link to comment Share on other sites More sharing options...
Brother Pheidias Posted August 30, 2016 Share Posted August 30, 2016 For a model you didn't really feel too much, it turned out marvellous. I know the feeling you're describing perfectly; when something ought to fuel the hobby passion but instead makes you want to do anything but that model... It sucks! Brother Callius 1 Back to top Link to comment Share on other sites More sharing options...
Brother Callius Posted August 31, 2016 Author Share Posted August 31, 2016 Lovely work. The dying Iron Warrior is, naturally, the best part. Thanks mate, thought you would like that little detail... Amazing work on that Knight, man. His weathering is spot on! Much obliged Flint, I'm not completely satisfied with the weathering but I can't put my finger on what's amiss. For a model you didn't really feel too much, it turned out marvellous. I know the feeling you're describing perfectly; when something ought to fuel the hobby passion but instead makes you want to do anything but that model... It sucks! Yeah I guess as bad minis goes this is a pretty good one Also good to know that it's not just me that gets that feeling from time to time. After my ''defeat'' by the knight I thought some termies for my Fists would cheer me right up; and man, was I right... I have now begun work on my first Imperial Fists Expansion vow that consists of a ten man Cataphractii squad with all the bells and whistles. The moment I started building these guys my hobby spirit lifted and I now have the good old passion when I paint that I lacked with the knight. I love putting together the termies, the amount of wargear they can take makes each one unique and the overall badass feel from these guys is amazing, can't wait to get one finished and battered up. Needless to say most of them will be well and truly bloodied... It's only the first yellow layer that has been completed but I thought I would update you guys anyway. Dosjetka 1 Back to top Link to comment Share on other sites More sharing options...
Andvarr A Posted September 1, 2016 Share Posted September 1, 2016 Hmm... General Melchet approves "baaaaaa" Someone locate Flashheart Brother Callius and Reyner 2 Back to top Link to comment Share on other sites More sharing options...
Brother Callius Posted September 1, 2016 Author Share Posted September 1, 2016 Hmm... General Melchet approves "baaaaaa" Someone locate Flashheart Link to comment Share on other sites More sharing options...
Forgefather Vulkan Posted September 2, 2016 Share Posted September 2, 2016 Out of curiosity, because i couldn't see that anyone else had asked, how do you paint that yellow? Could I trouble you for a step by step guide on it? I have a friend who is doing 30K IF and they have been having trouble getting them off the ground in terms of painting... Ty Link to comment Share on other sites More sharing options...
Brother Callius Posted September 2, 2016 Author Share Posted September 2, 2016 Out of curiosity, because i couldn't see that anyone else had asked, how do you paint that yellow? Could I trouble you for a step by step guide on it? I have a friend who is doing 30K IF and they have been having trouble getting them off the ground in terms of painting... Ty Of course! I'll do anything to help out. It's really simple and now that I write it for all to see, it seem's I get of easy with my legion of choice compared to several other legions For my Fists, the general order for the yellow goes: 1 - Grey primer, I use Vallejo spray primer which is the best I've ever tried. 2 - Two or more thinned coats of Averland sunset. 3 - Weathering is done with a sponge with first Rinox hide. 4 - Then a dabbing of Leadbecher, again with a sponge. 5 - Lastly the whole mini get's a good coating of Agrax earthshade to really mute the colours and tie them together. This is of course only the yellow steps, if they wish a better description of the whole process I will see what I can do. With this method you get some nice, dark and earthy tones instead of the bright yellow GW uses. In my head the VII should be dirty and gritty seeing as siege warfare is what they do best and that tend to be a long and hard task. If he is after a lighter yellow I would suggest using some thin layers of Yriel yelow or even Flash gitz yellow after the Averland sunset base. Hope this helps him I would love to see the results or hear if this is any good to him... Link to comment Share on other sites More sharing options...
Forgefather Vulkan Posted September 2, 2016 Share Posted September 2, 2016 Thanks for the reply, is the averland sunset airbrushed or just painted on normally? Yeah I'll see what can be done! I wanted to use a similar scheme for lamentors so it works well for both armies!! Link to comment Share on other sites More sharing options...
Brother Callius Posted September 3, 2016 Author Share Posted September 3, 2016 Thanks for the reply, is the averland sunset airbrushed or just painted on normally? Yeah I'll see what can be done! I wanted to use a similar scheme for lamentors so it works well for both armies!! Just a good old-fashioned brush Andvarr A 1 Back to top Link to comment Share on other sites More sharing options...
Andvarr A Posted September 3, 2016 Share Posted September 3, 2016 Thanks for the reply, is the averland sunset airbrushed or just painted on normally? Yeah I'll see what can be done! I wanted to use a similar scheme for lamentors so it works well for both armies!! Just a good old-fashioned brush All grafting here..... ...don't slouch darling... Brother Callius 1 Back to top Link to comment Share on other sites More sharing options...
Brother Callius Posted September 9, 2016 Author Share Posted September 9, 2016 Exciting news! (For me at least ) I've always done my painting (except for undercoat) with brushes, and it works like a charm, but when I paint bigger minis like tanks or my Reaver I did some three years ago, I get slight brush strokes. I know that these can be almost invisble if I just use very, very thin coats, but even with adequate thinning I still get marks in the finish. As I got my Spartan I had an idea of not using a brush since it's quite a large mini and it will take forever to get an even basecoat down without brush marks, since there's a lot of nooks and crannies and it's got a lot of surface area. So to speed up my basecoating and take my painting to the next level, I've gone out and got an airbrush and a ton of accessories (most are still in the mail thanks to a postal mix-up ) Since I have zero experience on the subject I have spent quite a few evenings watching youtube videos and reading reviews of different brushes and compressors. I then found a really good online store here in Denmark which has a great selection of airbrushes, compressors and the things you might need. The brush I ended up getting was an Iwata eclipse hp-cs, and that thing is a beauty. As soon as I opened the box I was impressed by how nice the polished finish was and it felt well balanced for my hand. Now I just need to learn how to not f***k everything up when I use it on a mini the first time. It's quite daunting to think about how to paint with one of these since I've allways used a brush for the better part of 13 years now, so I have a good amount of confidence in my manual painting and I know what I'm not good at. But the challenge is also quite exciting, so I look forward to trying this out. Last of all, if any of you has some awesome tips for an airbrush noobie please don't hesitate to share your wisdom Ovidius Incertus, Brother Pheidias and Luna707 3 Back to top Link to comment Share on other sites More sharing options...
Ovidius Incertus Posted September 9, 2016 Share Posted September 9, 2016 Aside from practicing with the trigger and learning to properly thin paint and starting on a test mini to get the feel of the airbrush, let me suggest not forgetting to empty the moisture trap on your compressor! It's humid here and I can't believe how fast I can fill up the trap. Save yourself the annoyance of screwing up what you're working on when you get all that extra water in your line. Brother Callius 1 Back to top Link to comment Share on other sites More sharing options...
Brother Callius Posted September 11, 2016 Author Share Posted September 11, 2016 Aside from practicing with the trigger and learning to properly thin paint and starting on a test mini to get the feel of the airbrush, let me suggest not forgetting to empty the moisture trap on your compressor! It's humid here and I can't believe how fast I can fill up the trap. Save yourself the annoyance of screwing up what you're working on when you get all that extra water in your line. Thanks! Yeah I got an idea of how important it is to keep the compressor free of condensation from a few youtube videos I've done a bit of painting this week and the bodys are about 90% done on the termies. I only need a few touch ups and then the final weathering. The arms/ weapons are up next and I will concentrate on getting them done before moving on to the hemlets. I've decided to go for the bare head for the as of yet unnamed sergeant, I know that it makes no real sense to remove ones helmet in battle but it looks so badass and I wanted to try my luck at skintones, which I know I suck at... I will be gone most of next week so not a whole lot of progress there but I hope on getting a good bit further next weekend. Here's my big LEGO killing machines as they are now, not the prettiest sight but the rest will have to wait... Link to comment Share on other sites More sharing options...
Brother Callius Posted September 30, 2016 Author Share Posted September 30, 2016 Back at last! I have been away a while due to my job, but now I'm back and getting ready to work on my IFE vow once more. The first five guys is now done and ready for battle. The next five guys are in the assembly line, just awaiting a package with some spare lightning claws. The progress has been really slow but as with all my minis I tend to go for quality over quantity, so I won't rush it for the sake of getting done. That was really all there is this time around, so enjoy my first five guys, including sergeant Reinhart: Kizzdougs, Soric, DuskRaider and 4 others 7 Back to top Link to comment Share on other sites More sharing options...
Kizzdougs Posted September 30, 2016 Share Posted September 30, 2016 The blood splatter on the Lightningclaw Cataphractii is exceptional! :tu: Link to comment Share on other sites More sharing options...
Dosjetka Posted September 30, 2016 Share Posted September 30, 2016 That is a fine bunch of Cataphractii. :tu: Link to comment Share on other sites More sharing options...

Recommended Posts
Create an account or sign in to comment
You need to be a member in order to leave a comment
Create an account
Sign up for a new account in our community. It's easy!
Register a new accountSign in
Already have an account? Sign in here.
Sign In Now