Lostrael Posted August 6, 2016 Author Share Posted August 6, 2016 Oof! Failcast... You brave, brave man! Not exactly what was in my mind when I tried to fix him. Had a mold line in his face... arr Once every 6 months I try to paint finecast... this is one of the better models. For the rivets, I've seen people talk about actual tiny plastic rivets being available, or microbeads in the 1 mm or so size, but those might be too big for your work. Honestly, you can probably just do without them, they really aren't necessary on the pauldrons. That said, Lostrael, I didn't realize I had never posted in your thread. Your painting is fantastic, I love the contrast you achieve and the highlighting is really great. Keep it up, I've really enjoyed looking through your thread in the last few months. Thanks. I hope I'll get this model in a presentable shape too. ~0.3 mm size I would need. *sigh* Link to comment https://bolterandchainsword.com/topic/318921-lostraels-dark-angels/page/6/#findComment-4459890 Share on other sites More sharing options...
Major_Gilbear Posted August 6, 2016 Share Posted August 6, 2016 Thanks. I hope I'll get this model in a presentable shape too. ~0.3 mm size I would need. *sigh* There are companies that make such things (example 1, example 2), but I'm really not sure they'd be worth purchasing given their cost. If you would like to make your own instead, there are three main ways of doing so: 1) Brass rod. Smooth the end of the brass rod on a fine emery board, drill a hole about 2-3mm deep, carefully measure and clip off the brass rod, and then glue it in. It helps if you use a spot of paint on the end that you filed before you cut it so that you know which end needs to stand proud when you glue it. 2) Greenstuff. Roll this out to the desired thickness using a scrap of plastic to ensure that you get it even down it's length. Using a brand new xacto blade, carefully slice off little rivet heads into a small pile. Put some glue on a scrap of plastic, and using a sewing pin/needle, put a spot where you rivet will go. Pick up a rivet from your pile with the new xacto blade til, and put n the tiny spot of glue you've just applied. 3) Superglue. Put some glue on a scrap of plastic, and using a sewing pin/needle, put a spot where you rivet will go. When the glue is dry, repeat this. Keep doing this until the dried glue has built up a suitable rivet. Personally, methods #2 and #3 would be my choice for a model of this size and fragility, but it's up to you. Failing that, you can just file the whole area smooth and just paint them on using a brush with a fine tip. As long as you do a slightly bigger dark/shaded roundel, and then put a bright/highlight spot in the centre of each, painted rivets are very convincing at this size! Anyway, good luck, and I look forward to seeing Belial painted. B) Space Truckin 1 Back to top Link to comment https://bolterandchainsword.com/topic/318921-lostraels-dark-angels/page/6/#findComment-4460107 Share on other sites More sharing options...
Lostrael Posted August 7, 2016 Author Share Posted August 7, 2016 Thanks Major. metal rivets would be overkill. I'll try the green stuff. just... must not sneeze Link to comment https://bolterandchainsword.com/topic/318921-lostraels-dark-angels/page/6/#findComment-4460569 Share on other sites More sharing options...
Chmur Posted August 8, 2016 Share Posted August 8, 2016 Alternatively, take a trip to nail salon. They have plenty of beads/gems/whatnots they glue on fingernails. Link to comment https://bolterandchainsword.com/topic/318921-lostraels-dark-angels/page/6/#findComment-4461220 Share on other sites More sharing options...
Lostrael Posted August 8, 2016 Author Share Posted August 8, 2016 Alternatively, take a trip to nail salon. They have plenty of beads/gems/whatnots they glue on fingernails. Nail salon . I normally give them a wide berth out of fear that their friendly staff would drag me in and decorate my nails with this stuff that would drive me crazy. The rivets are back on the model, more or less where they belong. Now doing the other punishing details. Raztalin, Bryan Blaire, Grand Master Belial and 3 others 6 Back to top Link to comment https://bolterandchainsword.com/topic/318921-lostraels-dark-angels/page/6/#findComment-4461643 Share on other sites More sharing options...
Raztalin Posted August 8, 2016 Share Posted August 8, 2016 Please tell me that's a little hedgehog there and I'm not going mad!? Greenz and Lostrael 2 Back to top Link to comment https://bolterandchainsword.com/topic/318921-lostraels-dark-angels/page/6/#findComment-4461668 Share on other sites More sharing options...
Lostrael Posted August 8, 2016 Author Share Posted August 8, 2016 Please tell me that's a little hedgehog there and I'm not going mad!? It is, no worry. Link to comment https://bolterandchainsword.com/topic/318921-lostraels-dark-angels/page/6/#findComment-4461770 Share on other sites More sharing options...
Greenz Posted August 9, 2016 Share Posted August 9, 2016 What method did you end up going with for the rivets? Beautiful free hand on the "repent". The style really brings me back to my tattoo apprenticeship. You should've been a surgeon with steady hands like that! Link to comment https://bolterandchainsword.com/topic/318921-lostraels-dark-angels/page/6/#findComment-4461982 Share on other sites More sharing options...
Lostrael Posted August 13, 2016 Author Share Posted August 13, 2016 What method did you end up going with for the rivets? Beautiful free hand on the "repent". The style really brings me back to my tattoo apprenticeship. You should've been a surgeon with steady hands like that! Some rivets are very small sand grains, some are green stuff. Both glued and put lots of paint on it to smooth the edges. There are good days and bad when writing scrolls. I had some tries on the rest of the model. Not yet happy. Chaplain Raeven, elmo, Tygwyn and 7 others 10 Back to top Link to comment https://bolterandchainsword.com/topic/318921-lostraels-dark-angels/page/6/#findComment-4466382 Share on other sites More sharing options...
Major_Gilbear Posted August 13, 2016 Share Posted August 13, 2016 Great painting as always, but that sword is sublime! B) Lostrael 1 Back to top Link to comment https://bolterandchainsword.com/topic/318921-lostraels-dark-angels/page/6/#findComment-4466550 Share on other sites More sharing options...
Epher Posted August 14, 2016 Share Posted August 14, 2016 Agreed with the good Major, that sword is a work of art! The lettering... How? ... I am without speech. That would be the best looking Belial I have ever seen. Lostrael 1 Back to top Link to comment https://bolterandchainsword.com/topic/318921-lostraels-dark-angels/page/6/#findComment-4466564 Share on other sites More sharing options...
Interrogator Stobz Posted August 14, 2016 Share Posted August 14, 2016 Great work Lostrael! :tu: I agree the sword is excellent. The script is good too, keep practicing and you'll be king of the skill in no time :D Don't be afraid to use a pencil first, especially on the bigger letters/words. (and making a frame outline for the letters is a great way to make sure they both fit the space well and to keep the gaps between letters correct) I can't wait to see more... :D 2c Stobz Link to comment https://bolterandchainsword.com/topic/318921-lostraels-dark-angels/page/6/#findComment-4466602 Share on other sites More sharing options...
Malcifer Posted August 14, 2016 Share Posted August 14, 2016 Lostrael, how are you getting that light blue on the wings and DA symbol? As always, your painting looks top notch! Lostrael 1 Back to top Link to comment https://bolterandchainsword.com/topic/318921-lostraels-dark-angels/page/6/#findComment-4466687 Share on other sites More sharing options...
FlamingDeth Posted August 14, 2016 Share Posted August 14, 2016 That lettering is pretty rad, and that's some precise painting, it's so good that I can almost ignore how awkward Belial's stock pose is. :p Space Truckin and Lostrael 2 Back to top Link to comment https://bolterandchainsword.com/topic/318921-lostraels-dark-angels/page/6/#findComment-4466750 Share on other sites More sharing options...
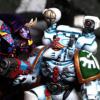
Chaplain Raeven Posted August 14, 2016 Share Posted August 14, 2016 It looks like Belial got dropped on the wrong spot. Instead of a deepstrike in the heat of battle, he got a mishap to a nice beachresort. He took shelter underneath the shade of the mighty parasol, while he waves his sword to the aproaching thunderhawk. FAQ isn't out yet, so the Landraider in the back had a Deepstrike mishap as well. Oh, and beautifull work on the painting! Lostrael and Epher 2 Back to top Link to comment https://bolterandchainsword.com/topic/318921-lostraels-dark-angels/page/6/#findComment-4466792 Share on other sites More sharing options...
Lostrael Posted August 14, 2016 Author Share Posted August 14, 2016 I agree the sword is excellent. The script is good too, keep practicing and you'll be king of the skill in no time Don't be afraid to use a pencil first, especially on the bigger letters/words. (and making a frame outline for the letters is a great way to make sure they both fit the space well and to keep the gaps between letters correct) Guess who has been a good tutor. Lostrael, how are you getting that light blue on the wings and DA symbol? As always, your painting looks top notch! Used Game Color Glacier Blue instead of white and a mix of this color with turquoise. I abused the turquoise on that model... the sword has too much on it. That lettering is pretty rad, and that's some precise painting, it's so good that I can almost ignore how awkward Belial's stock pose is. Yes, he is a very stiff character. It looks like Belial got dropped on the wrong spot. Instead of a deepstrike in the heat of battle, he got a mishap to a nice beachresort. He took shelter underneath the shade of the mighty parasol, while he waves his sword to the aproaching thunderhawk. FAQ isn't out yet, so the Landraider in the back had a Deepstrike mishap as well. Not sure if this was a mishap... Tactical Precision and this stuff Vow Finished! Malcifer, Interrogator Stobz, zacret and 6 others 9 Back to top Link to comment https://bolterandchainsword.com/topic/318921-lostraels-dark-angels/page/6/#findComment-4467311 Share on other sites More sharing options...
Lostrael Posted August 21, 2016 Author Share Posted August 21, 2016 I got reprimanded for piling up to much stuff (in front of the TV)... may be should not have bought this last box Time to continue on my veterans... an reduce the stack. Grand Master Belial, Epher, Chmur and 6 others 9 Back to top Link to comment https://bolterandchainsword.com/topic/318921-lostraels-dark-angels/page/6/#findComment-4474568 Share on other sites More sharing options...
Epher Posted August 21, 2016 Share Posted August 21, 2016 Epic... Freakin' epic! I don't know how you do it but the shading and detailing is insane. Do you use a magnifying glass? The dude needs a shave or he may not pass monring inspection by the company master. Lostrael 1 Back to top Link to comment https://bolterandchainsword.com/topic/318921-lostraels-dark-angels/page/6/#findComment-4474583 Share on other sites More sharing options...
Malcifer Posted August 22, 2016 Share Posted August 22, 2016 That backpack looks oddly familiar... (runs off to inform the inner circle) Lostrael 1 Back to top Link to comment https://bolterandchainsword.com/topic/318921-lostraels-dark-angels/page/6/#findComment-4474774 Share on other sites More sharing options...
Guest Posted August 22, 2016 Share Posted August 22, 2016 I can only say you are awesome so many times you know :) Link to comment https://bolterandchainsword.com/topic/318921-lostraels-dark-angels/page/6/#findComment-4474817 Share on other sites More sharing options...
Chmur Posted August 22, 2016 Share Posted August 22, 2016 Once again amazing paintjob, the shadowing and the blending of the colours - especially the vivid bolter. What kit is this head from? Lostrael 1 Back to top Link to comment https://bolterandchainsword.com/topic/318921-lostraels-dark-angels/page/6/#findComment-4474847 Share on other sites More sharing options...
Chaplain Raeven Posted August 22, 2016 Share Posted August 22, 2016 He reminds me of the fraters in Robin Hood Like always, excellent paintjob. Lostrael 1 Back to top Link to comment https://bolterandchainsword.com/topic/318921-lostraels-dark-angels/page/6/#findComment-4474868 Share on other sites More sharing options...
Major_Gilbear Posted August 22, 2016 Share Posted August 22, 2016 (edited) What kit is this head from? It's from the FW Dark Angels Head Upgrade set. I didn't really like all that much, but now I've seen it painted so nicely, I've rather changed my mind about it! The legs are from Spellcrow, the backpack is Cypher's, the weapons, arms and holster are from the BaC kit, and the shoulders look like FW Mk3, the torso... looks like a FW Mk3 with the loin armour shortened and a sword added to the breast? If I had one comment (and a nit-picky one at that), it would be to run a little thinned black ink down the sides of the chainsword teeth to separate the silver of the teeth from the red weapon casing. A bit like drilling out bolters, having that separation to suggest that the casing is hollow inside to contain the workings avoids the chainsword looking like a "toy". Anyway, it's a *fantastic* looking model (as always), so well done Lostrael! Edited August 22, 2016 by Major_Gilbear Lostrael 1 Back to top Link to comment https://bolterandchainsword.com/topic/318921-lostraels-dark-angels/page/6/#findComment-4474928 Share on other sites More sharing options...
Lostrael Posted August 22, 2016 Author Share Posted August 22, 2016 There is no reason inform the inner circle, it's all heresy. I had my problems with this head, the face is very detailed, even the eyes, but it is simply too big. Putting the head on a normal torso, or one of the DA ForgeWorld torsos, it looked like ahmm... a Chibi-marine. Mk3 torso works, it is bulky enough. The legs are from spellcrow. I put an unpainted picture of him somewhere in this thread. I never gave much a thought about how chain swords should look from the biting side. I will try that out. Surely I will also put dirt on the robes to indicate the he was on a battlefield for a while and had no time for shaving. Link to comment https://bolterandchainsword.com/topic/318921-lostraels-dark-angels/page/6/#findComment-4475532 Share on other sites More sharing options...
Father Mehman Posted August 22, 2016 Share Posted August 22, 2016 Well, I feel ashamed that I've missed this thread by not being on the B&C for a while . If I were to have been here, I would have said "excellent work, my friend". There are a lot of pages to go through but it should be fun seeing all your backlog of work. Oh, and excellent work, my friend ! Lostrael 1 Back to top Link to comment https://bolterandchainsword.com/topic/318921-lostraels-dark-angels/page/6/#findComment-4475544 Share on other sites More sharing options...
Recommended Posts
Create an account or sign in to comment
You need to be a member in order to leave a comment
Create an account
Sign up for a new account in our community. It's easy!
Register a new accountSign in
Already have an account? Sign in here.
Sign In Now