Search the Community
Showing results for tags 'hobby log'.
Found 8 results
-
 I recently started experimenting with oils, opting to smear a magenta/purple oil wash on my Great unclean one (on the tentacles, stomach and guts) with rather good results, if I do say so myself: So, yeah, oil washes are good, if you want to use them, but what if you don't? Well, have no fear, I still have some tips for you! There's a little oil wash on the back here, but much of the purple/magenta is actually done only with thinned acrylics and some washes and contrasts. AND, it was surprisingly easy, as I basically just splattered it on semi-randomly and let it dry, not caring if it dried slightly blotchy (in this case that was just a bonus, as it would look gross. On a less nurgley model, I would thin with contrast medium rather than water, to avoid splotchiness and keep the effect more subtle). My GUO did take a while to paint, but if you like it, I have some very good news for you: it didn't take very long and I didn't really do anything difficult or use any strange products or chemicals. Apart from the newly added effects, everything was done with a couple of brushes (some big cheap ones and my regular model brushes), regular GW acrylics, a couple of shades and contrasts, some sand and some Nurgle's rot for the base. I didn't do any fancy techniques like wetblending or the like either - in fact, many areas aren't really shaded or highlighted at all, if you look closely and I purposefully didn't even pick out all the little details (for artistic and laziness reasons). Here's how he looked before the oils (regrettably he's upside down, but I was living in a no-gravity environment at the time...) Assuming you like the result, I think the big thing to take away from my GUO is that painting models that are almost all skin/flesh doesn't need to be difficult at all, as long as you avoid the biggest pitfall of all: having all the skin be the same base colour, highlight and shade colour, because no matter how well you do it, it can easily come off as a bit boring and "plastic toy" looking. As far as I'm concerned, the only real key to making a big figure like this look good is to have different colours mixed in here and there, so the overall result is varied - it will look much more "natural", even if you're not a master of placing shadows and highlights, simply because real skin is not the same colour everywhere on your body (well, I assume not, I can only speak for myself, of course...). We don't get the same problem with smaller minis, simply because they're smaller, so the skin being the same colour everywhere isn't as noticeable. Here's another example: Incidentally, we see the same thing with terrain, where painting it like you would a regular miniature sometimes ends up looking worse than doing something much simpler that just looks better at that scale. But more about that in another post And to finish off, a couple of shots of some poxwalkers I'm experimenting on. One has had an all-over wash of the same purple/magenta wash taht I used on the GUO, another has had a more targeted application and the last one hasn't had any at all. As you can see, oil washes seem to have a lot of potential for painting skin and gross features, but it's not really a necessity at all, as long as you're not too afraid of putting different colours into the skin areas.
 -
Death Guard kill team, Chapter four: A dull, mounting headache...
Antarius posted a blog entry in Old Misadventures in Sci-Fi
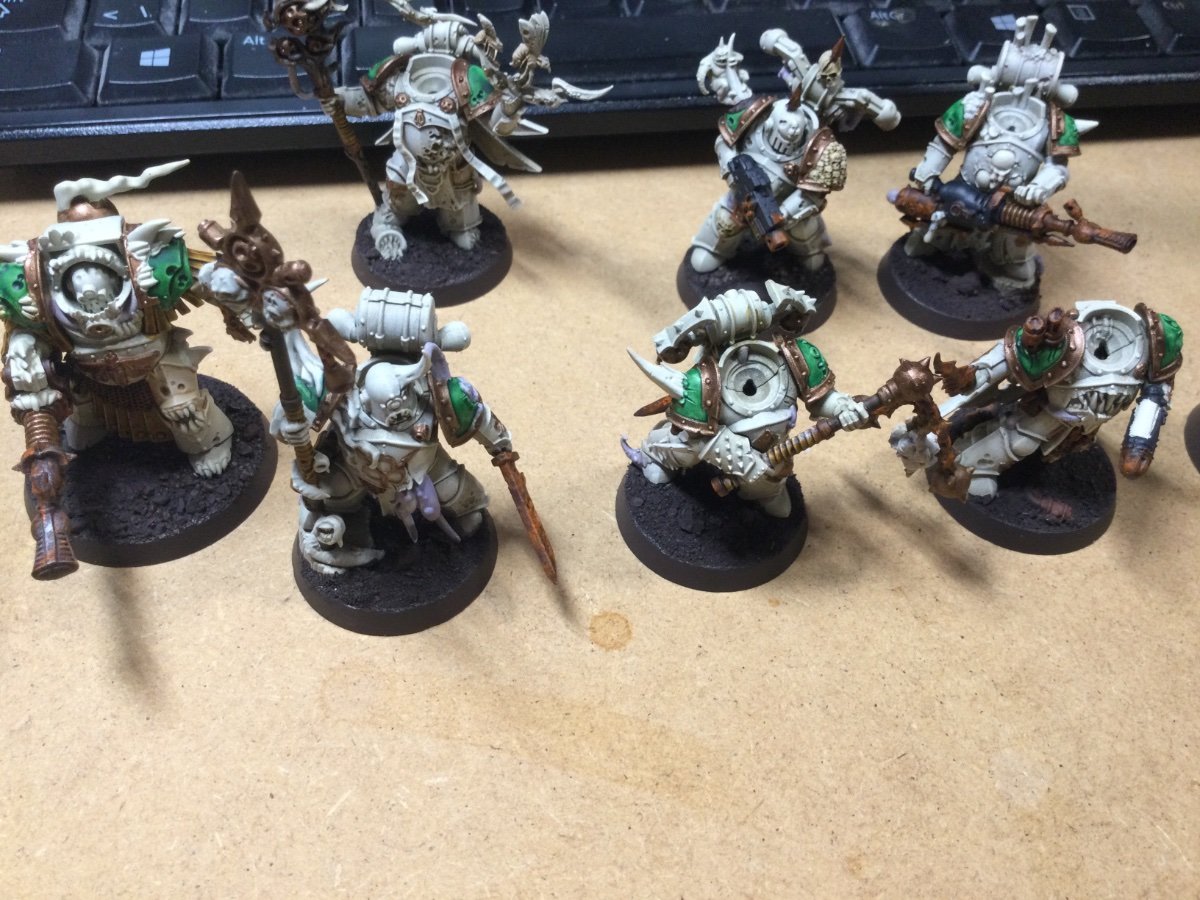
I guess you're wondering how I'll have managed to put off the oil paints for another day, huh? Well, the answer is easy: I told myself I'd better get the texture on the bases ready, as well as doing some more detail work on the trim and weapons, before moving on. Finally, when I couldn't think of anything else, I realised I hadn't primed the heads (I almost never paint the heads separately, as I generally finds it's more hassle than it's worth, but this time I thought it might make sense at least for the bare heads, if I was going to experiment with oils and so on). So, just to kick it up a notch (bam!), I decided I might as well prime the bare heads and the helmeted ones separately, so I primed the helmeted heads with the Leather Brown/Bone White rattlecans and primed the bare heads with a purple primer that I mixed from a redbrown and blue primer + a drop of purple ink and then I gave it a zenithal with a "Skeleton Bone" airbrush primer. It's going to be interesting how much difference this actually makes, but my idea was that if I just painted the bare heads with a regular pale skin and brownish shadows, there'd be very little contrast from the armour, so I think I'll try to give them really unhealthy, almost zombieish skin and theoretically, purple shadows should work well with greenish skin. Annoyingly, my airbrush had a bit of trouble spraying the skeleton bone primer smoothly, so there is a bit of "dustiness" to it, although not as bad as the picture makes it look (mental note: don't get freaked out by how bad things look when zooming so much that the objects appear bigger than they actually are - based on this picture I thought there was a huge mould line on one head and there... really wasn't, no matter how much I looked ). Once I paint on top of it I think it should be fine...-
- 4
-

-
- Death Guard
- hobby log
- (and 1 more)
-
Death Guard kill team, Chapter three: Starting to feel faint
Antarius posted a blog entry in Old Misadventures in Sci-Fi
So, I got slightly sidetracked today by a Civilization Halloween scenario involving zombies (who can say no to that kind of thing?). On top of that, the Queen of the Blackened Moon has been struck down by Grandfather Nurgle's blessing, so a lot of yesterday and today went with bringing her tea, preparing food and making "aww!" noises. Still, it's not all bad as I've managed to remember my old "heavy rust" recipe, which I decided I'd better apply at least the first couple of steps of before bringing in the oils (I just keep putting it off ). I figured some of you might be interested in the recipe, as it's both easy, simple, quite effective and doesn't involve any strange products, other than an old brush and some acrylics you probably already have lying around. It's great for batch painting too, so I really think it's worth having in your toolbox, if you do Death Guard, ruined terrain or other projects including heavily rusted parts. As a final bonus, I just find it very satisfying for some reason, so maybe you will too The recipe basically has 4 easy steps, but you can probably leave one out if you really want to speed things up (I do find that it works best with all of them though). It might seem kinda counterintuitive that you're not covering the metal colour with rust, but doing it the other way around, but I think this works better, Step 1: Give the entire part that's supposed to be rusted metal a Rhinox Hide basecoat (don't bother painting it metal first; this is a recipe for very rusty stuff) Step 2: Stipple or sponge the part heavily with Doombull Brown (or, if you can find it, the old "Vermin Fur" which was even better as it was slightly more reddish, but I find Doombull Brown does the trick just fine and it's what I use these days, as my Vermin Fur has run dry). The trick here is that you shouldn't be afraid to overdo it - you basically can't. The only real trick here is that the splotches of paint you sponge/stipple on leaves the illusion of texture, which actually (imho) looks more real than most rust products do at this scale. Step 3: Stipple the part slightly less heavily with Ryza Rust or Jokaero Orange (I prefer Ryza Rust; it looks like it'll be way to bright and OTT, but it dries to a considerably less garish colour). Once again, you can't really overdo it, as it's just personal taste how orangey you like your rust. Step 4: Give the part a much less heavy handed drybrush/stippling highlight (you might benefit from not using an old brush here, depending on your preferences). The trick here is to focus on areas that would probably be scraped and worn free of rust, which coincides nicely with the edges and details that are easiest to catch with a brush This is the only part where I think you need to be slightly wary of overdoing it, as the metal can "overwrite" the rust texture if you're not careful. But again, it's a matter of personal taste how much you want the metal to show "through". I actually think I might have overdone it a little with the metal in this example. I've reached the picture limit, so I'll upload my terminator guy to the comments, so you can see another example on his weapon and how it very much "reads" as metal, even at a distance. I've almost finished this step on the entire kill team by now, so there's very little left I can convince myself that I need to do before I "have" to get to grips with the oil washes- 1 comment
-
- 4
-
-
- Realm of Chaos
- Death Guard
- (and 2 more)
-
I was actually thinking this might be the time when I'd really buckle down and figure oil paints out, but I was not quite certain where to start and if it'd be a good idea to have more stuff done before I started washing. So, I chickened out and kept going on some other stuff to postpone my decision, mainly the leather straps, wood and brass trim/details and here's where we ended up: Which is... Pretty ok, I guess? they suffer a bit from being at the stage where nothing really looks very good, so it's a slightly dangerous place to leave them, as it's going to take a bit of effort to pick'em up again. But I feel pretty confident that I'll get around to doing some more work on them either tomorrow or the day after. I've basically just smeared contrast paint on them at this point (apart from the trim which is Balthasar Gold mixed with Wyldwood contrast, just to make it flow a bit more), I wasn't quite sure about the green, as otoh, I felt a bit of vibrancy would be nice, but otoh, it might end up too cartoony if I'm not careful - especially when I start doing all the little tentacles and nurglings and so on. But I'm not too bothered, as I can always tone it down again, should the need arise. "Not being too bothered" is absolutely the best piece of hobby advice I can give anyone, btw. All my work today, except for possibly the metal trim, has been of the "I'm not bothered with being super neat" variety and I just always find it works out best that way. Whenever I try to paint too neat, I just end up making mistakes and being unhappy with my work and I've never actually made any mistakes due to sloppiness that couldn't be fixed at a later stage. If I get out of the habit of painting, however, I tend to build an unreasonable level of ambition while my skill degrades, so the best thing to do is always just to crack on, which I really need to remember this fall. Apart from the final result, there's a few other things I did today that might be interesting to anyone doing Heresyish colour scheme DG: I'm sort of using the Terminator dude as a canvas for weird experiments, because: a) he looks different than the others anyway, so any variations won't be super noticeable and b) the good thing about this sort of minis is that any weird colour variations can easily be disguised as weathering/random grossness What you see on his leg is just a light coating of Reikland Fleshshade, which I actually yhink works quite well for giving it that worn, slightly warm tone. If I hadn't promised myself I'd do some oil stuff, I'd be tempted to just pour that all over them all and I think the armour'd be pretty fine, to be honest. But I do wanna get around to actually making oil paints work, so... I also tried an experiment were I just diluted the Snakebite Leather contrast I was using with some water and smeared it all over the power armour on one of the power armour marines (I'll post a pic in a comment, as I can't attach more to this post or I'll be over the limit...), on the off chance that it might save me the oil work, but it didn't really work as the contrast got weirdly glossy, so I just quickly went back over him with Pale Sand, which, again is sort of the genius of this type of paintjob.
- 5 comments
-
- 3
-
-
- Death Guard
- hobby log
- (and 1 more)
-
Death Guard kill team chapter one: getting the sniffles
Antarius posted a blog entry in Old Misadventures in Sci-Fi
First off, welcome to the first part of my fall project, which by popular demand has turned out to be a Death Guard kill team (whether it will actually be used for kill team is anyone's guess, but I have a lot of DG laying around and I wanted to paint at least some of them up). The general idea is that I'll be using this blog to keep me motivated through a, historically speaking, difficult time of year where motivation can often ebb. So any comments or suggestions you may want to leave are highly appreciated! I'm going to do this as part hobby log and part painting "guide" and assorted ramblings. The "guide" part is in quotation marks because, while I have done Death Guard before, I didn't really feel I did them justice the first time around and I really wanted to both up my game a little and also start experimenting with some new techniques and ideas. So while I'm reasonably certain that what I'm doing will work, I'm also learning as I go along. At the same time, I also want to keep things relatively simple and easy as I actually want to finish the project and not get discouraged halfway through, so I'm focusing on techniques and methods that will give me a lot of "bang for the buck", so to speak. The very first step was creating a poll to see what faction I should start with (with the help of our friendly moderators @Grotsmasha and @Dr_Ruminahui - thanks so much, guys!), but the first step hobby-wise was to do a zenithal prime with two Vallejo rattle cans, "Leather Brown" and "Bone White", which I felt would give me a nice foundation for the off-white armour that I personally prefer for Death Guard. Something I don't usually do is leave the heads off, but this time I did, partly because I wanted the opportunity to give any bare heads a different skin tone, partly because I just wasn't quite sure what heads would look best on what models. Strangely enough, they looked super greenish in the light of dawn, which is actually a look I'm trying to avoid. I mean, green will obviously show up, but the overall tone I'm going for is a warmish off-white for the armour. My next step was to give them a heavy overbrush/drybrush/stippling/general mess-around, using quite a big brush loaded with "Pale Sand" (although any warm, mostly white off-white will do), then mostly dried off before being applied to the minis: I don't worry about being neat at this stage or getting smooth coverage, but I do worry about obscuring too much of the recess colours. as I want them to be quite grimy and battle-worn in the end. If I wanted them "cleaner", I'd probably follow the same procedure but give them more passes with the brush (and perhaps let more paint remain on the brush). As it is now, I just give the areas I want to read as whiter (or that I know I want to paint a transparent colour over later) a second pass with the brush, but like I said, I don't worry too much about coverage as washes and further painting will smoothen out the gradients quite a bit. That said, the amount of texture on the ridged, corroded, pitted and damaged power armour of the Death Guard is almost ideal for this method and I do think it looks pretty good already. In fact, if I stopped now and painted in all the details, I think the armour itself would work quite well - but I will of course be doing a lot more as we move along, so stay tuned- 4 comments
-
- 8
-
-
- Realm of Chaos
- Death Guard
- (and 1 more)
-
FEB - More Ad Mech and can Doobles get in the green.....?
Doobles57 posted a blog entry in Doobles' slow grind to inbox zero
So, January kind of put me in a small (large) hole for my plan to reduce my pile of shame. In response February has been a month of looking to redress that issue. Hobby time has been limited unfortunately. Having a small child means living with your very own nurgling and boy oh boy did she bestow some of papa nurgle's finest blessings upon us this month. In total I managed to complete a grand total of.....5 models. Not ideal. However on the plus side, they were all from the same army AND from the same army that I completed models for last month! This is fairly rare in Doobles-land and I'm actually a little proud of that. I even have a dozen or so more Ad Mech models primed and waiting at my airbrush station (lol it's just my desk + a mask) for March. This has the possibility of becoming that rarest of things.....a fully painted army. I've just jinxed it though I'm sure..... Anyway, here are our completions this month: 3 Breachers. I think I enjoyed painting these? On one hand I think the OSL is much much better than the Skitarii I did last month so that feels good. On the other hand these felt like they took much longer than they needed to despite the simple paint scheme. Can't put my finger on why, but I've got 3 more part built, and another 3 still on sprue and I find myself in no rush at all to pick them up. Anyway, I think they look alright. A Skitarii Marshall and a Techpriest Enginseer. I'm not as happy with these, although they're both lovely models. Not sure they have the presence it feels they should have as leaders but I'll reserve judgement until the force grows a bit more as I can view it all as a group. Might return to add a bit of something to them at a later date, but in the meantime I'm conscious of A) getting stuff done & B) not wanted to depart too far from the look and feel I've established and the techniques to get there. We'll see. In other pile-reduction news there was a lot of selling this month which - in spreadsheet terms at least - more than made up for the limited painting time. An entire project has departed (Flesh Eater Courts - side note, what on earth is with the price of Charnel Thrones??) and I also uncovered a random bunch of Ultramarines things that I didn't see me going to trouble of ripping apart and rebuilding to fit in my Black Templars. So off they went. Talking of Black Templars, and marines in general, I've found myself with less and less interest in 40K marines in the last 6 months. I love the BTs and their lore and aesthetic was a big part of what pulled me into the game back when they were the poster boys of 3rd edition. But I have no desire to paint any 40K marines or get them out for a game. Heresy is somehow different and still holds my interest, but in 40K marines are now bottom of the list out of the stuff I own. It's weird. Can't bring myself to part with them yet, but not leaving the garage for the painting or gaming table for the foreseeable future. Anyway, enough waffle, here are the numbers! Models IN: 12 Models OUT: 58 FEB TOTAL: -46 YTD TOAL: -30 We're back baby! Let's see what new stuff gets released in the next month, but I'm going to see if I can keep a bit of momentum going now. Marching on to March! -
Hi everybody. I tend to get in a bit of a hobby slump every fall/winter, but this year things are going to be different! Not only have I enlisted the help of the community here, to help me choose what my project(s) will be, I have also made a blog to keep myself motivated. I think and hope this will work out nicely, as I always find the Call to Arms and similar events super motivating, so hopefully some of you will want to follow along and interact with me a bit. I reckon I'll make (nearly) daily updates to this thread and then post links to my blogposts as I make them. That way more people might actually see them, as the blogs still seem to be very niche. In any case, please feel free to comment either in this thread or on the blog posts - it really helps a lot with staying motivated, as we head into the dark season(s) And, just so it's not all about me, please feel free to ask about any techniques, methods and so on, if I do something you might like to use yourself (or just know more about). I'll be more than happy to explain my process! Without further ado, my first project is a Death Guard kill team (which may or may not be expanded upon, once I'm done with the first 8 models; I've got lots of Death Guard lying around). The project is basically an exercise in using zenithal priming, drybrushing, stippling and (eventually) oils, as well as some (rather simple) colour theory to really get a lot of "bang for the buck" and hopefully make these minis look really good in a timeframe that'd actually be realistic for doing an entire army. Here's where we are at present: And here's where we started: (there are four more "chapters", detailing my progress so far, should you care to read them - more will probably be along shortly) Right now I'm just waiting for the primer on the heads to cure, so I can move on with the helmeted heads and get started on using the oil paints that I've been putting off (and off and off)...

- 44 replies
-
- 6
-
-

-
- hobby log
- Death Guard
- (and 1 more)