Captain Semper Posted March 6, 2014 Share Posted March 6, 2014 *turns green with evny* The creativity of this thread is really something! I find it very annoying that Forte is good at painting AND greenstuff AND comes up with ideas like the beads for the eyes... Ahem *straightens tie* I think those raptors will turn out to be amazing! Link to comment https://bolterandchainsword.com/topic/282983-fort%C3%A9s-creations-started-crimson-fists-pg-67/page/24/#findComment-3612080 Share on other sites More sharing options...
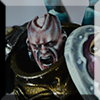
Forté Posted March 6, 2014 Author Share Posted March 6, 2014 (edited) that sonic blaster(?) is amazing.Many thanks (Blastmaster, but I'll let you off). More to come. ideas like the beads for the eyes...*cough*dolls*cough*. No idea where the idea came from. Eyeballs gave me the idea really. +++ update +++ Managed some more time (think the Raptors may be feeling a little neglected) while the nipper ad his nap. So here it is. I had some of the bit that I had stamped left over which was fully cured so I popped off the two head parts. Glued on the textured GS and cut it to fit. Heads back into place and build up the sides with a little texture too. Those bits, and the gap filling, need a bit of smoothing when ready so I can add a bit of trim with plasticard. Bit of work on the face. Needs a few more added and maybe a bit of tubing before adding the flesh round the edges. And finally... Flayed Skin mini tutorial Here's the way I create my Flayed Flesh on my minis. Useful tools: Mixture of sculpting tools, knives and a mechanical pencil without lead for stamping rivets. Step 1: Mix your kneadatite (green stuff) properly Step 2: Roll your putty out between a folded bit of parchment or greaseproof paper. I use a kitchen rolling pin for this. This piece has been cut to a rough size. I usually leave it a bit longer to cure a bit more but I wanted to finish before the kid woke. Step 3: Position your piece in place. I then pressed my pencil where I wanted the rivets. Step 4: Use a tool or toothpick to press in stretch marks by the rivets. Step 5: Use a tool to make holes where the eyes, nostrils, and mouth would have been (or other holes like belly button). After this I also roughed the edge up to give it a more torn look and pressed it down a bit around underlying details. Last step: I used a pin to hook under where the nose would be, through a nostril. Gave it a little lift and stretch. This one does need a little clean up but it needs to cure more before I do that so the detail stays where it should. This is the head from a Marine too which is why there's the three extra studs. So when I paint that I'll be trying to do some stubble too on the top and back of the head. Hope that helps and please feel free to leave feedback, comments, ideas, gift voucher details for an Imperial Knight kit maybe? Edited March 6, 2014 by forte Koriel, GrandMagnus, Flint13 and 2 others 5 Back to top Link to comment https://bolterandchainsword.com/topic/282983-fort%C3%A9s-creations-started-crimson-fists-pg-67/page/24/#findComment-3612140 Share on other sites More sharing options...
Kilofix Posted March 6, 2014 Share Posted March 6, 2014 Jumping ahead here but what are you going to do with the hair? Leave it as is and paint it white or purple or something? Just wondering cause I'm working on a different project and am struggling with the hair. My mode'ls face is already so pale that the hair blends in too much. Link to comment https://bolterandchainsword.com/topic/282983-fort%C3%A9s-creations-started-crimson-fists-pg-67/page/24/#findComment-3612168 Share on other sites More sharing options...
Forté Posted March 6, 2014 Author Share Posted March 6, 2014 Jumping ahead here but what are you going to do with the hair? Leave it as is and paint it white or purple or something? Just wondering cause I'm working on a different project and am struggling with the hair. My mode'ls face is already so pale that the hair blends in too much. Going to keep the hair but won't know on colour till paint is on the body. Possibly keep it fairly natural to offset the range of colour on the rest. Link to comment https://bolterandchainsword.com/topic/282983-fort%C3%A9s-creations-started-crimson-fists-pg-67/page/24/#findComment-3612177 Share on other sites More sharing options...
helterskelter Posted March 6, 2014 Share Posted March 6, 2014 I want to make a guitar that looks like your blastmaster... Link to comment https://bolterandchainsword.com/topic/282983-fort%C3%A9s-creations-started-crimson-fists-pg-67/page/24/#findComment-3612334 Share on other sites More sharing options...
GrandMagnus Posted March 6, 2014 Share Posted March 6, 2014 (edited) Cool facemask and the change you have done to the eyes is truly horrifing Edited March 6, 2014 by Anaziel Link to comment https://bolterandchainsword.com/topic/282983-fort%C3%A9s-creations-started-crimson-fists-pg-67/page/24/#findComment-3612419 Share on other sites More sharing options...
Brother Ambroz Posted March 6, 2014 Share Posted March 6, 2014 That blasmaster is just amazing man. Freakin love it. The head looks great too and as I said in the other thread, I'll definitely be using that tutorial man. Link to comment https://bolterandchainsword.com/topic/282983-fort%C3%A9s-creations-started-crimson-fists-pg-67/page/24/#findComment-3612421 Share on other sites More sharing options...
El-Diablo Posted March 6, 2014 Share Posted March 6, 2014 Wow, I go away and paint some square bases for a few days and you start pumping out sonic weapons? Nicely done so far, though i'd urge you to get rid of the plasma flask at the top/rear of the weapon, it's a very recognisable element of the plasma cannon that could take away from the overall finish. Link to comment https://bolterandchainsword.com/topic/282983-fort%C3%A9s-creations-started-crimson-fists-pg-67/page/24/#findComment-3612457 Share on other sites More sharing options...
Forté Posted March 6, 2014 Author Share Posted March 6, 2014 Many thanks for your comments everyone. Wow, I go away and paint some square bases for a few days and you start pumping out sonic weapons? Nicely done so far, though i'd urge you to get rid of the plasma flask at the top/rear of the weapon, it's a very recognisable element of the plasma cannon that could take away from the overall finish. Wasn't too sure on that one. I could just shave the side parts down. I do still have more Talos vials too. To e to raid the bits box I think. El-Diablo 1 Back to top Link to comment https://bolterandchainsword.com/topic/282983-fort%C3%A9s-creations-started-crimson-fists-pg-67/page/24/#findComment-3612464 Share on other sites More sharing options...
Fracture Posted March 6, 2014 Share Posted March 6, 2014 Really nice tutorial for the skin. I need to get one if those pencils tomorrow, much easier than doing it be hand. Link to comment https://bolterandchainsword.com/topic/282983-fort%C3%A9s-creations-started-crimson-fists-pg-67/page/24/#findComment-3612754 Share on other sites More sharing options...
-Brutus- Posted March 7, 2014 Share Posted March 7, 2014 Good stuff, the pencil-rivet maker is a brilliant idea!! Link to comment https://bolterandchainsword.com/topic/282983-fort%C3%A9s-creations-started-crimson-fists-pg-67/page/24/#findComment-3613045 Share on other sites More sharing options...
Forté Posted March 7, 2014 Author Share Posted March 7, 2014 Good stuff, the pencil-rivet maker is a brilliant idea!! Not taking credit for it as I read it somewhere ages ago. Doesn't always look right on things either. Link to comment https://bolterandchainsword.com/topic/282983-fort%C3%A9s-creations-started-crimson-fists-pg-67/page/24/#findComment-3613084 Share on other sites More sharing options...
Captain Semper Posted March 7, 2014 Share Posted March 7, 2014 OK question: What color will the hair be? (difficult one I know!) :D Link to comment https://bolterandchainsword.com/topic/282983-fort%C3%A9s-creations-started-crimson-fists-pg-67/page/24/#findComment-3613089 Share on other sites More sharing options...
Forté Posted March 7, 2014 Author Share Posted March 7, 2014 OK question: What color will the hair be? (difficult one I know!) :D Second person to ask ;) Possibly a natural look to go against everything else. Or maybe white. Tough to decide without any colours on the model yet. Link to comment https://bolterandchainsword.com/topic/282983-fort%C3%A9s-creations-started-crimson-fists-pg-67/page/24/#findComment-3613203 Share on other sites More sharing options...
Crimson Hawk Posted March 7, 2014 Share Posted March 7, 2014 Wow. I just read through the whole thread, and I am beyond amazed. Your painting is absurdly smooth and clean. In fact, you could say that painting miniatures is... your forté *Kakophoni scream* Forté 1 Back to top Link to comment https://bolterandchainsword.com/topic/282983-fort%C3%A9s-creations-started-crimson-fists-pg-67/page/24/#findComment-3613334 Share on other sites More sharing options...
Forté Posted March 7, 2014 Author Share Posted March 7, 2014 In fact, you could say that painting miniatures is... your forté *Kakophoni scream* Funny you say that. Forté has been my dj name for many years. Link to comment https://bolterandchainsword.com/topic/282983-fort%C3%A9s-creations-started-crimson-fists-pg-67/page/24/#findComment-3613335 Share on other sites More sharing options...
El-Diablo Posted March 7, 2014 Share Posted March 7, 2014 Hmm, I think with the side nubs shaved down you could be allright, might be worth adding a lip of plasticard strip around the bottom to make it look similar to the Talos vials? Link to comment https://bolterandchainsword.com/topic/282983-fort%C3%A9s-creations-started-crimson-fists-pg-67/page/24/#findComment-3613504 Share on other sites More sharing options...
Rune_Priest_Rhapsody Posted March 7, 2014 Share Posted March 7, 2014 One of my favorite Wolf heads, forte. You made it look so creepy with the beady eyes and the face plate. And the final blast master gun is just rad, man!! End of Line Link to comment https://bolterandchainsword.com/topic/282983-fort%C3%A9s-creations-started-crimson-fists-pg-67/page/24/#findComment-3613580 Share on other sites More sharing options...
Forté Posted March 7, 2014 Author Share Posted March 7, 2014 One of my favorite Wolf heads, forte. You made it look so creepy with the beady eyes and the face plate. And the final blast master gun is just rad, man!! End of Line Oh Rhaps. None of those pieces are finished. Still got some details on the gun and more bits to add to the face. And tweak the flayed face too. Link to comment https://bolterandchainsword.com/topic/282983-fort%C3%A9s-creations-started-crimson-fists-pg-67/page/24/#findComment-3613591 Share on other sites More sharing options...
Telhdrat Posted March 7, 2014 Share Posted March 7, 2014 Very nice idea with the sonic blaster, fits quite will the Kakophoni guns as well. Link to comment https://bolterandchainsword.com/topic/282983-fort%C3%A9s-creations-started-crimson-fists-pg-67/page/24/#findComment-3613711 Share on other sites More sharing options...
daemonclaw Posted March 7, 2014 Share Posted March 7, 2014 Hope that helps and please feel free to leave feedback, comments, ideas, gift voucher details for an Imperial Knight kit maybe? you brightened my day up with that one sir as for the plasma flask you could always replace it with the round exhaust vent from a backpack as a secondary speaker. also with the greenstuff ,if you let it cure for about 40 minutes you can stretch it more to get interesting shapes. ps a little tip you may already know .....to speedup curing greenstuff http://img.photobucket.com/albums/v490/minimaker/Mini%20sculpting-Tools/ef93.jpg not my idea and i have not tried it but thought it may be helpfull Link to comment https://bolterandchainsword.com/topic/282983-fort%C3%A9s-creations-started-crimson-fists-pg-67/page/24/#findComment-3613795 Share on other sites More sharing options...
Forté Posted March 7, 2014 Author Share Posted March 7, 2014 (edited) Hope that helps and please feel free to leave feedback, comments, ideas, gift voucher details for an Imperial Knight kit maybe? you brightened my day up with that one sir as for the plasma flask you could always replace it with the round exhaust vent from a backpack as a secondary speaker. also with the greenstuff ,if you let it cure for about 40 minutes you can stretch it more to get interesting shapes. ps a little tip you may already know .....to speedup curing greenstuff http://img.photobucket.com/albums/v490/minimaker/Mini%20sculpting-Tools/ef93.jpg not my idea and i have not tried it but thought it may be helpfull Many thanks. I used to just leave any GS under the lamp I used to use. My current ones don't heat up though lol. I usually do leave it for a bit but I was on a time limit. Nice idea about the vent too. Still need to go through my bits but I know I have plenty on packs. Edited March 7, 2014 by forte Link to comment https://bolterandchainsword.com/topic/282983-fort%C3%A9s-creations-started-crimson-fists-pg-67/page/24/#findComment-3613804 Share on other sites More sharing options...
Ace Debonair Posted March 8, 2014 Share Posted March 8, 2014 Wow, I look away from this thread for a couple of days and when I come back there's an awesome Screaming Dragon and a tutorial for covering chaos marines with other people's faces. If I had any greenstuff I'd be covering my Chaos marines in it even now. They're not even Slaanesh worshippers, particularly. Fantastic stuff as usual! Link to comment https://bolterandchainsword.com/topic/282983-fort%C3%A9s-creations-started-crimson-fists-pg-67/page/24/#findComment-3614417 Share on other sites More sharing options...
Forté Posted March 8, 2014 Author Share Posted March 8, 2014 Wow, I look away from this thread for a couple of days and when I come back there's an awesome Screaming Dragon and a tutorial for covering chaos marines with other people's faces. If I had any greenstuff I'd be covering my Chaos marines in it even now. They're not even Slaanesh worshippers, particularly. Fantastic stuff as usual! Many thanks Ace. Flayed skin isn't restricted to Slannesh. Or even Chaos. Likely a few Loyalist Chapters still do it depending on their background. Think about Native Amarican tribes who used to use scalping (Apache I think but I may be wrong). Link to comment https://bolterandchainsword.com/topic/282983-fort%C3%A9s-creations-started-crimson-fists-pg-67/page/24/#findComment-3614431 Share on other sites More sharing options...
Combat_Vet Posted March 8, 2014 Share Posted March 8, 2014 @Forte - It wasn't just the Apache. Many of the Northern tribes took scalps, from some Mohawk and Ojibwa in Canada through the Sioux and Arapahoe on the plains. They picked up the habit from the French who paid for the scalps of "Indians" during the early days of exploration. We even have several tribes that ate "long pork" and that can only be blamed on us :) Link to comment https://bolterandchainsword.com/topic/282983-fort%C3%A9s-creations-started-crimson-fists-pg-67/page/24/#findComment-3615032 Share on other sites More sharing options...
Recommended Posts
Create an account or sign in to comment
You need to be a member in order to leave a comment
Create an account
Sign up for a new account in our community. It's easy!
Register a new accountSign in
Already have an account? Sign in here.
Sign In Now