Forté Posted May 26, 2015 Author Share Posted May 26, 2015 His right pistol one is marble too ;) And yes, that was on purpose. Goes back to the weapons on my Kakophoni. The turquoise goes from P3 Coal Black through old GW Hawk Turquoise, P3 Arcane Blue, VGC Verdigris, and to VMC Off White. All with mixes in between. Tried to do it the way Andy Wardle showed at Salute. Link to comment Share on other sites More sharing options...
Forté Posted May 28, 2015 Author Share Posted May 28, 2015 Time for a second ETL vow for the Chaos Gods. And still to add to my Flayers too. Though these are an addition to the Iron Warriors Champion that recently joined. 2x Vindicator Siege tanks with Siege Shield, Combi-Bolter, Dirge Caster, and Warpflame Gargoyles. Now, I don't like the DC you get in the kits so I've use a few of the small beast heads. And Warpflame Gargoyles...well, I've settled for a flame at the top of each cannon and I'll add some glowing runes too. These will not be to the standard of the Lord but should sit well on the table with him and the rest of the army. So here's how they look after heavy dry brushing of VMA black metal, VMC gun grey, GW mithril silver, VMA chrome, and an all over wash of AP Dark Tone. Still to do is: add black, turquoise, and purple panels. Though I may do turquoise and black chevrons. pick out trim in tin bitz and bronze paint tracks charadon granite add any transfers sponge chip with black to look like pitting and dents use washes to build up grease and oil dust up with pigments, and any soot paint glowing runes, flames, and any osl from the flames So as you see, I'm not cutting corners but using a different approach. I let you know how it goes :thanks: :tu: Link to comment Share on other sites More sharing options...
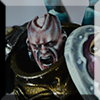
Urauloth Posted May 28, 2015 Share Posted May 28, 2015 (edited) Bloody hell. The bloke with wings is amazing, I think you've outdone yourself with this one. Looking forward to seeing how the vindicators turn out, always love to see some treads. Good choice on the dirge casters, by the way, the ones in the kit are really... uninspiring. Edited May 28, 2015 by A Kvlt Ghost Forté 1 Back to top Link to comment Share on other sites More sharing options...
Kizzdougs Posted May 28, 2015 Share Posted May 28, 2015 The depth of colour on the Lord's face is amazing! I really love the highlighting and blending on the armour and the marble effect on the shoulder pad. Your painting has come such a long way :tu: Forté 1 Back to top Link to comment Share on other sites More sharing options...
Augustus b'Raass Posted May 28, 2015 Share Posted May 28, 2015 That marble is magnizficent. excellent work Forte! Are the Vindi's going to be IW or Slaaneshi? Or something in between? :) Forté 1 Back to top Link to comment Share on other sites More sharing options...
Forté Posted May 28, 2015 Author Share Posted May 28, 2015 That marble is magnizficent. excellent work Forte! Are the Vindi's going to be IW or Slaaneshi? Or something in between? :) They are from an Iron Warriors warband that has become part of the Divine Flayers so yes, something in between sounds about right ;) Link to comment Share on other sites More sharing options...
Skrundle87 Posted May 28, 2015 Share Posted May 28, 2015 You've done an amazing job yet again, top quality work here mate Link to comment Share on other sites More sharing options...
Forté Posted June 2, 2015 Author Share Posted June 2, 2015 Update time... I finished the Vindicators a few days back and did them...wait for it...at a more gaming standard than my usual fussy painting. Though they've still had weathering added using sponge chipping and pigments. So after that "why aren't they as tempting as my usual standard" bombshell, it's time for a third (yes, third..I'm surprised at it too) ETL vow. And what have I put forward this time..... +++VOW #3+++ Chaos Lord in Terminator Armour with the Burning Brand, Black Mace, VotLW, MoN, Sigil of Corruption, and Combat Familiar (don't think I've forgotten anything. But...it's not going to be a gaming miniature but a display piece on a plinth and I'll aim to post a full step by step along the way. And here's the start.. Plinth building. Being that I almost always start from the base I need to first make a plinth. Now I could just buy one, but money is currently a little tight so, it's time to break out the saw, mitre block, and sand paper. And not forgetting a bit of 2x2 for this one. Once the noisy part is done and hopefully all fingers are still intact, it's time to start smoothing the sides down. Starting from the lowest grit paper I start to rub the block following the direction of the wood grain till I'm happy with it. I also keep the paper on a hard flat surface. Then move up a grade. I used 60, 80, 180, and 1000. Could have done more stages between but I used what I had. Well, that where I've got to so far. I'm toying with varnishing the block as the grain is quite nice. Likely a dark oak. Though I'm going to take my rotary tool to the top first and give it some shape. I'll update soon and will be basing and piecing model parts together very soon. C&C welcome :thanks: :tu: Kizzdougs 1 Back to top Link to comment Share on other sites More sharing options...
Ace Debonair Posted June 3, 2015 Share Posted June 3, 2015 (edited) Sweet Emperor's Forehead, that's one crazy, creepy looking Chaos Lord. He absolutely looks the part, though - somewhere between decadent glory and twisted, feral power unleashed. EDIT: Also those tanks are looking mighty sharp - turns out there was another page I'd missed out. I was distracted by the wings, I guess! Edited June 3, 2015 by Ace Debonair Link to comment Share on other sites More sharing options...
Forté Posted June 3, 2015 Author Share Posted June 3, 2015 Sweet Emperor's Forehead, that's one crazy, creepy looking Chaos Lord. He absolutely looks the part, though - somewhere between decadent glory and twisted, feral power unleashed. EDIT: Also those tanks are looking mighty sharp - turns out there was another page I'd missed out. I was distracted by the wings, I guess! Well he is supposed to be the centre of attention so I must have done something right :D Link to comment Share on other sites More sharing options...
Forté Posted June 24, 2015 Author Share Posted June 24, 2015 Well it's been a fair while since I last updated my progress. Work, non-GW painting, and other real life commitments. So then, here's what I have been up to with my Nurgle Chaos Lord... First up, I worked on the display stand (the block of wood last posted). First up I used my rotary tool to carve into the top to start off some basing texture and surface variation. My tool of choice. Once I'd hacked away at it I decided to play with some bits using blutac to get some ideas for placement before breaking out the Milliput and building up the ground level. Then the Milliput went on and the parts I settled on were pressed into place as I intend to make it look like they are rising from the ground. That's the stage it stayed for a few weeks until I'd finished the other projects and got a bit of motivation back for this one. So it was back to play with the blutac for posing. Ignore the power fist and the chest eagle. Both will be removed and replaced with a distended gut and a tentacle held Black Mace. Lots of sculpting to do now so until then, thank you for checking in. I do also have a poll ongoing to choose the Primary and Secondary colours that I'll be using on this too. Now it's as a challenge and I'm looking for colours that wouldn't normally be seen as Nurgle so go wild. Help me choose the main colours! Squeaky and Chandrian 2 Back to top Link to comment Share on other sites More sharing options...
Forté Posted June 29, 2015 Author Share Posted June 29, 2015 Update time again. Now the base is textured. And here's how... First I added areas using Vallejo Grey Pumice. It's the grey patches you can see. While that was still wet I took my rotary tool to Mr Nurgle, hacking into the chest plate then using a ball burr to add some more damage to the armour. Next session I added small bits of slate and then soil to the base. Then I started with the green stuff. First with the thigh armour as I wanted to bulk it out a bit. Then added the start of the gut and armour growth to join the icon to the body. Had to leave that to fully cure so on to the next session... More gut work and the start on the Burning Brand. Now I know it looks a bit...welll...questionable, but it'll gain a third sack soon. And that's where he's at for now. Think one more session should do it and then it'll be painting time finally. Hope you like where it's going. Happy painting our_baz, Kizzdougs and DimDim 3 Back to top Link to comment Share on other sites More sharing options...
deathspectersgt7 Posted June 29, 2015 Share Posted June 29, 2015 Man you are going to town on him . Forté 1 Back to top Link to comment Share on other sites More sharing options...
Forté Posted June 29, 2015 Author Share Posted June 29, 2015 Man you are going to town on him . Cheers ;) Link to comment Share on other sites More sharing options...
Chickenleg Posted June 30, 2015 Share Posted June 30, 2015 Lovely work friend, good work on the dead meat hanging. Forté 1 Back to top Link to comment Share on other sites More sharing options...
Kizzdougs Posted June 30, 2015 Share Posted June 30, 2015 Awesome, dude!! The distended gut is really well done :tu: Forté 1 Back to top Link to comment Share on other sites More sharing options...
Forté Posted June 30, 2015 Author Share Posted June 30, 2015 Many thanks. Got to love those silicone clay shapers. Link to comment Share on other sites More sharing options...
Forté Posted July 1, 2015 Author Share Posted July 1, 2015 Ok, the colours have been decided and they are.. Primary: PINK Secondary: ORANGE Wow, that is actually a challenge in its own right anyway. Link to comment Share on other sites More sharing options...
Ace Debonair Posted July 1, 2015 Share Posted July 1, 2015 Eww, that model's gross. In the most Nurgle-riffic, disease-tacular way, of course. Pink and Orange? Is that a close enough result for the rise of Lord Battenburg? Link to comment Share on other sites More sharing options...
Forté Posted July 1, 2015 Author Share Posted July 1, 2015 Eww, that model's gross. In the most Nurgle-riffic, disease-tacular way, of course. Pink and Orange? Is that a close enough result for the rise of Lord Battenburg? It's close. Especially when quartered ;) Link to comment Share on other sites More sharing options...
Kurgan the Lurker Posted July 1, 2015 Share Posted July 1, 2015 You got a problem with Orange?!? ;) Forté 1 Back to top Link to comment Share on other sites More sharing options...
Slips Posted July 2, 2015 Share Posted July 2, 2015 If you can make me regret having Iris' with Painting Pink and Orange together, I'll say its awesome and well done. Forté 1 Back to top Link to comment Share on other sites More sharing options...
Forté Posted July 2, 2015 Author Share Posted July 2, 2015 You got a problem with Orange?!? ;) Nope. And it's actually a colour I rarely use too so that's a bonus in itself. Hopefully my old Blazing Orange is still useable. Or it'll have to be Flaming Orange which isn't as bright. Link to comment Share on other sites More sharing options...
Brother-Chaplain Kage Posted July 2, 2015 Share Posted July 2, 2015 Wait, you're going to paint a Nurgle marine in orange and pink? This I gotta see. Link to comment Share on other sites More sharing options...
Forté Posted July 2, 2015 Author Share Posted July 2, 2015 Wait, you're going to paint a Nurgle marine in orange and pink? This I gotta see. Yup. You got it. Then I'll be weathering. Link to comment Share on other sites More sharing options...

Recommended Posts
Create an account or sign in to comment
You need to be a member in order to leave a comment
Create an account
Sign up for a new account in our community. It's easy!
Register a new accountSign in
Already have an account? Sign in here.
Sign In Now